Data Caching and Merging Array-Based Data
This recipe demonstrates preparing and supplying product data for something like a highly detailed product comparison page. We are accessing data from multiple sources, and using Conscia to unify arrays of product data in real-time to deliver a richer and more performant web experience.
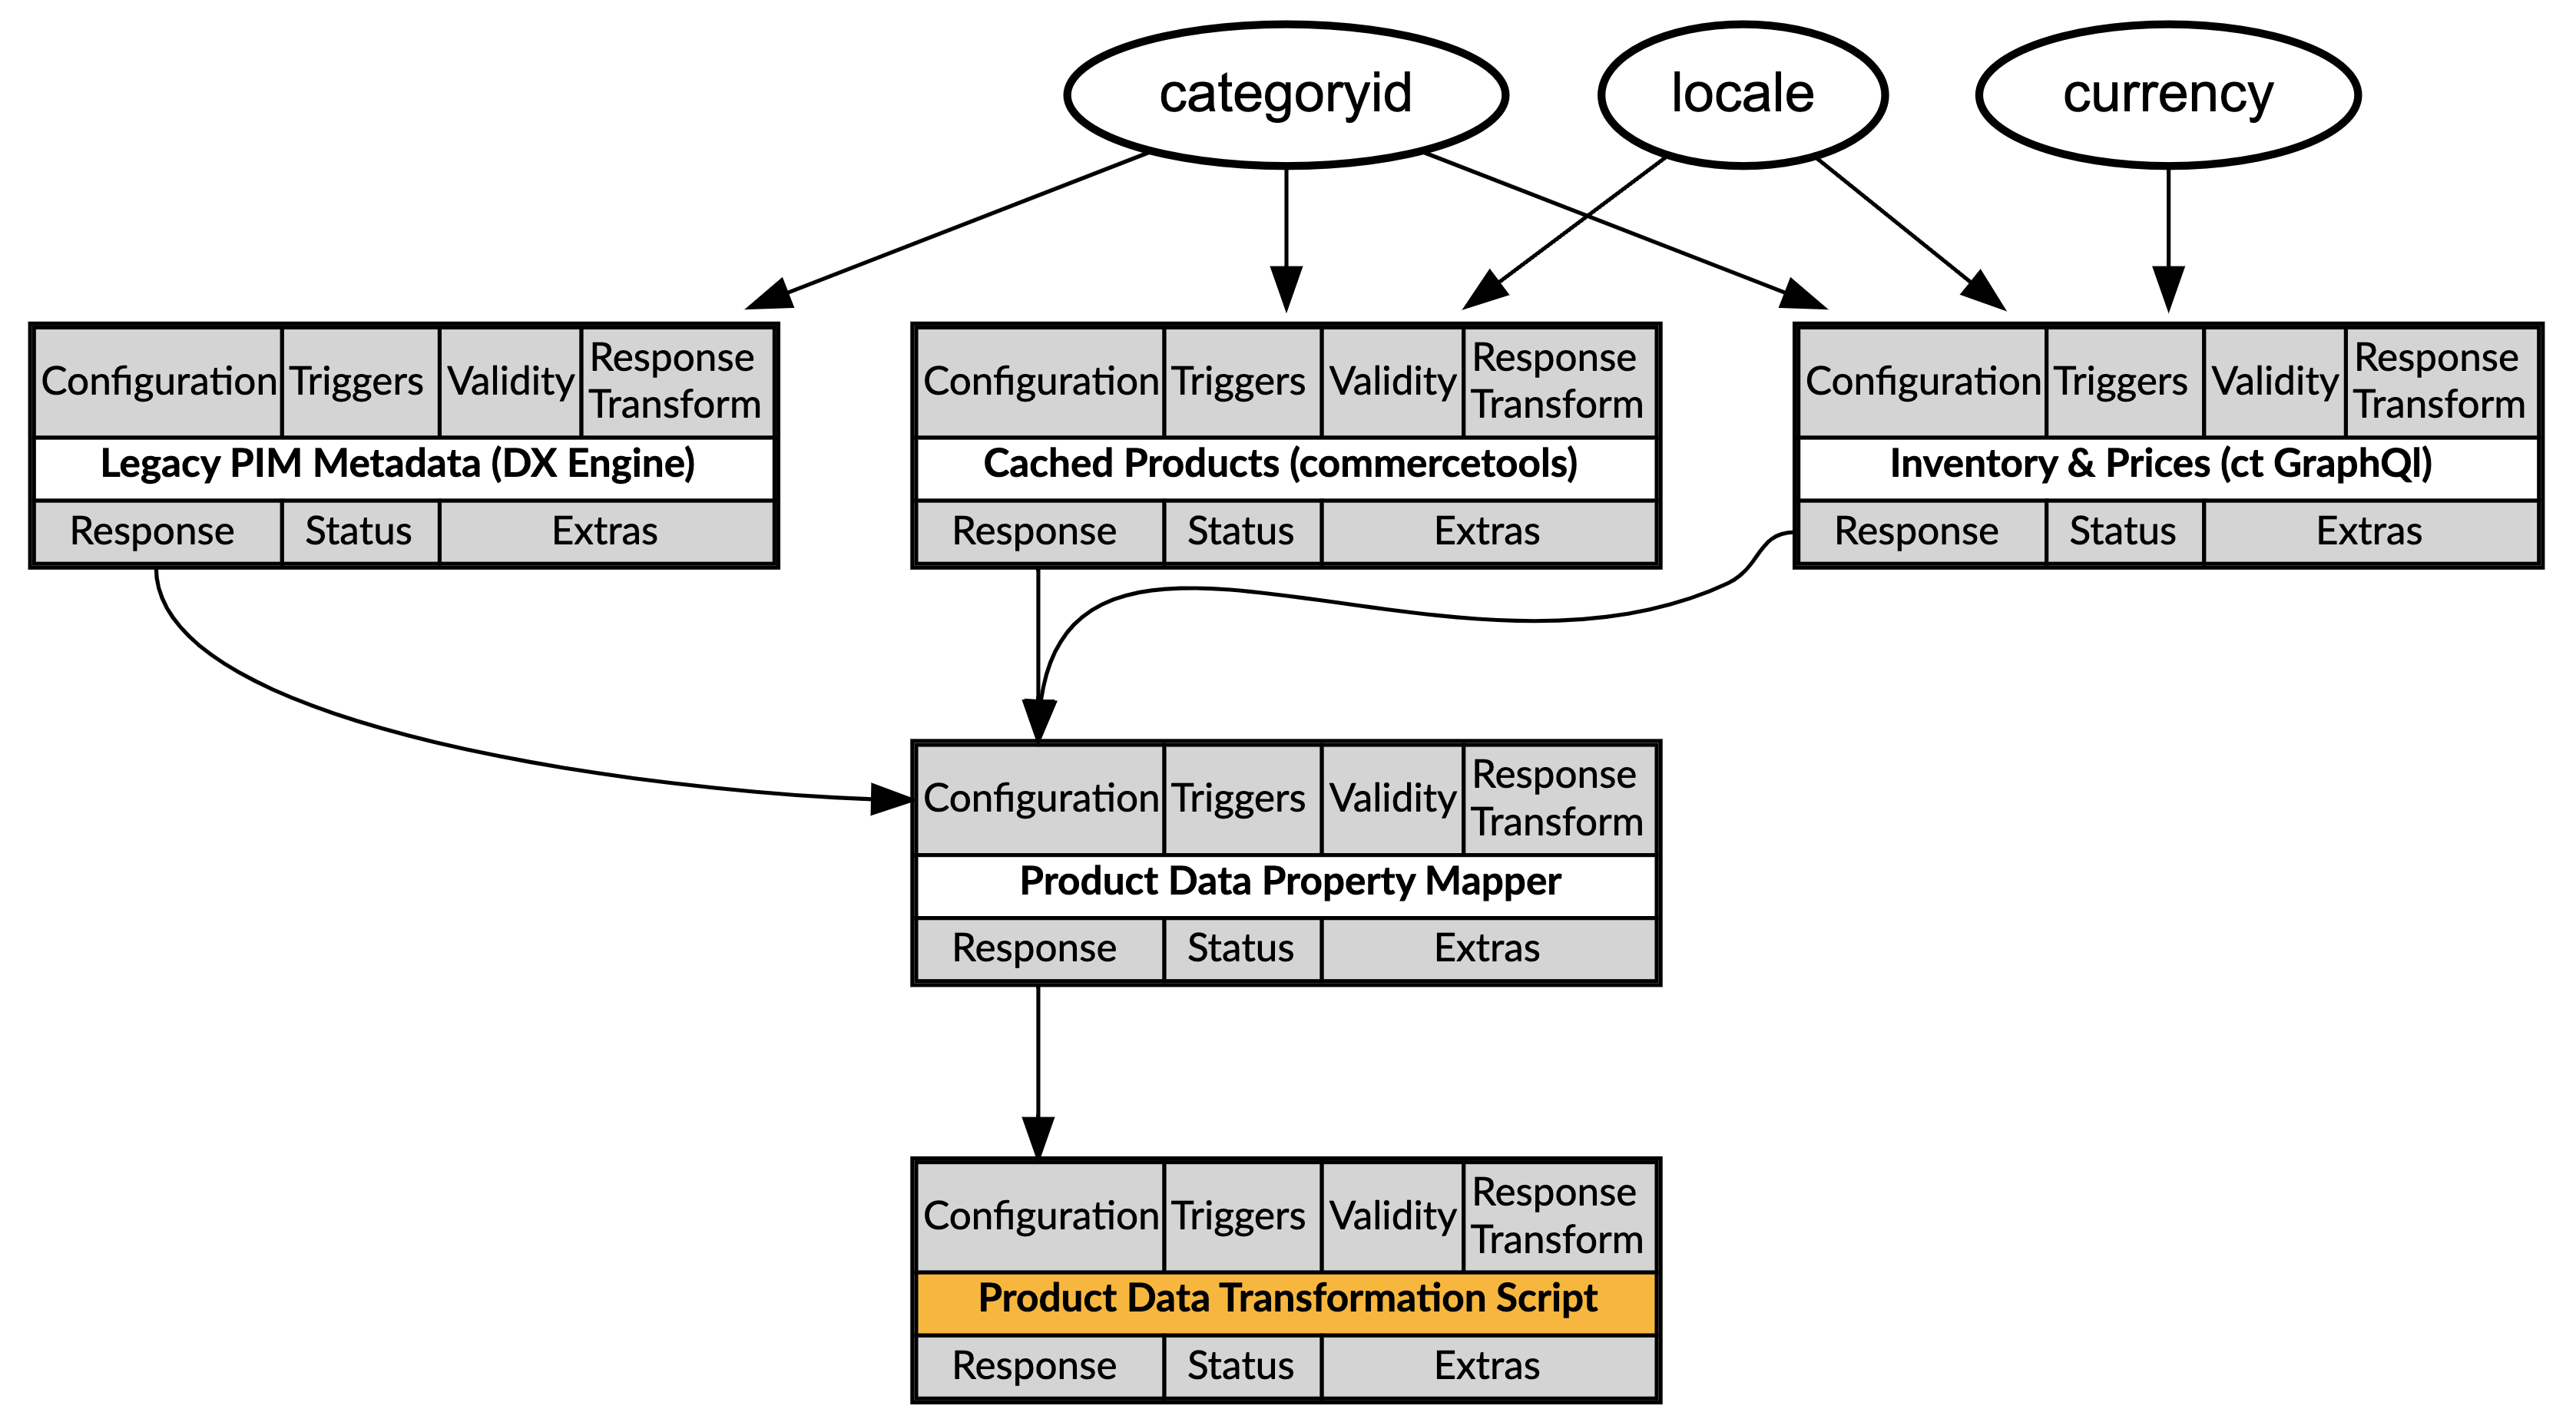
In this example, we have a hypothetical client who is adopting best-in-breed MACH technologies with a phased approach. They want to maximize the benefit of their new services, but are still being reliant on legacy systems with inadequate or obsolete connectivity. We will be stitching together three data sources:
- Legacy product metadata from their antiquated PIM, which is uploaded weekly, accessed and cached weekly via DX Engine;
- Product records from commercetools via REST, cached through Conscia every 5 minutes to improve performance; and
- Product inventory and pricing data from commercetools, queried via graphQL in real-time.
This allows us to minimize the amount of round-trip traffic to deliver comprehensive product data to the frontend. The same technique can apply to data from a broader selection of sources; the pattern would be the same, with adjustments to ensure the caching is appropriate.
Note: the "PIM data" we're retrieving (AI-generated meta characteristics) could easily be stored in commercetools; it's intended to be illustrative of contributing supplemental data that might be challenging to store in commercetools, for instance traceability details about sustainable fabrics used across multiple products.
Mapping Out DX Engine Elements
When the frontend calls Conscia's Experience API, it will pass the following Context:
- The
currencyvalue for the currency the customer is shopping in, to serve relevant prices. - The
localevalue to deliver the most relevant localized text content. - The
categoryidvalue to select the relevant subset of products.
An example call looks like this:
POST {{engineUrl}}/experience/components/_query
X-Customer-Code: {{customerCode}}
Authorization: Bearer {{dxEngineToken}}

{
  "componentCodes": ["product-data-transformation-script"],
  "context": {
    "currency": "USD",
    "locale": "en-US",
    "categoryid": "476f69be-e09e-4952-8ae7-61ba6af059ba"
}
}
Based on the context provided in this Experience API call, we will retrieve relevant products from each endpoint and provide the contextually-relevant characteristics to the web experience:
  "response": [
    {
      "attributes": [
        {
          "name": "brand_name",
          "value": "Winsome Wood Trading"
        }
      ],
      "availability": {
        "isOnStock": true,
        "availableQuantity": 12345,
        "version": 1,
        "id": "f1fb9f8e-db80-4b50-b20e-71a84828df54"
      },
      "assets": [],
      "images": [
        {
          "url": "https://item.tscimg.ca/TSC/6/62/623/0x0/623064.jpg?impolicy=M",
          "dimensions": {
            "w": 200,
            "h": 200
          }
        }
      ],
      "prices": 239.98,
      "key": "3326176",
      "sku": "1151",
      "id": "4f031234-3321-4e37-b67f-127631158ba5",
      "name": "Liso Writing Desk with Drawer",
      "categories": [
        {
          "typeId": "category",
          "id": "3eb949a9-9a30-42cb-9597-04e1f89aa1a1"
        }
      ],
      "slug": "liso-writing-desk-with-drawer-623064",
      "inventory": {
        "availableQuantity": 12345
      },
      "PIM Metafields": {
        "Dimensions": "48 x 24 x 30 inches",
        "Material": "Wood",
        "Requires Assembly": "Yes",
        "Weight": "40 lbs"
      }
    },
    {...}
  ]
DX Graph Configuration Details
The topics in this section explain how to create a PIM metafields data model in DX Graph, and populate it with sample data. A variety of alternative endpoints, including git gists, commercetools, or a SaaS PIM, could serve this role if DX Graph is not available.
Data Collection
Data Model for PIM data
- Navigate to the Data Model page (Manage Flows --> Data Model).
- Click the + (Create Data Collection) button.
- Enter the following and click Submit.
| Field | Value |
|---|---|
| Name | PIM Data |
| Data Collection Code | pimdata |
| Unique ID for Record | id |
Schema for PIM Data
- Right-click the new "PIM Data" Data Model, and select Edit --> Edit Schema. Introduce the following schema:
| Field Name | Field Type | Display Name | Settings |
|---|---|---|---|
| id | TEXT field | commercetools Product ID | Required Not Read-Only Unique |
| category-id | TEXT field | commercetools Category ID | Required Not Read-Only Not Unique |
| name/en | TEXT field | Not Required Not Read-Only Not Unique | |
| name/en-US | TEXT field | Not Required Not Read-Only Not Unique | |
| pim_metafields/Material | TEXT field | Not Required Not Read-Only Not Unique | |
| pim_metafields/Weight | TEXT field | Not Required Not Read-Only Not Unique | |
| pim_metafields/Dimensions | TEXT field | Not Required Not Read-Only Not Unique | |
| pim_metafields/Requires Assembly | TEXT field | Not Required Not Read-Only Not Unique |
Source Data
Sample Data
A .csv file, linked above, was used for this recipe. It was produced by performing a GET against the relevant Collection in commercetools, removing all fields but id, category, and localized names, and feeding the JSON into an LLM to generate various metafield values. The JSON was then converted into a CSV file.
Data Upload
To set up the ingestion of the csv file, the following tasks were performed:
- In a Postman client using the Conscia Postman Collection, run Bucket --> "Upload files to a Bucket" with the following qualities:
- dataBucketCode:
incoming - Body type:
form-data - Key file[], of type File, with value
pim.csv
- dataBucketCode:
- In Postman, run Bucket --> "Analyze a file in a Bucket" with the following qualities:
- dataBucketCode:
incoming - Body type:
JSON - The following body text:
- dataBucketCode:
{
    "filename": "pim.csv",
    "sourceSchema": {
        "type": "object",
        "properties": {
            "id": {
                "type": "string"
            },
            "category-id": {
                "type": "string"
            },
            "name/en": {
                "type": "string"
            },
            "name/en-US": {
                "type": "string"
            },
            "pim_metafields/Material": {
                "type": "string"
            },
            "pim_metafields/Weight": {
                "type": "string"
            },
            "pim_metafields/Dimensions": {
                "type": "string"
            },
            "pim_metafields/Requires Assembly": {
                "type": "string"
            }
        },
        "required": [
            "id", "category-id"
        ]
    },
    "recordIdentifierField": "id",
    "parseOptions": {
        "format": "DELIMITED",
        "delimiter": ",",
        "quoteChar": "\"",
        "escapeChar": "\""
    },
    "collectionCode": "pimdata",
    "transformers": []
}
We should see nbrFinalRecords equal 35 with nbrIssues at 0.
- In Postman, run Bucket--> "Import files in a Bucket into a Collection" with the following qualities:
- dataBucketCode: incoming
- Body type: JSON
- The following body text:
{
  "skippedBucketCode": "skipped",
  "processedBucketCode": "processed",
  "invalidBucketCode": "invalid",
  "filenamePattern": "pim.csv",
  "skipInvalidRecords": false,
    "sourceSchema": {
        "type": "object",
        "properties": {
            "id": {
                "type": "string"
            },
            "category-id": {
                "type": "string"
            },
            "name/en": {
                "type": "string"
            },
            "name/en-US": {
                "type": "string"
            },
            "pim_metafields/Material": {
                "type": "string"
            },
            "pim_metafields/Weight": {
                "type": "string"
            },
            "pim_metafields/Dimensions": {
                "type": "string"
            },
            "pim_metafields/Requires Assembly": {
                "type": "string"
            }
        },
        "required": [
            "id", "category-id"
        ]
    },
    "recordIdentifierField": "id",
    "parseOptions": {
        "format": "DELIMITED",
        "delimiter": ",",
        "quoteChar": "\"",
        "escapeChar": "\""
    },
    "collectionCode": "pimdata",
    "transformers": []
}
We should see nbrValidRecords equal 35 with nbrValidationIssues at 0.
-
Add the new Collection to the navigation menu:
- Navigate to the Left Navigation page (Manage Flows --> Left Navigation).
- Select Left Nav - Sources.
- Select Create Record (button with three boxes and an asterisk, top-right)
- Set the following values:
Field Value Order any unique integer Label "Legacy PIM" Active Checked Content Collection Add one item Content Collection Label PIM Data Repository Master Content Content Data Collection PIM Data -
Visit the PIM Sources page (Collections --> Sources --> Legacy PIM --> PIM) and validate the row count is correct (35) and the csv contents are successfully imported.
We will execute the remainder of the recipe in DX Engine.
DX Engine Configuration Details
The topics in this section explain how to implement the elements involved in this recipe.
Context Fields
We need to create Context Fields to enable our Experience Rules to access Context values. For the purpose of this recipe, we'll be manually entering a few expected values into the Context Field configuration. For a production implementation, you would want to configure a Component to supply the expected values.
Connections
commercetools Connection
To create a Connection used to store the commercetools connection credentials, in the DX Engine UI:
- Navigate to the Connections page (Manage Flows --> Connections).
- Click Add Connection. The Create Connection page appears.
- For Connection Code, enter an identifier for the Conection:
conn-conscia-commercetools. - For Connection Name, enter a friendly name for the Connection:
Commercetools Connection. - Optionally, enter a Description for the Connection.
- For Connector, select Commercetools.
- Ener the Project key, Hosting region, Client Id and Client Secret from commercetools.
- Click Submit.
DX Graph Connection
To create a Connection used to access DX Graph, in the DX Engine UI:
- Navigate to the Connections page (Manage Flows --> Connections).
- Click Add Connection. The Create Connection page appears.
- For Connection Code, enter an identifier for the Conection:
dx-graph. - For Connection Name, enter a friendly name for the Connection:
DX Graph. - Optionally, enter a Description for the Connection.
- For Connector, select DX Graph.
- Ener the Conscia Endpoint, API Key, and Customer Code for your DX Graph instance.
- Click Submit.
Product Data Retrieval Components
Component to retrieve PIM data from DX Graph
- Navigate to the Experience Components page (Manage Flows --> Components).
- Click the + Add Component button.
- Enter the following and click Submit.
- Note: The example category we are using has 35 products, hence the record limit is set at 35.
| Field | Value |
|---|---|
| Component Code | legacy-pim-endpoint |
| Component Name | Legacy PIM Metadata (DX Engine) |
| No Rules | Checked |
| Component Type | Dx Graph - Dynamic Record List |
| Connection | Get value from: Literal DX Graph |
| Collection ID | "Metadata coming from our legacy PIM system" |
| Maximum number of records to return | 35 |
| Query Filter Get value from: JS Expression | JSON.stringify({<br/>  $eq: {<br/>  field: 'category-id',<br/>  value: contextField('categoryid')<br/> }<br/>}) |
| Response Transform | _.map(response, element =><br/> _.assign(<br/>  {<br/>   "id": element["id"],<br/>   "PIM Metafields": {<br/>    "Dimensions": element["pim_metafields/Dimensions"],<br/>    "Material": element["pim_metafields/Material"],<br/>    "Requires Assembly": element["pim_metafields/Requires Assembly"],<br/>    "Weight": element["pim_metafields/Weight"]<br/>   }<br/>  }<br/> )<br/>); |
Component to retrieve core product data from commercetools
- Navigate to the Experience Components page (Manage Flows --> Components).
- Click the + Add Component button.
- Enter the following and click Submit.
- Note: The example category we are using has 35 products, hence the record limit is set at 35.
| Field | Form Tab | Value |
|---|---|---|
| Component Code | Main | ct-products-cached |
| Component Name | Main | Cached Products (commercetools) |
| No Rules | Main | Checked |
| Component Type | Main | Commercetools - Dynamic Product List |
| Connection Get value from: Literal | Main | Commercetools Connection |
| IETF language code | Main | en-US |
| Limit Get value from: Literal | Main | 35 |
| Filte Get value from: JS Expression | Main | 'categories.id:subtree(\"' + contextField('categoryid') + '\")' |
| Response Transform | Main | _.map(response, element =><br/> _.assign(<br/>  element.masterVariant, {<br/>   "id": element.id,<br/>   "name": element.name[contextField('locale')],<br/>   "categories": element.categories,<br/>   "slug": element.slug[contextField('locale')]<br/>  }<br/> )<br/>); |
| Cached | Caching | Checked |
| Cache Time-to-live | Caching | 300 |
Component to retrieve real-time product specifics from commercetools
- Navigate to the Experience Components page (Manage Flows --> Components).
- Click the + Add Component button.
- Enter the following and click Submit.
| Field | Form Tab | Value |
|---|---|---|
| Component Code | Main | commercetools-graphql-inventory |
| Component Name | Main | Inventory & Prices (ct GraphQl) |
| No Rules | Main | Checked |
| Component Type | Main | Conscia - Universal API Connector |
| Webservice Path Get value from: Literal | Main | https://api.us-central1.gcp.commercetools.com/omni-channel-experience/graphql |
| Method | Main | POST |
| Headers | Main | Header: content-type, Get value from: Literal, Value: application/json Header: Authorization, Get value from: Literal, Value: Bearer REDACTED |
| URL encode the keys and values | Main | Checked |
| Body Get value from: JS Expression | Main | JSON.stringify({<br/> query: "query getRealTime($filter: String, $currency: Currency!, $locale: Locale) {\n productProjectionSearch( \n queryFilters: [{ string: $filter }],\n limit: 35\n ) {\n results {\n id\n name(locale: $locale)\n \n masterVariant {\n availability{\n noChannel {\n availableQuantity\n }\n }\n price(currency:$currency) {\n value {\n centAmount\n }\n } \n \n }\n }\n }\n}",<br/> variables: {<br/>  "filter": 'categories.id:subtree(\"' + contextField('categoryid') + '\")' ,<br/>  "currency": contextField('currency') ,<br/>  "locale": contextField('locale')<br/>}<br/>}) |
| Response Transform | Main | _.map(response.data.productProjectionSearch.results, element =><br/> _.assign(<br/>  {<br/>   "id": element.id,<br/>   "inventory": element.masterVariant.availability.noChannel,<br/>   "prices": element.masterVariant.price.value.centAmount / 100<br/>  }<br/> )<br/>); |
Mapping and Transforming Components
Because each of our sources are providing an array of 35 partial product records in indeterminate order, we must iterate across each array and map them together by a shared field (id). Conscia provides the capability to execute this complex logic quickly and efficiently in two Components: A Mapper, and a Transformation Script running against the mapped object.
Mapper Component to represent all product data on one object
- Navigate to the Experience Components page (Manage Flows --> Components).
- Click the + Add Component button.
- Enter the following and click Submit.
- Note: the ordering is deliberate here; we wish to override the cached pricing, which may be outdated, with up-to-the-second and currency-specific pricing from the graphQL query. This ordering ensures the freshest data overwrites the stalest.
| Field | Form Tab | Value |
|---|---|---|
| Component Code | Main | product-data-property-mapper |
| Component Name | Main | Product Data Property Mapper |
| Component Type | Main | Conscia - Property Mapper |
| No Rules | Main | Checked |
| Default Expression Type | Main | javascript |
- Create three Property Maps as follows and click Submit.
PIM Metadata Map:
| Field | Value |
|---|---|
| Source Data | Get value from: Component Response Legacy PIM Metadata (DX Engine) |
| Expression Type | Javascript |
| Mappings | Target property: pim Source expression: data |
commercetools Map:
| Field | Value |
|---|---|
| Source Data | Get value from: Component Response Cached Products (commercetools) |
| Expression Type | Javascript |
| Mappings | Target property: cached Source expression: data |
GraphQL Map:
| Field | Value |
|---|---|
| Source Data | Get value from: Component Response Inventory & Prices (ct GraphQL) |
| Expression Type | Javascript |
| Mappings | Target property: graphQL Source expression: data |
Transformation Script Component to consolidate product data arrays
- Navigate to the Experience Components page (Manage Flows --> Components).
- Click the + Add Component button.
- Enter the following and click Submit.
| Field | Form Tab | Value |
|---|---|---|
| Component Code | Main | product-data-transformation-script |
| Component Name | Main | Product Data Transformation Script |
| No Rules | Main | Checked |
| Component Type | Main | Conscia - Data Transformation Script |
| Data to modify | Main | Get value from: Component Response Product Data Property Mapper |
| Script | Main | const map = new Map();<br/><br/>// Function to add an array to the map.<br/>function addToMap(arr) {<br/>  for (const item of arr) {<br/>    if (!map.has(item.id)) {<br/>      map.set(item.id, {});<br/>    }<br/>    Object.assign(map.get(item.id), item);<br/>  }<br/>}<br/><br/>// Add all arrays to the map, stalest to freshest.<br/>addToMap(data["pim"]);<br/>addToMap(data["cached"]);<br/>addToMap(data["graphQL"]);<br/><br/>// Convert map values to array. Assigning to a variable returns that variable.<br/>v = Array.from(map.values()); |