Leveraging LLMs to Orchestrate LLMs
This recipe demonstrates the procedural orchestration of three different targeted applications of LLM technology using an LLM "master router". Designed in a chat-bot context, executing this recipe grants the business user a framework for a comprehensive automated support solution using Conscia, with opportunities for capability expansion and levers available for tuning and manipulation. While a human customer service agent is superior at responding to a customer's mood and responding appropriately, LLM-based interfaces can still lean in that direction; the more comprehensively they do so, the fewer support requests need to be served by a human agent.
In this example, we're using ChatGPT to simulate a variety of niche, specialist LLM-powered services. We're executing this with simple prompts; in a production scenario, a custom model (or at least, a comprehensive instruction set for a retail model) would be more appropriate.
With this recipe, you could make further additions or adjustments for executing on additional capabilities outside of a simulated order lookup. As the other avenues are defined but not configured, the recipe will fail to deliver a meaningful result if the customer message is not order status-related!
LLM models vary in their ability to handle decision-making logic. It will be up to your business users to select the appropriate tool or tools for your unique context.
This Recipe debuted in a Concia Webinar on Large Language Models. The relevant section of the webinar is embedded below.
Mapping Out DX Engine Elements
When the frontend calls Conscia's Experience API, it will pass a simple context:
- The
contentof a message entered by the customer in the chat box. Note that in a production scenario, customers may find it more engaging to have their entire conversational history passed to Conscia instead.
An example call looks like this:
POST {{engineUrl}}/experience/components/_query
X-Customer-Code: {{customerCode}}
Authorization: Bearer {{dxEngineToken}}

{
  "componentCodes": ["chatgpt-sentiment-completion"],
  "context": {
    "content": "Tell me the order status of Order 0911, beloved friend."
  }
}
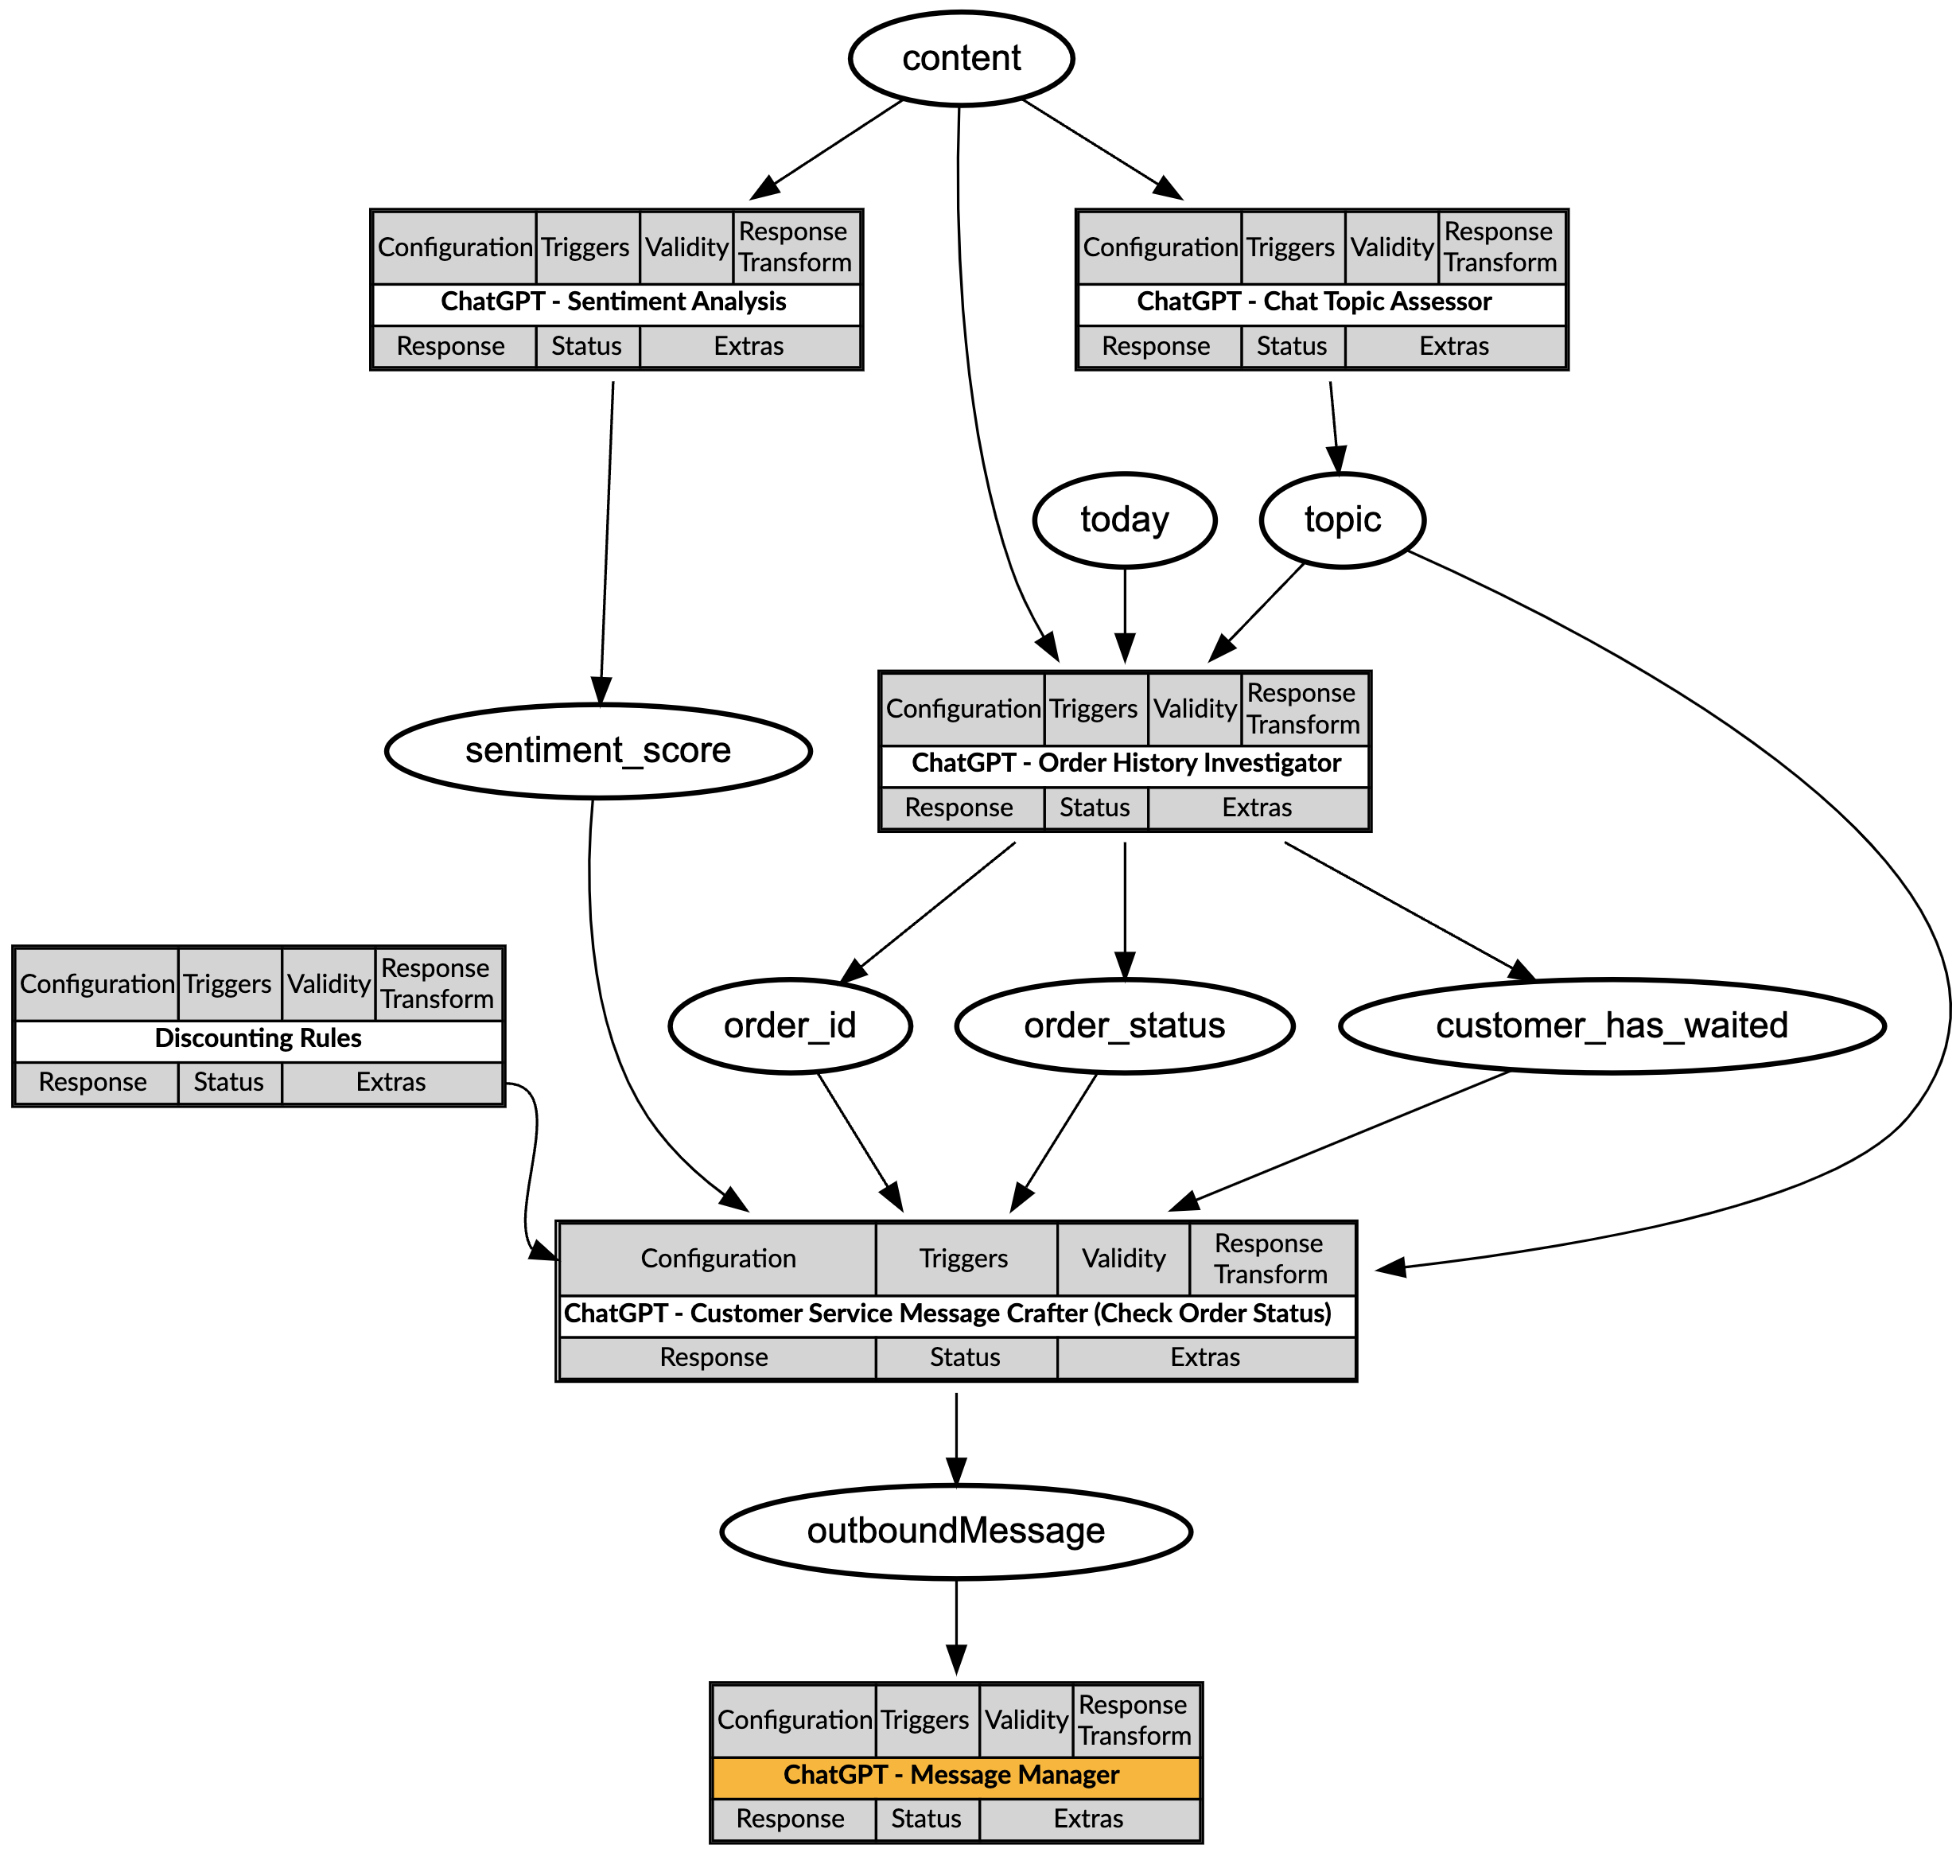
When presented with the Content of a message:
- The Sentiment Analysis Component will determine the mood of the customer.
- The Chat Topic Assessor Component will determine the customers' need.
- If that need is for an order update, the Order History Investigator Component will retrieve the estimated delivery date as compares to the date predicted on order creation.
- The customers' sentiment and the state of the order will inform the response message.
- If the order is late, the customer is upset, or both, then the Customer Service Message Crafter Component will include a discount based on the policies in the Discounting Rules.
Assuming the order is slightly delayed and the customer does not seem troubled by that fact, the response may look like the following:
"response": {
        "customer_message": "Dear valued customer, thank you for your patience. I wanted to update you on the status of your order 0911. Currently, your order is 'In Transit - Delayed'. We understand that waiting can be frustrating, and we appreciate your understanding. As a token of our appreciation for your patience, we would like to offer you a discount. Please use the coupon code '5%OFF0911' for your next purchase. Thank you for being a valued customer!",
        "coupon_code": "5%OFF0911"
}
DX Engine Configuration Details
The topics in this section explain how to implement the elements involved in this recipe.
Secrets
ChatGPT Secret
To create a Secret used to store the ChatGPT API Key, in the DX Engine UI:
- Navigate to the Secrets page (Manage Flows --> Secrets).
- Click the + Add Secret button.
- Enter the following and click Submit:
| Field | Value |
|---|---|
| Secret Code | chatgpt-account |
| Secret Name | ChatGPT |
| Secret Value | Enter your ChatGPT API key. |
Connections
Connection to ChatGPT
- Navigate to the Connections page (Manage Flows --> Connections).
- Click the + Add Connection button.
- Enter the following and click Submit:
| Field | Value |
|---|---|
| Connection Code | chatgpt-connection |
| Connection Name | ChatGPT Connection |
| Connector | Universal API Connector |
| Base URL | Get value from: Literal https://api.openai.com/v1 |
| Base Headers | Header: Authorization Value: Get value from: JS Expression `Bearer ` + secret('chatgpt-account') |
| Base Headers | Header: OpenAI-Organization Value: Get value from: Literal {your organization id} |
| Base Headers | Header: content-type Value: Get value from: Literal application/json |
Components
Component to Assess the Chat Topic
- Navigate to the Experience Components page (Manage Flows --> Components).
- Click the + Add Component button.
- Enter the following and click Submit.
| Field | Form Tab | Value |
|---|---|---|
| Component Code | Main | chatgpt-topic-assessor |
| Component Name | Main | ChatGPT - Chat Topic Assessor |
| No Rules | Main | Checked |
| Component Type | Main | Conscia - Universal API Connector |
| Connection | Main | ChatGPT Connection |
| Webservice Path | Main | Get value from: Literal/chat/completions |
| Method | Main | POST |
| Response Transform | Main | JSON.parse(response.choices.at(0).message.content) |
| Context Field Enrichments | Update Context | Context Field: topic Expression: response.topic |
| Body | Main | Get value from: JS Expression |
JSON.stringify({
  model: "gpt-4o-mini",
  response_format: { type: "json_object" },
  messages: [
    {
      role: "user",
      content: contextField('content')
    },
    {
      role: "system",
      content: "You are a 'traffic cop' receiving the full history of messages sent to a chat window on an ecommerce site, and determining which topic the request currently under discussion is on. Viable topics are ['Check order status', 'Product availability inquiry', 'Shipping information', 'Technical or Account Support', 'Initiate a return or exchange', 'Request a discount', 'Store hours inquiry']. You will respond simply with a JSON object containing 'topic' and one of the topics above."
    }
  ]
 })
Component to perform a Sentiment Analysis
- Navigate to the Experience Components page (Manage Flows --> Components).
- Click the + Add Component button.
- Enter the following and click Submit.
| Field | Form Tab | Value |
|---|---|---|
| Component Code | Main | chatgpt-sentiment-completion |
| Component Name | Main | ChatGPT - Sentiment Analysis |
| No Rules | Main | Checked |
| Component Type | Main | Conscia - Universal API Connector |
| Connection | Main | ChatGPT Connection |
| Webservice Path | Main | Get value from: Literal/chat/completions |
| Method | Main | POST |
| Response Transform | Main | JSON.parse(response.choices.at(0).message.content) |
| Context Field Enrichments | Update Context | Context Field: sentiment_score Expression: response.sentiment_score Context Field: sentiment Expression: response.sentiment |
| Body | Main | Get value from: JS Expression |
JSON.stringify({
  "model": "gpt-4o-mini",
  "response_format": { "type": "json_object" },
  "temperature": 0.35,
  "messages": [
    {
      "role": "user",
      "content": contextField('content')
    },
    {
      "role": "system",
      "content": "You are a sentiment analysis specialist. You will be shown a message from a customer, and it is your responsibility to determine how happy or unhappy they are. Your response should be a JSON object containing a 'sentiment_score' value from 0 (the unhappiest a person has ever been) to 100 (the happiest a person has ever been) and a 'sentiment' rating from the following scale: ['Very Unhappy', 'Unhappy', 'Neutral', 'Happy', 'Very Happy']."
    }
  ]
 })
Component to Investigate Order History
Note that for this recipe, we are simply having ChatGPT parse the Order ID to build a response. This could easily be replaced by an API call to the commerce engine you are deploying.
- Navigate to the Experience Components page (Manage Flows --> Components).
- Click the + Add Component button.
- Enter the following and click Submit.
| Field | Form Tab | Value |
|---|---|---|
| Component Code | Main | chatgpt-investigator-completion |
| Component Name | Main | ChatGPT - Order History Investigator |
| No Rules | Main | Checked |
| Component Type | Main | Conscia - Universal API Connector |
| Connection | Main | ChatGPT Connection |
| Webservice Path | Main | Get value from: Literal/chat/completions |
| Method | Main | POST |
| Response Transform | Main | JSON.parse(response.choices.at(0).message.content) |
| Trigger Expression | Conditions | contextField('topic') == 'Check order status' |
| Context Field Enrichments | Update Context | Context Field: order_status Expression: response.order_status Context Field: customer_has_waited Expression: response.customer_has_waited Context Field: order_id Expression: response.order_id |
| Body | Main | Get value from: JS Expression |
JSON.stringify({
  "model": "gpt-4o",
  "response_format": { "type": "json_object" },
  "temperature": 0.50,
  "messages": [
    {
      "role": "user",
      "content": contextField('content')
    },
    {
      "role": "system",
      "content": "The date is " + contextField('today') + ". You will be given a sentence containing a four digit order_id. the first two digits are the scheduled_delivery_date this month, and the last two are days_delayed. Your response will be a JSON object with the following parameters: 'order_id'; 'today'; 'customer_has_waited' which is 'today' minus 'scheduled_delivery_date' (minimum 0); and 'order_status' - if the order's current_delivery_date is before today, write 'Delivered'. If the scheduled_delivery_date and current_delivery_date are the same, write 'In Transit'. If the scheduled_delivery_date is in the past and the current_delivery_date is today or in the future, write 'In Transit - Delayed'. If the scheduled_delivery_date and current_delivery_date are both in the future, write 'In Transit - Delays Expected'."
      }
  ]
 })
Component to define Appeasement Discounting Rules
With this component, we can set Rules to determine when we appease a customer and what discount they are issued. Note that the Component to actually generate a discount code is not present.
- Navigate to the Experience Components page (Manage Flows --> Components).
- Click the + Add Component button.
- Enter the following and click Submit.
| Field | Form Tab | Value |
|---|---|---|
| Component Code | Main | discounting-rules |
| Component Name | Main | Discounting Rules |
| No Rules | Main | Not Checked |
| Component Type | Main | Conscia - Metadata |
| Attribute Configuration | Attribute Definition | Attribute Property: sentimentThresholdAttribute Name: Sentiment ThresholdAttribute Description: Any message lower than this % Sentiment could receive a discount.Attribute Required: CheckedType: NumberThe default value of the attribute: 49 |
| Attribute Configuration | Attribute Definition | Attribute Property: sentimentAppeasementAttribute Name: Sentiment AppeasementAttribute Description: Any message lower than the Sentiment Threshold receives this much discount.Attribute Required: CheckedType: TextThe default value of the attribute: 10% |
| Attribute Configuration | Attribute Definition | Attribute Property: waitingThresholdAttribute Name: Waiting ThresholdAttribute Description: A customer who's been waiting longer than this length of days could receive a discount.Attribute Required: CheckedType: NumberThe default value of the attribute: 2 |
| Attribute Configuration | Attribute Definition | Attribute Property: waitingAppeasementAttribute Name: Waiting AppeasementAttribute Description: A customer who's been waiting longer than the Waiting Threshold receives this much discount.Attribute Required: CheckedType: TextThe default value of the attribute: 5% |
Component to Craft an Order History Response Message
- Navigate to the Experience Components page (Manage Flows --> Components).
- Click the + Add Component button.
- Enter the following and click Submit.
| Field | Form Tab | Value |
|---|---|---|
| Component Code | Main | chatgpt-message-crafter-check-order-status |
| Component Name | Main | ChatGPT - Customer Service Message Crafter (Check Order Status) |
| No Rules | Main | Checked |
| Component Type | Main | Conscia - Universal API Connector |
| Connection | Main | ChatGPT Connection |
| Webservice Path | Main | Get value from: Literal/chat/completions |
| Method | Main | POST |
| Response Transform | Main | JSON.parse(response.choices.at(0).message.content) |
| Trigger Expression | Conditions | contextField('topic') == 'Check order status' |
| Context Field Enrichments | Update Context | Context Field: outboundMessage Expression: response.customer_message |
| Body | Main | Get value from: JS Expression |
JSON.stringify({
  "model": "gpt-4o",
  "response_format": { type: "json_object" },
  "temperature": 0.16,
  "messages": [
    {
      "role": "user",
      "content": "{ " +
        "'order_id': " + contextField('order_id') + ", "
        "'order_status: " + contextField('order_status') + ", "
        "'sentiment_score: " + contextField('sentiment_score') + ", "
        "'sentiment_appeasement': " + ((contextField('sentiment_score') < componentExtras('discounting-rules').rule.attributes.sentimentThreshold) ? componentExtras('discounting-rules').rule.attributes.sentimentAppeasement : 0) + ", "
        "'waiting_appeasement': " + ((contextField('customer_has_waited') > componentExtras('discounting-rules').rule.attributes.waitingThreshold) ? componentExtras('discounting-rules').rule.attributes.waitingAppeasement : 0) + " }"
    },
    {
      "role": "system",
      "content": "You are a virtual helpdesk assistant for an ecommerce website. You will be given the order_status of order order_id. "
      "Write an appropriate update to the customer describing the state of their order, being sensitive of their sentiment_score, which spans from 0(extremely unhappy) to 100(extremely happy)."

      "You are authorized to share a discount code to the customer if appropriate. The discount_percentage is the sum of sentiment_appeasement and waiting_appeasement. "
      "This discount should be presented in the form of a coupon code, where discount_percentage is the prefix, 'OFF' is in the middle, and order_id is the suffix. "
      "Ensure you share the coupon_code value in your message, but only if discount_percentage > 0%. "
      "If discount_percentage = 0%, do not mention a discount, coupon code, or appeasement of any kind, and coupon_code is null. "

      "Respond with a JSON object containing {customer_message, coupon_code}`"
    }
  ]
 })
Component to Manage Messages
Finally, it all comes together in this Component. Each Message Crafter prepares its Message if the Topic is set appropriately; this Component provides a singular endpoint to deliver any type of outbound customer messages across topics.
- Navigate to the Experience Components page (Manage Flows --> Components).
- Click the + Add Component button.
- Enter the following and click Submit.
| Field | Form Tab | Value |
|---|---|---|
| Component Code | Main | chatgpt-message-manager |
| Component Name | Main | ChatGPT - Message Manager |
| No Rules | Main | Checked |
| Component Type | Main | Conscia - Metadata |
| Response Transform | Main | contextField('outboundMessage') |
Experience Rules
Experience Rules to deliver Discounting Values
- Navigate to the Omnichannel Experience Rules page (Manage Experiences --> Experience Rules).
- Navigate to your Discounting Rules Component under All Components.
- Click the + Add Experience Rule button.
- Enter the following and click Submit.
| Field | Form Tab | Value |
|---|---|---|
| Rule ID | Main | Default |
| Rule Name | Main | Default |
| Priority | Main | 1 |
| Is Default | Main | Checked |
| Active | Experience | Checked |
| Attributes | Experience | Sentiment Threshold: 49Sentiment Appeasement: 10%Waiting Threshold: 2Waiting Appeasement: 5% |