Developing and Applying Taxonomies
This recipe demonstrates Conscia's intrinsic taxonomy capabilities. For those unaware, a Taxonomy Collection is a Collection that is built to support a Source Collection by enriching its data through the application of tags. Each entry in a Taxonomy Collection is a rule that applies its title as a tag if its conditions are met.
In a production environment, taxonomies are applied automatically. In staging, they must be manually applied using the Apply Taxonomy button.

This example uses gently-massaged data distributed by Best Buy for use as an Open Data Set. It contains the following three Sources:
- Thirty Stores, which each have a storeID, name, type, phone number, and comprehensive address;
- Fifty Products, which each have an productId, SKU, product images, and an assortment of meta-attributes; and
- Fifteen hundred Inventories, which is a bridge table between Store and Product, showing the inventory level of each item at each location.
This data set is sufficiently complex to demonstrate a variety of taxonomical activities.
DX Graph Source Configuration
It is best to consider this recipe in two halves - establishing the seed data, and iteratively performing work against it. If you are working with a seeded DX Graph sandbox, you can skip ahead to the second section.
Initialize Stores
Data Model for Stores
- Navigate to the Data Model page (Settings --> Data Model) of the DX Graph UI.
- Click the + (Create Data Collection) button.
- Enter the following and click Submit.
| Field | Value |
|---|---|
| Data Collection Code | stores |
| Name | Stores |
| Description | A listing of store locations and details. |
| Unique ID for Record | storeId |
Schema for Stores
- Right-click the new "Stores" Data Model, and select Edit --> Edit Schema. Introduce the following schema:
| Field Name | Field Type | Display Name | Settings |
|---|---|---|---|
| storeId | TEXT field | Store ID | Required Not Read-Only Unique |
| storeType | TEXT field | Store Type | Required Not Read-Only Not Unique |
| name | TEXT field | Name | Required Not Read-Only Not Unique |
| longName | TEXT field | Long Name | Not Required Not Read-Only Not Unique |
| address | TEXT field | Address | Not Required Not Read-Only Not Unique |
| address2 | TEXT field | Address 2 | Not Required Not Read-Only Not Unique |
| city | TEXT field | City | Not Required Not Read-Only Not Unique |
| region | TEXT field | Region | Not Required Not Read-Only Not Unique |
| country | TEXT field | Country | Not Required Not Read-Only Not Unique |
| phone | TEXT field | Phone Number | Not Required Not Read-Only Not Unique |
| postalCode | TEXT field | Postal Code | Not Required Not Read-Only Not Unique |
Initialize Products
Data Model for Products
- Navigate to the Data Model page (Settings --> Data Model) of the DX Graph UI.
- Click the + (Create Data Collection) button.
- Enter the following and click Submit.
| Field | Value |
|---|---|
| Data Collection Code | products |
| Name | Products |
| Description | A detailed listing of items available for sale. |
| Unique ID for Record | productId |
Schema for Products
The Products schema contains a variety of metadata to allow for exploration of different DX Graph capabilities. Entering all of these fields manually is, therefore, time-consuming, and using the Conscia Postman Collection is likely to be more productive.
- Using Postman or a similar client, send a Set Products Schema API call with the following JSON payload as the Body:
set Products Schema via API call
{
"fields": {
"productId": {
"jsonSchema": {
"type": "number",
"title": "Product ID"
},
"options": {
"readonly": false,
"required": true
}
},
"sku": {
"jsonSchema": {
"type": "string",
"title": "SKU"
},
"options": {
"readonly": false,
"required": true
}
},
"image": {
"jsonSchema": {
"type": "string",
"title": "Image",
"description": "URL of the image"
},
"options": {
"readonly": false,
"required": false
},
"displaySchema": {
"ui:widget": "vue:ImageRender",
"ui:options": {
"allowUpload": true,
"dataBucketCode": "static-assets"
}
}
},
"name": {
"jsonSchema": {
"type": "string",
"title": "Name"
}
},
"type": {
"jsonSchema": {
"type": "string",
"title": "Type"
},
"options": {
"readonly": false,
"required": false
}
},
"active": {
"jsonSchema": {
"type": "string",
"title": "Active"
},
"options": {
"readonly": false,
"required": false
}
},
"regularPrice": {
"jsonSchema": {
"type": "number",
"title": "Regular Price"
},
"options": {
"readonly": false,
"required": false
}
},
"salePrice": {
"jsonSchema": {
"type": "number",
"title": "Sale Price"
},
"options": {
"readonly": false,
"required": false
}
},
"clearance": {
"jsonSchema": {
"type": "string",
"title": "Clearance"
},
"options": {
"readonly": false,
"required": false
}
},
"upc": {
"jsonSchema": {
"type": "string",
"title": "UPC"
},
"options": {
"readonly": false,
"required": false
}
},
"productTemplate": {
"jsonSchema": {
"type": "string",
"title": "Product Template"
},
"options": {
"readonly": false,
"required": false
}
},
"shortDescription": {
"jsonSchema": {
"type": "string",
"title": "Short Description"
},
"options": {
"readonly": false,
"required": false
}
},
"description": {
"jsonSchema": {
"type": "string",
"title": "Description"
},
"options": {
"readonly": false,
"required": false
}
},
"longDescription": {
"jsonSchema": {
"type": "string",
"title": "Long Description"
},
"options": {
"readonly": false,
"required": false
}
},
"manufacturer": {
"jsonSchema": {
"type": "string",
"title": "Manufacturer"
},
"options": {
"readonly": false,
"required": false
}
},
"modelNumber": {
"jsonSchema": {
"type": "string",
"title": "Model Number"
},
"options": {
"readonly": false,
"required": false
}
},
"thumbnailImage": {
"jsonSchema": {
"type": "string",
"title": "Thumbnail Image",
"description": "URL of the thumbnail image"
},
"options": {
"required": false
},
"displaySchema": {
"ui:widget": "vue:ImageRender",
"ui:options": {
"allowUpload": true,
"dataBucketCode": "static-assets"
}
}
},
"height": {
"jsonSchema": {
"type": "string",
"title": "Height"
},
"options": {
"readonly": false,
"required": false
}
},
"width": {
"jsonSchema": {
"type": "string",
"title": "Width"
},
"options": {
"readonly": false,
"required": false
}
},
"depth": {
"jsonSchema": {
"type": "string",
"title": "Depth"
},
"options": {
"readonly": false,
"required": false
}
},
"weight": {
"jsonSchema": {
"type": "string",
"title": "Weight"
},
"options": {
"readonly": false,
"required": false
}
},
"color": {
"jsonSchema": {
"type": "string",
"title": "Color"
},
"options": {
"readonly": false,
"required": false
}
},
"albumTitle": {
"jsonSchema": {
"type": "string",
"title": "Album Title"
},
"options": {
"readonly": false,
"required": false
}
},
"alternateViewsImage": {
"jsonSchema": {
"type": "string",
"title": "Alternate View Image"
},
"options": {
"readonly": false,
"required": false
},
"displaySchema": {
"ui:widget": "vue:ImageRender",
"ui:options": {
"allowUpload": true,
"dataBucketCode": "static-assets"
}
}
},
"categoryId": {
"jsonSchema": {
"type": "string",
"title": "Category Id"
},
"options": {
"readonly": false,
"required": false
}
},
"class": {
"jsonSchema": {
"type": "string",
"title": "Product Class"
},
"options": {
"readonly": false,
"required": false
}
},
"classId": {
"jsonSchema": {
"type": "number",
"title": "Product Class Id"
},
"options": {
"readonly": false,
"required": false
}
},
"department": {
"jsonSchema": {
"type": "string",
"title": "Department"
},
"options": {
"readonly": false,
"required": false
}
},
"departmentId": {
"jsonSchema": {
"type": "number",
"title": "Department Id"
},
"options": {
"readonly": false,
"required": false
}
},
"displayType": {
"jsonSchema": {
"type": "string",
"title": "Display Type"
},
"options": {
"readonly": false,
"required": false
}
},
"dollarSavings": {
"jsonSchema": {
"type": "number",
"title": "$ Savings"
},
"options": {
"readonly": false,
"required": false
}
},
"energyStarQualified": {
"jsonSchema": {
"type": "string",
"title": "Energy Star Qualified?"
},
"options": {
"readonly": false,
"required": false
}
},
"freeShipping": {
"jsonSchema": {
"type": "string",
"title": "Free Shipping?"
},
"options": {
"readonly": false,
"required": false
}
},
"percentSavings": {
"jsonSchema": {
"type": "number",
"title": "% Savings"
},
"options": {
"readonly": false,
"required": false
}
},
"proposition65WarningMessage": {
"jsonSchema": {
"type": "string",
"title": "Proposition 65 Warning Message"
},
"options": {
"readonly": false,
"required": false
}
},
"proposition65WarningType": {
"jsonSchema": {
"type": "string",
"title": "Proposition 65 Warning Type"
},
"options": {
"readonly": false,
"required": false
}
},
"subclass": {
"jsonSchema": {
"type": "string",
"title": "Subclass"
},
"options": {
"readonly": false,
"required": false
}
},
"subclassId": {
"jsonSchema": {
"type": "number",
"title": "Subclass ID"
},
"options": {
"readonly": false,
"required": false
}
},
"warrantyLabor": {
"jsonSchema": {
"type": "string",
"title": "Warranty (Labor)"
},
"options": {
"readonly": false,
"required": false
}
},
"warrantyParts": {
"jsonSchema": {
"type": "string",
"title": "Warranty (Parts)"
},
"options": {
"readonly": false,
"required": false
}
},
"tags": {
"jsonSchema": {
"type": "string",
"title": "Tags"
},
"options": {
"readonly": false,
"required": false
}
}
}
}
- Of course, you can right-click the new "Products" Data Model, and select Edit --> Edit Schema. Introduce the following schema:
Set Products Schema manually
| Field Name | Field Type | Display Name | Settings |
|---|---|---|---|
| productId | number field | Product ID | Required Not Read-Only Not Unique |
| sku | string field | SKU | Required Not Read-Only Not Unique |
| image | image field | Image | Not Required Not Read-Only Not Unique |
| name | string field | Name | Not Required Not Read-Only Not Unique |
| type | string field | Type | Not Required Not Read-Only Not Unique |
| active | string field | Active | Not Required Not Read-Only Not Unique |
| regularPrice | number field | Regular Price | Not Required Not Read-Only Not Unique |
| salePrice | number field | Sale Price | Not Required Not Read-Only Not Unique |
| clearance | string field | Clearance | Not Required Not Read-Only Not Unique |
| upc | string field | UPC | Not Required Not Read-Only Not Unique |
| productTemplate | string field | Product Template | Not Required Not Read-Only Not Unique |
| shortDescription | string field | Short Description | Not Required Not Read-Only Not Unique |
| description | string field | Description | Not Required Not Read-Only Not Unique |
| longDescription | string field | Long Description | Not Required Not Read-Only Not Unique |
| manufacturer | string field | Manufacturer | Not Required Not Read-Only Not Unique |
| modelNumber | string field | Model Number | Not Required Not Read-Only Not Unique |
| thumbnailImage | image field | Thumbnail Image | Not Required Not Read-Only Not Unique |
| height | string field | Height | Not Required Not Read-Only Not Unique |
| width | string field | Width | Not Required Not Read-Only Not Unique |
| depth | string field | Depth | Not Required Not Read-Only Not Unique |
| weight | string field | Weight | Not Required Not Read-Only Not Unique |
| color | string field | Color | Not Required Not Read-Only Not Unique |
| albumTitle | string field | Album Title | Not Required Not Read-Only Not Unique |
| alternateViewsImage | string field | Alternate View Image | Not Required Not Read-Only Not Unique |
| alternateViewsImage | image field | Alternate View Image | Not Required Not Read-Only Not Unique |
| categoryId | string field | Category Id | Not Required Not Read-Only Not Unique |
| class | string field | Product Class | Not Required Not Read-Only Not Unique |
| classId | number field | Product Class Id | Not Required Not Read-Only Not Unique |
| department | string field | Department | Not Required Not Read-Only Not Unique |
| departmentId | number field | Department Id | Not Required Not Read-Only Not Unique |
| displayType | string field | Display Type | Not Required Not Read-Only Not Unique |
| dollarSavings | number field | $ Savings | Not Required Not Read-Only Not Unique |
| energyStarQualified | string field | Energy Star Qualified? | Not Required Not Read-Only Not Unique |
| freeShipping | string field | Free Shipping? | Not Required Not Read-Only Not Unique |
| percentSavings | number field | % Savings | Not Required Not Read-Only Not Unique |
| proposition65WarningMessage | string field | Proposition 65 Warning Message | Not Required Not Read-Only Not Unique |
| proposition65WarningType | string field | Proposition 65 Warning Type | Not Required Not Read-Only Not Unique |
| subclass | string field | Subclass | Not Required Not Read-Only Not Unique |
| subclassId | number field | Subclass ID | Not Required Not Read-Only Not Unique |
| warrantyLabor | string field | Warranty (Labor) | Not Required Not Read-Only Not Unique |
| warrantyParts | string field | Warranty (Parts) | Not Required Not Read-Only Not Unique |
| tags | string field | Tags | Not Required Not Read-Only Not Unique |
Initialize Inventory
Data Model for Inventory
- Navigate to the Data Model page (Settings --> Data Model) of the DX Graph UI.
- Click the + (Create Data Collection) button.
- Enter the following and click Submit.
| Field | Value |
|---|---|
| Data Collection Code | inventory |
| Name | Inventory |
| Description | A bridge table for Products and Stores, showing stock levels. |
| Unique ID for Record | id |
Schema for Inventory
- Right-click the new "Inventory" Data Model, and select Edit --> Edit Schema. Introduce the following schema:
| Field Name | Field Type | Display Name | Settings |
|---|---|---|---|
| id | TEXT field | Inventory Entry ID | Required Not Read-Only Unique |
| productId | TEXT field | Product ID | Required Not Read-Only Not Unique |
| storeId | TEXT field | Store ID | Required Not Read-Only Not Unique |
| inventory | INTEGER field | Inventory | Not Required Not Read-Only Not Unique |
Upload and Import Source Data
As mentioned above, three .csv files - Stores, Products, and Inventories - were used for this recipe.
Store Records
To set up the ingestion of the csv file, the following tasks were performed:
-
In a Postman client using the Conscia Postman Collection, run Bucket --> "Upload files to a Bucket" with the following qualities:
- dataBucketCode:
incoming - Body type:
form-data - Key file[], of type File, with value
stores-seeder.csv
- dataBucketCode:
-
In Postman, run Bucket--> "Import files in a Bucket into a Collection" with the following qualities:
- dataBucketCode: incoming
- Body type: JSON
-
Copy and paste the following JSON as the call's body text:
Schema for Store import
{
    "skippedBucketCode": "skipped",
    "processedBucketCode": "processed",
    "invalidBucketCode": "invalidated",
    "skipInvalidRecords": false,
    "filenamePattern": "stores-seeder.csv",
    "sourceSchema": {
        "type": "object",
        "properties": {
            "storeId": {
                "type": "number"
            },
            "storeType": {
                "type": "string"
            },
            "name": {
                "type": "string"
            },
            "longName": {
                "type": "string"
            },
            "address": {
                "type": "string"
            },
            "address2": {
                "type": "string"
            },
            "city": {
                "type": "string"
            },
            "region": {
                "type": "string"
            },
            "country": {
                "type": "string"
            },
            "phone": {
                "type": "string"
            },
            "postalCode": {
                "type": "string"
            }
        },
        "required": [
            "storeId"
        ]
    },
    "recordIdentifierField": "storeId",
    "parseOptions": {
        "format": "DELIMITED",
        "delimiter": ",",
        "quoteChar": "\"",
        "escapeChar": "\""
    },
    "collectionCode": "stores",
    "transformers": []
}
We should see nbrValidRecords equal 30 with nbrValidationIssues at 0.
Product Records
To set up the ingestion of the csv file, the following tasks were performed:
-
In a Postman client using the Conscia Postman Collection, run Bucket --> "Upload files to a Bucket" with the following qualities:
- dataBucketCode:
incoming - Body type:
form-data - Key file[], of type File, with value
products-seeder.csv
- dataBucketCode:
-
In Postman, run Bucket--> "Import files in a Bucket into a Collection" with the following qualities:
- dataBucketCode: incoming
- Body type: JSON
-
Copy and paste the following JSON-format data as the call's body text:
Schema for Product import
{
    "skippedBucketCode": "skipped",
    "processedBucketCode": "processed",
    "invalidBucketCode": "invalidated",
    "skipInvalidRecords": false,
    "filenamePattern": "products-seeder.csv",
    "sourceSchema": {
        "type": "object",
        "properties": {
            "productId": {
                "type": "number"
            },
            "active": {
                "type": "string"
            },
            "albumTitle": {
                "type": "string"
            },
            "alternateViewsImage": {
                "type": "string"
            },
            "categoryId": {
                "type": "string"
            },
            "class": {
                "type": "string"
            },
            "classId": {
                "type": "number"
            },
            "clearance": {
                "type": "string"
            },
            "color": {
                "type": "string"
            },
            "department": {
                "type": "string"
            },
            "departmentId": {
                "type": "number"
            },
            "depth": {
                "type": "string"
            },
            "displayType": {
                "type": "string"
            },
            "dollarSavings": {
                "type": "number"
            },
            "energyStarQualified": {
                "type": "string"
            },
            "freeShipping": {
                "type": "string"
            },
            "height": {
                "type": "string"
            },
            "image": {
                "type": "string"
            },
            "description": {
                "type": "string"
            },
            "longDescription": {
                "type": "string"
            },
            "manufacturer": {
                "type": "string"
            },
            "modelNumber": {
                "type": "string"
            },
            "name": {
                "type": "string"
            },
            "percentSavings": {
                "type": "number"
            },
            "productTemplate": {
                "type": "string"
            },
            "proposition65WarningMessage": {
                "type": "string"
            },
            "proposition65WarningType": {
                "type": "string"
            },
            "regularPrice": {
                "type": "number"
            },
            "salePrice": {
                "type": "number"
            },
            "shortDescription": {
                "type": "string"
            },
            "sku": {
                "type": "string"
            },
            "subclass": {
                "type": "string"
            },
            "subclassId": {
                "type": "number"
            },
            "thumbnailImage": {
                "type": "string"
            },
            "type": {
                "type": "string"
            },
            "upc": {
                "type": "string"
            },
            "warrantyLabor": {
                "type": "string"
            },
            "warrantyParts": {
                "type": "string"
            },
            "weight": {
                "type": "string"
            },
            "width": {
                "type": "string"
            }
        },
        "required": [
            "productId",
            "sku"
        ]
    },
    "recordIdentifierField": "productId",
    "parseOptions": {
        "format": "DELIMITED",
        "delimiter": ",",
        "quoteChar": "\"",
        "escapeChar": "\""
    },
    "collectionCode": "products",
    "transformers": []
}
We should see nbrValidRecords equal 50 with nbrValidationIssues at 0.
Inventory Records
To set up the ingestion of the csv file, the following tasks were performed:
-
In a Postman client using the Conscia Postman Collection, run Bucket --> "Upload files to a Bucket" with the following qualities:
- dataBucketCode:
incoming - Body type:
form-data - Key file[], of type File, with value
inventory-seeder.csv
- dataBucketCode:
-
In Postman, run Bucket--> "Import files in a Bucket into a Collection" with the following qualities:
- dataBucketCode: incoming
- Body type: JSON
-
Copy and paste the following JSON-format data as the call's body text:
Schema for Inventory import
{
    "skippedBucketCode": "skipped",
    "processedBucketCode": "incoming",
    "invalidBucketCode": "invalidated",
    "skipInvalidRecords": false,
    "filenamePattern": "inventory-seeder.csv",
    "sourceSchema": {
        "type": "object",
        "properties": {
            "id": {
                "type": "number"
            },
            "inventory": {
                "type": "number"
            },
            "productId": {
                "type": "string"
            },
            "storeId": {
                "type": "string"
            }
        },
        "required": [
            "id",
            "productId",
            "storeId"
        ]
    },
    "recordIdentifierField": "id",
    "parseOptions": {
        "format": "DELIMITED",
        "delimiter": ",",
        "quoteChar": "\"",
        "escapeChar": "\""
    },
    "collectionCode": "inventory",
    "transformers": []
}
We should see nbrValidRecords equal 1500 with nbrValidationIssues at 0.
Nav Management
-
Add the new Collections to the navigation menu:
-
Navigate to the Left Navigation page (Settings --> Left Navigation) of the DX Engine UI.
-
Select Left Nav - Sources.
-
Select Create Record (button with three boxes and an asterisk, top-right)
-
Create the following:
Entry Fields Values Create Record Order
Label
Seeder Data1
"Seeder Data"
CheckedContent Collection #1 Collection Label
Data Repository
Data CollectionStores
Master Content
StoresContent Collection #2 Collection Label
Data Repository
Data CollectionProducts
Master Content
ProductsContent Collection #3 Collection Label
Data Repository
Data CollectionInventory
Master Content
Inventory
-
-
Visit the PIM Sources page (Collections --> Sources --> Legacy PIM --> PIM) and validate the row counts are correct (30, 50, and 1500) and the csv contents are successfully imported.
DX Graph Taxonomy Configuration
In a production environment, multiple Taxonomy Collections can be applied to the same Source Collection. This allows for different fields to receive tags, which can improve the data cleanlinless or enable service to multiple downstream systems. For this recipe, we will simply create one Taxonomy Collection for each Source Collection, and put the values in a tags field. Note that this field does not need to exist in the Source Collection schema; the Taxonomy Collection will add it dynamically.
Taxonomy Collections
The format for each of these, at a base level, is the same. Substitute <<COLLECTION>> for the relevant Collection name Products, Stores, Inventory when running the below three times:
- Navigate to the Data Model page (Settings --> Data Model) of the DX Engine UI.
- Right-click the table and select Create --> Create Taxonomy Collection.
- Enter the following and click Submit.
| Field | Value |
|---|---|
| Data Collection Code | <<collection>>-taxonomy |
| Data Collection Name | <<Collection>> Taxonomy |
| Description | A Taxonomy for <<Collection>>. |
| Unique ID for Rule | id |
| Target Data Repository | Master Content |
| Target Data Collection | <<Collection>> |
| Target Data Field | tags |
Nav Management
Add the new Collections to the navigation menu:
-
Navigate to the Left Navigation page (Settings --> Left Navigation) of the DX Engine UI.
-
Select Left Navigation - Taxonomies.
-
Select Create Record (button with three boxes and an asterisk, top-right)
-
Create the following:
Entry Fields Values Create Record Order
Label
Seeder Data1
"Seeder Data"
CheckedContent Collection #1 Collection Label
Data Repository
Data CollectionStores
Master Content
Stores TaxonomyContent Collection #2 Collection Label
Data Repository
Data CollectionProducts
Master Content
Products TaxonomyContent Collection #3 Collection Label
Data Repository
Data CollectionInventory
Master Content
Inventory Taxonomy
Building and Running Taxonomies
Inventory Taxonomy: Low Stock Alerts (Compare)
We can have a taxonomy that tags inventory entries as to whether they are low stock (less than five items at that location) or out of stock (zero items at that location). This data is useful on the store side to assist in restocking and reordering, and on the warehouse and procurement side to keep track of inventory turns, stock-out rate, days sales of inventory (DSI), and more.
- Navigate to the Taxonomies page of the DX Engine UI.
- Select Inventory, under Seeder Data.
- Select Create Record (button with three boxes and an asterisk, top-right)
- Set the following values:
| Field | Value |
|---|---|
| Rule Name | low-stock |
| Description | A taxonomy applied to low inventory levels. |
| Active | Checked |
- Then right-click the record and select Edit Rule Criteria. Establish the following rule:

-
Repeat the process to set an out-of-stock Rule in the same way, but select
Less Than or Equal To 0orEqual To 0depending on your pessimism. -
Apply the Taxonomy Collection (button with a tree diagram and a play icon, top right). Press Confirm.
Now, we can go to the Inventory Sources page (Collections -> Sources) and see a number of records tagged with low-stock and out-of-stock - how helpful! You can apply a Filter to only see Records with a specified tag, or create an Inspector Card that does the same (that process is described elsewhere).

Product Taxonomy: Data Completeness and Readiness (AND/OR, Compare, Present)
Looking through the data set, we can see that some products have all of height/width/depth/weight, and some have none. Surely there's a business rationale for either condition, but if a product only has some of those fields then we can consider its information incomplete. While we're at it, let's insist that every product has set a color.
First Rule: Specify a Color
We'll spice up (and future-proof!) an otherwise straightforward taxonomy rule by not mandating that a color be specified for software, gift certificate codes, et cetera.
- Navigate to the Taxonomies page of the DX Engine UI.
- Select Products, under Seeder Data.
- Select Create Record (button with three boxes and an asterisk, top-right)
- Set the following values:
| Field | Value |
|---|---|
| Rule Name | Color Attribute Missing |
| Description | Require Colors for all Hard Goods. |
| Active | Checked |
Then right-click the record and select Edit Rule Criteria.
- On the COMPLEX tab, drag an AND node into play.
- On the CHECK tab, drag an "Is/Isn't Blank" node into play nested under the AND node. Set the Field to "Color" and specify that the field should be blank.
- On the COMPARE tab, drag an "Equal To" node into play nested under the AND node. Set the Field to "Type" and the Value to "HardGood".
Second Rule: Height, Width, and Depth
It sometimes helps to explicitly spell out the rule logic; assembly flows smoothly from a well-articulated clause. Let's start with the validity case, the rule for not applying the taxonomy:
If either (height, width, and depth are blank) or (height, width and depth are not blank) DON'T tag it.
Per De Morgan's laws, to invert the implicit NOT of DON'T, we also invert each AND and OR:
If (any of height, width, and depth are blank) and (any of height, width, and depth are not blank) DO tag it.
That looks right! Let's implement it in the engine.
- Navigate to the Taxonomies page of the DX Graph UI.
- Select Products, under Seeder Data.
- Select Create Record (button with three boxes and an asterisk, top-right)
- Set the following values:
| Field | Value |
|---|---|
| Rule Name | Physical Parameters Incomplete |
| Description | A taxonomy that validates height, width, and depth values. |
| Active | Checked |
Then right-click the record and select Edit Rule Criteria.
- On the COMPLEX tab, drag an AND node into play. Nest two OR nodes under it.
- On the CHECK tab, drag three "Is/Isn't Blank" nodes under each OR node.
- For one set of three, configure the nodes such that "Height is blank", "Width is blank" and "Depth is blank" are all together.
- For the other, configure the nodes such that "Height is not blank", "Width is not blank" and "Depth is not blank" are all together.

Prep, Run, and Validate
Apply the Taxonomy Collection (button with a tree diagram and a play icon, top right). Press Confirm.
Now, we can go to the Products Sources page (Collections -> Sources) and see the results. Conveniently, six products have Color Attribute Missing, four have Physical Parameters Incomplete, but none have both - so we can see that complete (or completely missing) physical attributes are passing inspection, as are hard goods with an assigned color.
Product Taxonomy: Regulatory Compliance (Interpretation, AND/OR/NOT, String)
Let's examine two of the variety of fields available, "Proposition 65 Warning Message" and "Proposition 65 Warning Type". For those unfamiliar, this is the "Known to the State of California to cause cancer" or "Known to the State of California to cause birth defects or other reproductive harm" warnings (or both) that you've seen on some products. Often this is a benign disclosure, but we want to ensure that we are in full adherence to the regulation and our customers are well-informed.
Looking at the data set, we have a variety of products with a Warning Type of 1 and no message, and several with a Warning Type of 4 and a "cancer or reproductive harm" message. We can safely assume, then, that Type 2 is solely "reproductive harm" and Type 3 is solely "cancer".
To ensure compliance with this regulation, we'll need to ensure the following:
- If the Warning Type is 1, the Warning Message is blank.
- If the Warning Type is 2 or 4, the Warning Message should include "reproductive harm"
- If the Warning Type is 3 or 4, the Warning Message should include "cancer".
We'll administer this using two taxonomy rules.
First Rule: Type 1
- Navigate to the Taxonomies page of the DX Engine UI.
- Select Products, under Seeder Data.
- Select Create Record (button with three boxes and an asterisk, top-right)
- Set the following values:
| Field | Value |
|---|---|
| Rule Name | Prop 65 Issue (Type 1) |
| Description | A taxonomy applied to low inventory levels. |
| Active | Checked |
Then right-click the record and select Edit Rule Criteria.
- On the COMPLEX tab, drag an AND node into play.
- On the COMPARE tab, drag an Equal To node into play nested into the AND. Set the Field to "Proposition 65 Warning Type" and the Value to 1.
- On the CHECK tab, drag an "Is/Isn't Blank" node underneath that, in the AND. Set it so that the "Proposition 65 Warning Message" should NOT be blank.
A reminder that we are describing the failure condition here, not the success; in this instance, we want to tag Type 1 products which have a Message, so they can be reviewed.
Second Rule: Types 2, 3 and 4
It sometimes helps to explicitly spell out the rule logic; assembly flows smoothly from a well-articulated clause.
Either (It's Type 2 or 4 and missing "reproductive harm") or (It's Type 3 or 4 and missing "cancer").
- Navigate to the Taxonomies page of the DX Engine UI.
- Select Products, under Seeder Data.
- Select Create Record (button with three boxes and an asterisk, top-right)
- Set the following values:
| Field | Value |
|---|---|
| Rule Name | Prop 65 Issue |
| Description | A general taxonomy for products of potential concern. |
| Active | Checked |
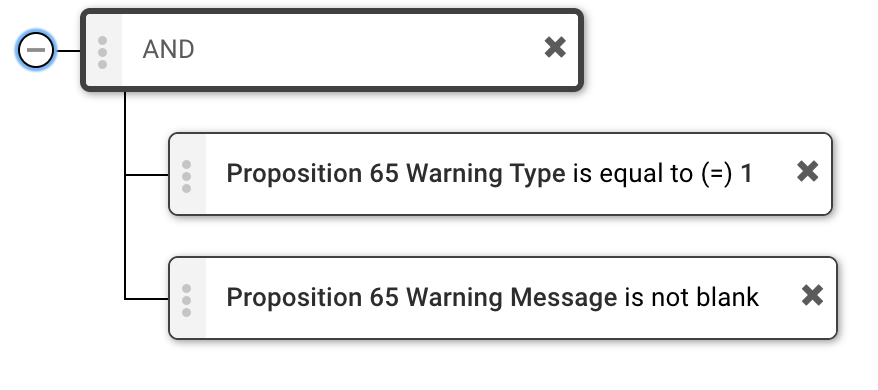
Then right-click the record and select Edit Rule Criteria.
- On the COMPLEX tab, drag an OR node into play. Drag two children AND nodes to nest underneath, and give each of those a nested NOT node.

- On the SEARCH tab, drag a Word Search node into play under each AND.
- For the first Word Search, Set the Field to "Proposition 65 Warning Type", the Value to
2, 4(four characters, no quotes or braces), and the Match Mode to ANY. - For the second Word Search, Set the Field to "Proposition 65 Warning Type", the Value to
3, 4(four characters, no quotes or braces), and the Match Mode to ANY.
- For the first Word Search, Set the Field to "Proposition 65 Warning Type", the Value to
- On the SEARCH tab, drag a Phrase Search node to nest underneath each NOT.
- For the first Phrase Search, Set the Field to "Proposition 65 Warning Message" and the Value to
reproductive harm(with no quotes or braces). - For the second Phrase Search, Set the Field to "Proposition 65 Warning Message" and the Value to
cancer(with no quotes or braces).
- For the first Phrase Search, Set the Field to "Proposition 65 Warning Message" and the Value to

A reminder that we are describing the failure condition here, not the success; in this instance, we want to tag Type 2, 3 or 4 products that have inadequate Messages so they can be reviewed.
Prep, Run, and Validate
The data set happens to not have any Type 1 errors. In order to trigger the Type 1 rule, we'll need to go into the Products Sources page (Collections --> Sources), select any product with a Proposition 65 Warning Type of 1, and add any text to the Proposition 65 Warning Message field. Then scroll down and Save the record. Edits can also be conducted right on the Collection view page.

Now, we can return to the Taxonomies page of the DX Engine UI, and apply the Products Taxonomy Collection (button with a tree diagram and a play icon, top right). Press Confirm. Return to the Products Sources page (Collections --> Sources) and inspect the results by sorting the records by the Tags column.

Store Taxonomy: Geographic Region By State (Search)
Our Store data is reasonably straightforward, but taxonomies can apply categorizations to these stores so as to enrich the data for use in market analysis, future store planning, and warehouse operations.
Similarly to the next Taxonomy, we can use the US Census Bureau regions to split up the data. These are:
| Region | States |
|---|---|
| Northeast | CT, ME, MA, NH, RI, VT, NJ, NY, PA |
| Midwest | IL, IN, MI, OH, WI, IA, KS, MN, MO, NE, ND, SD |
| South | DE, FL, GA, MD, NC, SC, VA, WV, AL, KY, MS, TN, AR, LA, OK, TX |
| West | AZ, CO, ID, MT, NV, NM, UT, WY, AK, CA, HI, OR, WA |
The format of all four rules will be the same, but with <<REGION>> and <<STATES>> being substituted for the values above. For each Region:
- Navigate to the Taxonomies page of the DX Engine UI.
- Select Stores, under Seeder Data.
- Select Create Record (button with three boxes and an asterisk, top-right)
- Set the following values:
| Field | Value |
|---|---|
| Rule Name | <<REGION>> Census Region |
| Description | Stores in the US <<REGION>>. |
| Active | Checked |
Then right-click the record and select Edit Rule Criteria.
- On the SEARCH tab, drag in a Word Search node.
- Set the Field to Region.
- Set the Value to
<<STATES>>(from the table above). Supply no quotes, enclosing braces, or parentheses. - Set the Match Mode to ANY.
Now, we can apply the Taxonomy Collection (button with a tree diagram and a play icon, top right). Press Confirm. Head to the Stores Sources page (Collections --> Sources) and inspect the results by sorting the records by the Tags column.

Store Taxonomy: Postal Area By Zip Code (Regex)
Our Store data is reasonably straightforward, but taxonomies can apply categorizations to these stores so as to enrich the data for use in market analysis, future store planning, and warehouse operations.
Similarly to the previous Taxonomy, we can use the US Postal Service Areas to split up the data. These are:
| Area | First Digit of Zip Code |
|---|---|
| Northeast | 0 or 1 |
| Mid-Atlantic | 2 |
| Southeast | 3 |
| Midwest | 4 or 5 |
| Southwest | 6 |
| West | 7 or 8 |
| Pacific | 9 |
The format of all seven rules will be the same, but with <<AREA>> and <<DIGITS>> being substituted for the values above. For each Region:
- Navigate to the Taxonomies page of the DX Engine UI.
- Select Stores, under Seeder Data.
- Select Create Record (button with three boxes and an asterisk, top-right)
- Set the following values:
| Field | Value |
|---|---|
| Rule Name | <<AREA>> Postal Area |
| Description | Stores in the US <<AREA>>. |
| Active | Checked |
Then right-click the record and select Edit Rule Criteria.
- On the PATTERN tab, drag a Regex Pattern node into play.
- Set the Field to Postal Code.
- Set the Value to
[<<DIGITS>>][0-9]{4}(from the table above). Supply no quotes, enclosing braces, or parentheses. In the case of multiple values being acceptable, enter both digits in the first square brace. - Set the Match Mode to ANY.
Now, we can apply the Taxonomy Collection (button with a tree diagram and a play icon, top right). Press Confirm. Head to the Stores Sources page (Collections --> Sources) and inspect the results by sorting the records by the Tags column.

Store Taxonomy: Zip Code validation (OR/NOT, Regex)
There's also an opportunity in the Store Taxonomy to add a rule that validates broken zip codes. A US Zip Code:
- Must be either exactly five digits, or five digits, a hyphen, and four digits;
- Can't start with 000;
- Can't contain any letters or other symbols.
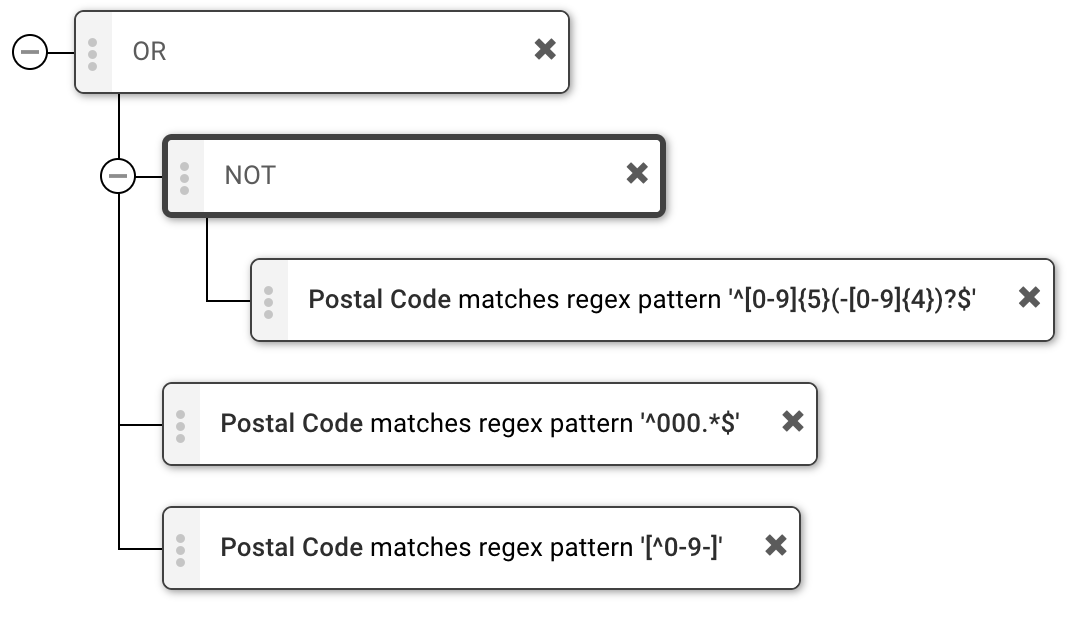
We can ensure all of these with one regular expression, but this would be a "magic regex" that was inscrutable to most users. Instead, we can have three rules for catching exceptions to the three conditions above, unified by an OR statement. We can either put a statement that's true of valid zip codes behind a NOT, or we can put a statement that's true of invalid zip codes directly in the OR statement. Both are demonstrated below.
Rule Implementation
- Navigate to the Taxonomies page of the DX Engine UI.
- Select Stores, under Seeder Data.
- Select Create Record (button with three boxes and an asterisk, top-right)
- Set the following values:
| Field | Value |
|---|---|
| Rule Name | Zip Code Issue |
| Description | Indicates a Zip Code is incorrectly formatted. |
| Active | Checked |
Then right-click the record and select Edit Rule Criteria.
- On the COMPLEX tab, drag an OR into play. Drag a NOT into play nested underneath it.
- On the PATTERN tab, drag a Regex Pattern node into play, nested beneath the NOT. Set the Field to Postal Code and the Value to
^[0-9]{5}(-[0-9]{4}). This satisfies the first condition. Regex is explained here. - On the PATTERN tab, drag a Regex Pattern node into play, after the NOT (but not nested beneath). Set the Field to Postal Code, and the Value to
^000.*$. This satisfies the second condition. Regex is explained here. - On the PATTERN tab, drag a Regex Pattern node into play, after the previous Regex node. Set the Field to Postal Code and the Value to
[^0-9-]. This satisfies the third condition. Regex is explained here.
Prep, Run, and Validate
The data set happens to not have any zip code errors. In order to trigger this rule, we'll need to go into the Stores Sources page (Collections --> Sources) and replace three zipcodes with the following:
-----(fails condition 1, passes conditions 2 and 3)00044(fails condition 2, passes conditions 1 and 3)71109with a trailing whitespace (fails condition 3, passes conditions 1 and 2).
Now, we can return to the Taxonomies page of the DX Engine UI, and apply the Stores Taxonomy Collection (button with a tree diagram and a play icon, top right). Press Confirm. Return to the Stores Sources page (Collections --> Sources) and inspect the results by sorting the records by the Tags column.
