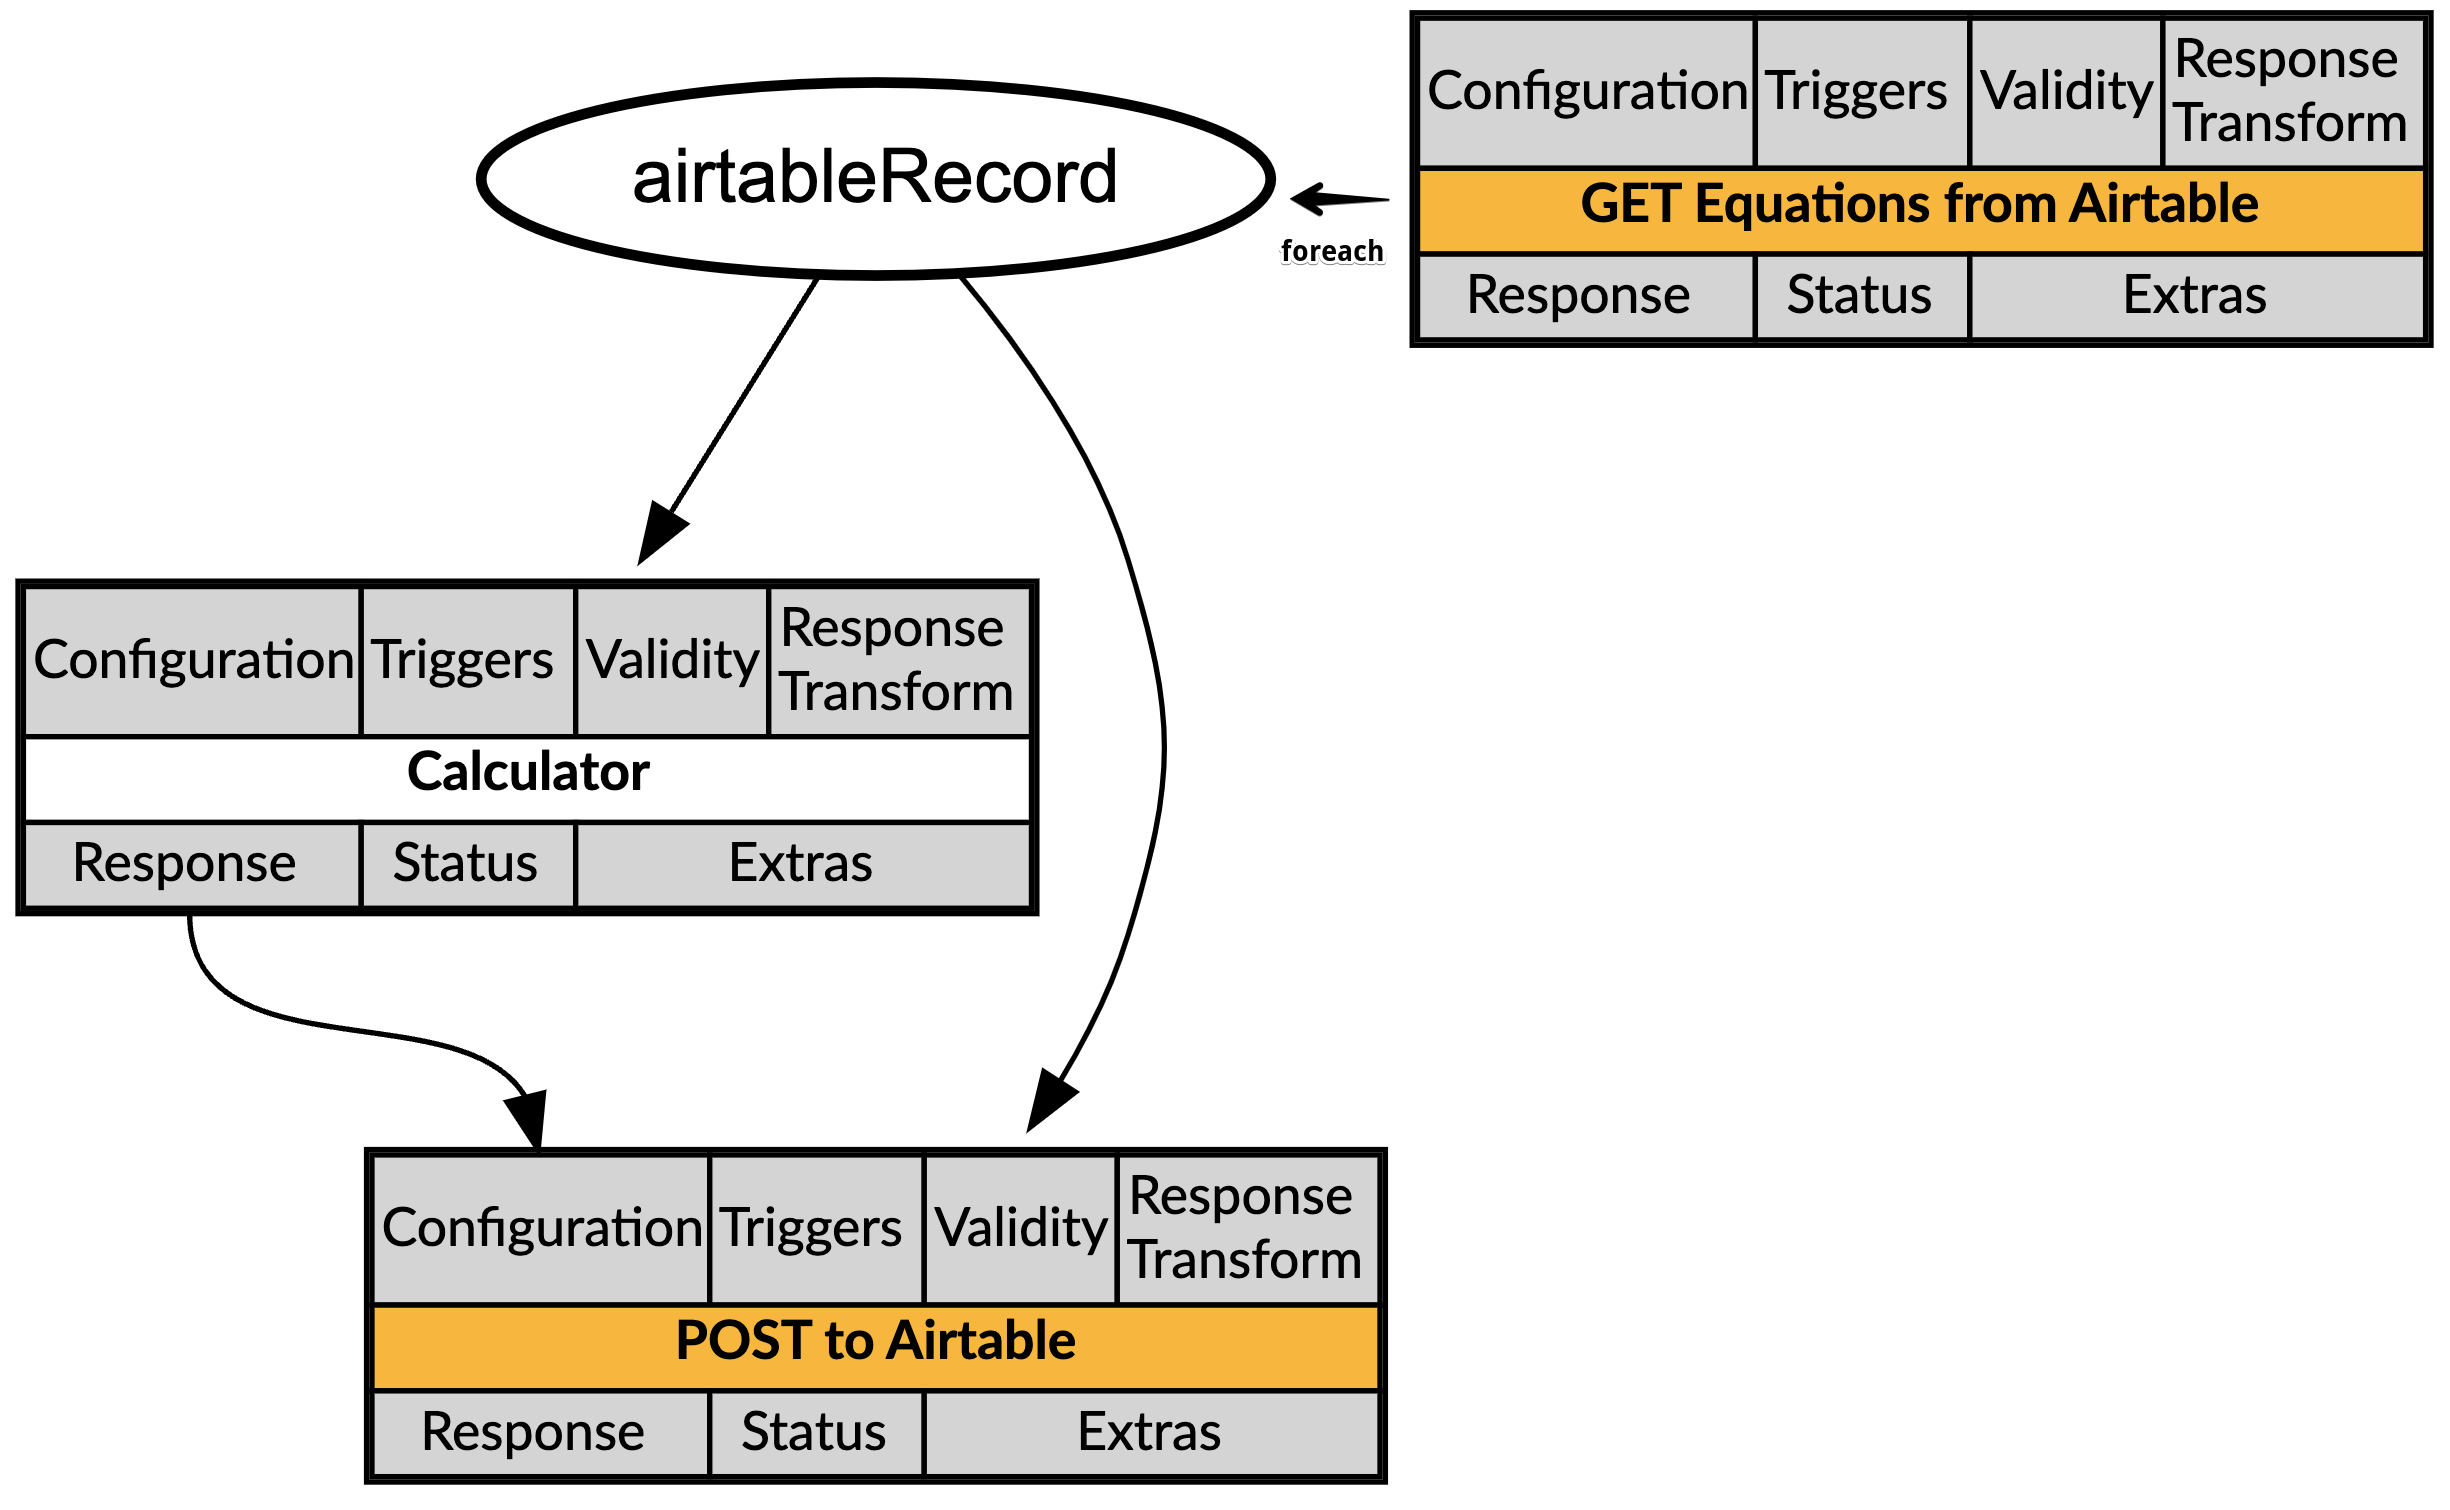
Batch Data Operations with a Sub Component
This straightforward recipe demonstrates a core Conscia behaviour - interacting with an API endpoint, and executing a task per-record against the results. In this example, we will be reading and writing from an Airtable, an innovative spreadsheet-type collaboration tool. We will read from a Table and for each unserved row, perform a unit of work on that input in Conscia, then write the output to another Table.
Airtable accounts are free, and no premium capabilities are required for this recipe.
The architectural approach demonstrated here is valuable for iterative extract, transform and load from a web service; catching up to a queue asynchronously; and many more common applications.
Mapping Out DX Engine Elements

This recipe, as it stands, is not designed to supply a digital experience in real-time. Instead, it showcases Conscia's usefulness as an intermediary data management suite, building modular low-code functions to streamline operations and maximize business user workflows.
No context is required as input. The output is the result of each POST operation back to Airtable, to validate the success or failure of these efforts.
Airtable Configuration Details
Create Airtable
Visit airtable.com, hit +Create, and start a new Base. Then create the following two Tables:
| Table Name | Simple Fields |
|---|---|
| Input | Equation_ID - Single line text, primary fieldEquation - Single line text |
| Output | Calculation_Date - Date, primary field, Include timeSolution - Single line text |
Establish Airtable Relationships
Then we can create a relationship between the two tables. This can be originated from either table (creating a 1:1 link from Output to Input creates the reciprocal Field in Input for Output). Regardless of the first field we add, we need the following two fields present each Table:
| Table Name | Relationship Fields |
|---|---|
| Input | Calculation_Date - Link to OutputSolution (from Output) - Lookup, source Calculation_Date, Output field Solution |
| Output | Equation_ID - Link to InputEquation (from Input) - Lookup, source Equation_ID, Output field Equation |
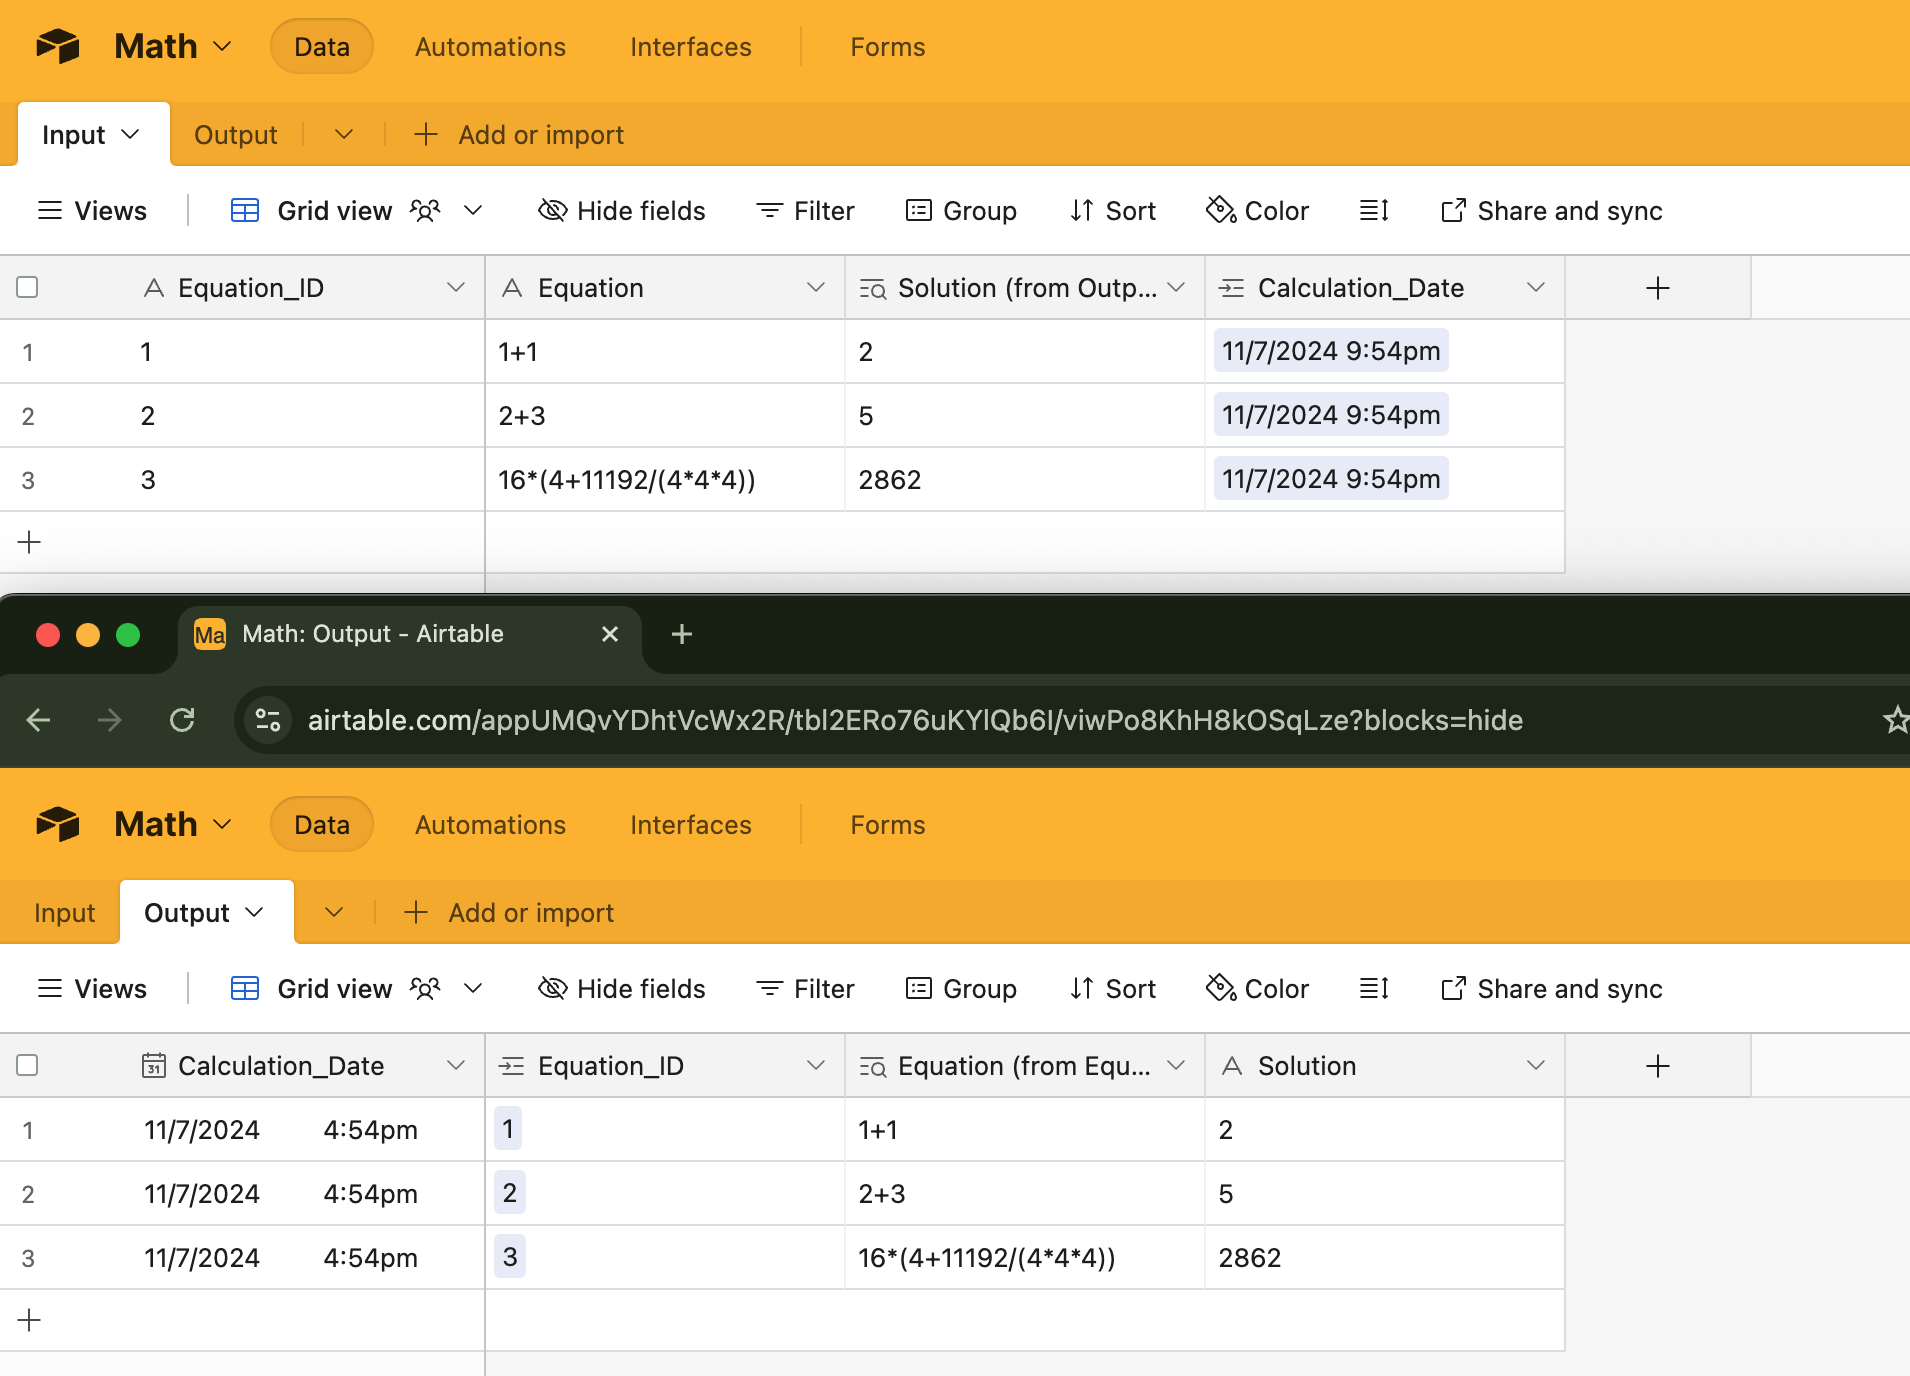
Now we have two linked Tables. Rows in Input can be created with an ID and an equation each; the recipe will execute the calculations, and create rows in Output that link to the Input and solve the equation.
DX Engine Configuration Details
The topics in this section explain how to implement the elements involved in this recipe.
Secrets
Airtable Secret
First, visit the Airtable Builder Hub and create a personal access token with, at a minimum, data.records:read and data.records:write permissions.
Then, to create a Secret in Conscia used to store the Airtable token, in the DX Engine UI:
- Navigate to the Secrets page (Manage Flows --> Secrets).
- Navigate to the Secrets page (Manage Flows --> Secrets).
- Click the + Add Secret button.
- Enter the following and click Submit:
| Field | Value |
|---|---|
| Secret Code | airtable |
| Secret Name | Airtable |
| Secret Value | Enter your Airtable token. |
Connections
Configure and Connect to Airtable
We must instantiate our Airtable in Conscia. You'll need to retain the Base ID (the first segment of the URL, it starts with app) and the Table's ID (the next segment of the URL, it starts with viw).
- Navigate to the Connections page (Manage Flows --> Connections).
- Navigate to the Connections page (Manage Flows --> Connections).
- Click the + Add Connection button.
- Enter the following and click Submit:
| Field | Value |
|---|---|
| Connection Code | airtable |
| Connection Name | Airtable |
| Connector | Universal API Connector |
| Base URL | Get value from: Literal https://api.airtable.com/v0/ + the Base ID retained above + / |
| Base Headers | Header: Authorization Value: Get value from: JS Expression "Bearer " + secret('airtable') |
| Base Headers | Header: content-type Value: Get value from: Literal application/json |
Components
Component to Retrieve Equations from Airtable
- Navigate to the Experience Components page (Manage Flows --> Components).
- Navigate to the Experience Components page (Manage Flows --> Components).
- Click the + Add Component button.
- Enter the following and click Submit.
| Field | Value |
|---|---|
| Component Code | get-airtable-equations |
| Component Name | GET Equations from Airtable |
| No Rules | Checked |
| Component Type | Conscia - Universal API Connector |
| Connection | Airtable |
| Webservice Path | Get value from: Literal the Table ID retained above |
| Method | GET |
| Query Parameters | Parameter: filterByFormula Get value from: Literal - NOT({{Calculation_Date}}) |
| Response Transform | response.records.length == 0 ? null : response.records |
Component to Evaluate Equations
A variety of techniques and approaches would serve; we'll use a Data Transformation Script to execute a unit of work on each row retrieved.
- Navigate to the Experience Components page (Manage Flows --> Components).
- Navigate to the Experience Components page (Manage Flows --> Components).
- Click the + Add Component button.
- Enter the following and click Submit.
| Field | Value |
|---|---|
| Component Code | calculator |
| Component Name | Calculator |
| No Rules | Checked |
| Component Type | Conscia - Data Transformation Script |
| Data to modify | Get value from: JS Expression(contextField('airtableRecord').fields.Equation) |
| Script | |
Component to Store Solutions in Airtable
- Navigate to the Experience Components page (Manage Flows --> Components).
- Navigate to the Experience Components page (Manage Flows --> Components).
- Click the + Add Component button.
- Enter the following and click Submit.
| Field | Value |
|---|---|
| Component Code | post-to-airtable |
| Component Name | POST to Airtable |
| No Rules | Checked |
| Component Type | Conscia - Universal API Connector |
| Connection | Airtable |
| Webservice Path | Get value from: Literal Output |
| Method | POST |
| Body | |
Sub Component Execution
Now, in order to complete the recipe, the Airtable GET Component must query Airtable and, for each record which passes the filter criteria, execute both the Calculator and the POST to Airtable Component. As the Calculator is a required input to POST to Airtable, we instantiate the POST to Airtable as a Sub Component of Airtable GET, making it a Parent Component.
- Navigate to the Experience Components page (Manage Flows --> Components).
- Click the Airtable GET Component.
- Navigate to the Sub Components tab.
- Enter the following and click Submit.
| Field | Value |
|---|---|
| Sub Components | Add one entry. |
| Property Name | llm_runs |
| Component Codes | Add one entry: post-to-airtable |
| Context Field for Sub Component | Add one entry: Context Field: airtableRecord Expression: response |
As response is an array of Table rows, the Sub Component will be invoked response.length times and each execution of post-to-airtable will receive one entry as airtableRecord.
After populating a few sample equations, successful invocation of the Airtable GET Component will produce a result like the following in Airtable:
