Polling Third-Party Endpoints with a Microservice
A lightweight, task-specific microservice can extend the capabilities of Conscia's low-code platform tremendously, and allow for a streamlined and clear business user experience despite complex programmed functions being executed in the workflow. This recipe demonstrates one such microservice.
While calls to DX Engine's Experience API allow for synchronous and asynchronous calls to web services, there are workflows that cannot be adequately engaged by a single synchronous call or asynchronous call. While strategies exist to fulfill this need using Conscia alone, it is typical for enterprises to implement a number of cloud-hosted serverless functions peripheral to their orchestration platform instance.
This recipe demonstrates a typical microservice interaction - a function called Relay. It requests a job be enqueued on another system, actively polls a job status endpoint, and then queries the job result once it has concluded. In this example, we will be sending a query to a specific OpenAI (ChatGPT) Assistant, and awaiting the response created by that LLM.
Additionally, we take advantage of Conscia's Experience Rules to capture the majority of the data fields required, so that business users can call upon "pre-fab" configuration combinations instead of concerning themselves with managing a complex state.
By following this pattern any necessary tools and capabilities, like real-time LLM content, can supplement and extend Conscia's capabilities.
Mapping Out The Recipe
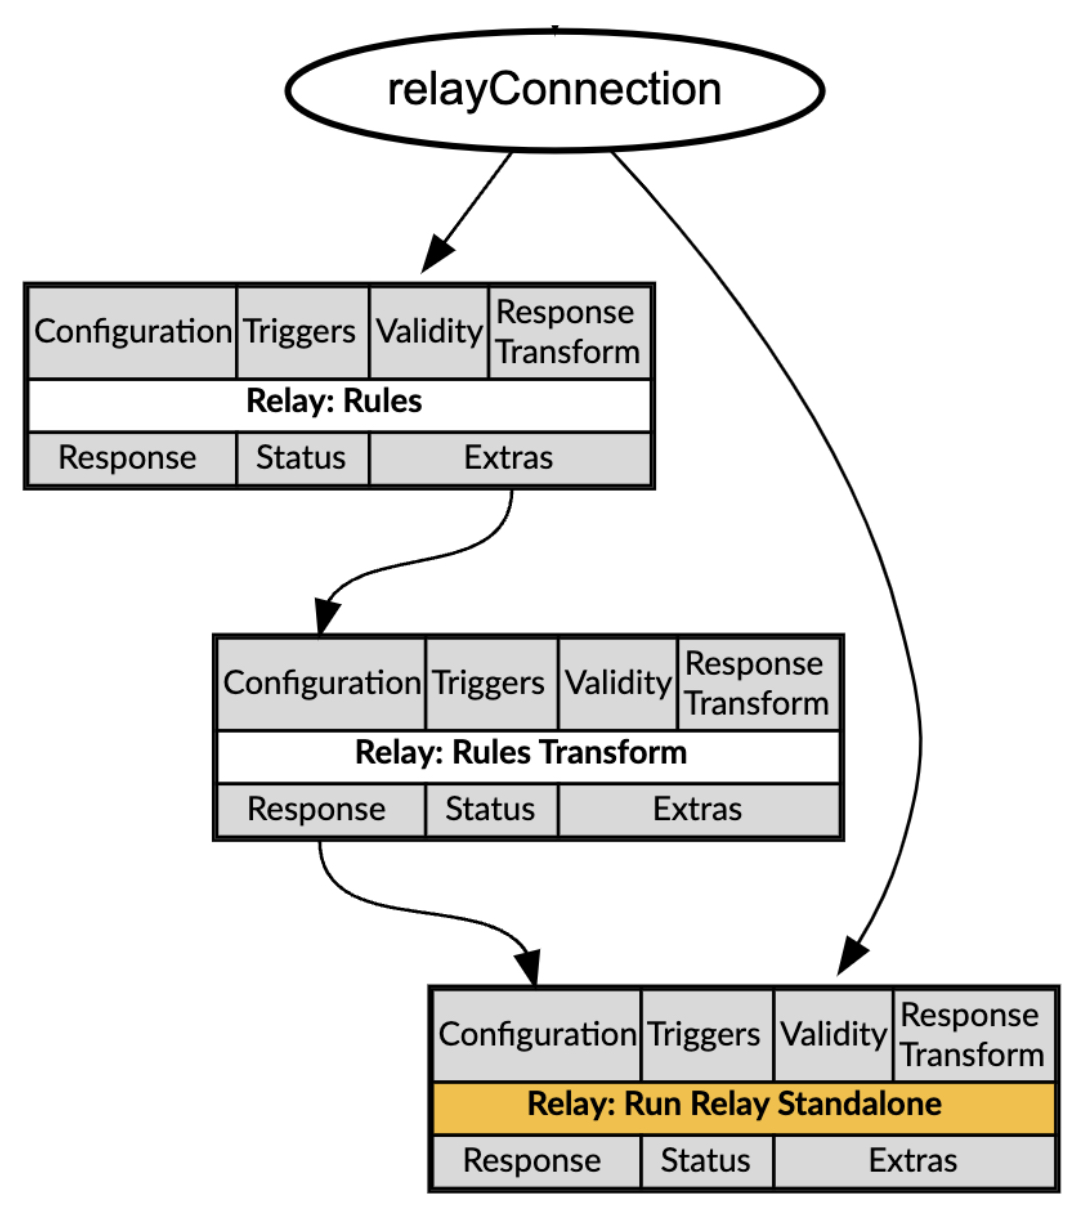
When the frontend calls Conscia's Experience API, it will pass one Context field:
- The
relayConnectionvalue, which is the name of a Connection. This will provide the Relay Component both its actual connection details and the rules by which the outgoing payload is populated.
An example call looks like this:
POST {{engineUrl}}/experience/components/_query
X-Customer-Code: {{customerCode}}
Authorization: Bearer {{dxEngineToken}}

{
  "componentCodes": ["relay"],
  "context": {
    "relayConnection": "relay-openai"
}
}
Based on the context provided, we will reach out to OpenAI with a pre-populated query ("Explain deep learning to a 5 year old."), and the LLM will respond:
{
  "duration": 6308,
  "components": {
    "relay": {
      "status": "VALID",
      "response": "Imagine your brain is like a big team of tiny helpers who work together to figure things out. Deep learning is like teaching a computer to have its own team of tiny helpers, called neurons, that work together to learn new things. Just like you learn by looking at stuff and practicing, the computer looks at lots of examples, practices a lot, and gets smarter over time."
    }
  },
  "errors": []
}
Microservice Configuration Details
For this recipe, we hosted the following Javascript application on Google Cloud, using Cloud Run. However, this is a "vanilla" JS application (using only common packages like Express and https) that can be hosted on any cloud or server.
The inputs to this application are detailed in the Relay Rules Component. To summarize the work performed, it will call apiUrl1 with apiBody1, headers, and an auth if provided via downstream-authorization. Once complete, it will substitute any response variables, then call the pollUrl every pollInterval until the response matches the doneRegex. Then, it will either GET apiUrl2, or POST apiUrl2 with apiBody2 depending on if apiBody2 was provided. The second API response is sent back to Conscia. Logging and error handling are present.
index.js
const express = require('express');
const axios = require('axios');
const https = require('https');

const logging = process.env.NODE_ENV !== 'production';

const log = (message) => {
    if (logging) {
        console.log(message);
    }
};

// Create a new HTTPS agent
const agent = new https.Agent({
    secureProtocol: 'TLSv1_2_method',
    rejectUnauthorized: false // Disable SSL certificate verification
});

const app = express();
app.use(express.json());

// Endpoint to receive requests from your program
app.post('/start-job', async (req, res) => {
    let { apiUrl1, apiBody1, headers, responseVariables, pollUrl, pollInterval, doneRegex, apiUrl2, apiBody2 } = req.body;

    if (req.headers['downstream-authorization']) {
        headers['authorization'] = req.headers['downstream-authorization'];
    }
    log("req.body: " + JSON.stringify(req.body));
    log("headers: " + JSON.stringify(headers));
    log("req.headers: " + JSON.stringify(req.headers));

    try {
        // Step 2: Make a request to API URL #1 to start a job
        const response1 = await axios.post(apiUrl1, apiBody1, {
            headers: { ...headers },
            httpsAgent: agent
        });
        log("response1: " + response1);

        // Step 3: Dynamically retrieve variables from the response
        const context = {};
        responseVariables.forEach(variable => {
            context[variable] = response1.data[variable];
            pollUrl = pollUrl.replace(`{!{${variable}}!}`, context[variable]);
            apiUrl2 = apiUrl2.replace(`{!{${variable}}!}`, context[variable]);
        });

        log("context: " + context);
        log("pollUrl: " + pollUrl);

        let pollResponse;
        const doneRegexObj = new RegExp(doneRegex);
        let isJobDone = false;

        while (!isJobDone) {
            await new Promise(resolve => setTimeout(resolve, pollInterval));

            pollResponse = await axios.get(pollUrl, { headers });

            log("pollResponse: " + JSON.stringify(pollResponse.data) + ", " + JSON.stringify(pollResponse.status) + ", " + JSON.stringify(pollResponse.headers));

            // Check the entire pollResponse for the key-value pair in doneRegex.
            if (doneRegexObj.test(JSON.stringify(pollResponse.data))) {
                isJobDone = true;
                log("isJobDone: " + isJobDone);
            }
        }

        // Step 4: Run API URL #2.
        let apiResponse2;
        if (apiBody2) {
            apiResponse2 = await axios.post(apiUrl2, apiBody2, {
                headers: { ...headers },
                httpsAgent: agent
            });
        } else {
            apiResponse2 = await axios.get(apiUrl2, {
                headers: { ...headers },
                httpsAgent: agent
            });
        }

        log("apiResponse2: " + JSON.stringify(apiResponse2.data) + ", " + JSON.stringify(apiResponse2.status) + ", " + JSON.stringify(apiResponse2.headers));
        res.status(apiResponse2.status).json(apiResponse2.data);

    } catch (error) {
        console.error('Error handling job request:', error);

        // Log detailed error information
        if (error.response) {
            console.error('Response data:', error.response.data);
            console.error('Response status:', error.response.status);
            console.error('Response headers:', error.response.headers);
            res.status(error.response.status).json({ error: error.response.data });
        } else if (error.request) {
            console.error('Request data:', error.request);
            res.status(500).json({ error: 'No response received from the server' });
        } else {
            console.error('Error message:', error.message);
            res.status(500).json({ error: 'An unexpected error occurred' });
        }
    }
});

// Start the server
const PORT = process.env.PORT || 8080;
app.listen(PORT, () => {
    log(`Microservice listening on port ${PORT}`);
});
package.json
{
  "name": "relay",
  "version": "1.0.0",
  "description": "",
  "main": "index.js",
  "scripts": {
    "start": "node index.js"
  },
  "repository": {
    "type": "git",
    "url": "git+https://github.com/conscia/relay.git"
  },
  "keywords": [],
  "author": "",
  "license": "ISC",
  "bugs": {
    "url": "https://github.com/conscia/relay/issues"
  },
  "homepage": "https://github.com/conscia/relay#readme",
  "dependencies": {
    "axios": "^1.7.7",
    "dotenv": "^16.4.5",
    "express": "^4.21.0"
  }
}
OpenAI Configuration Details
OpenAI Assistants are the API-only equivalent of Custom GPTs, which are web UI only. They cannot be accessed in a single-call Completion, instead being accessed via creation of a new threaded conversation. However, this allows us to unlock additional capabilties, such as adding additional back-and-forth to the dialog, redirecting a conversation to a more appropriate Assistant, and so on.
OpenAI API Key
On the OpenAI Platform API Keys page, create an API Key that allows for, at a minimum, "Assistants" and "Threads" write permissions.
OpenAI Assistant
On the OpenAI Platform Assistants Page, create an Assistant to receive the incoming request. The example today uses quite a simple and to-the-point Assistant:
| Field | Value |
|---|---|
| Name | Succinct Jimmy |
| System instructions | You're an educational service for extremely smart people. Give brief, technically-sound explanations. |
| Model | gpt-4o |
| Response format | text |
| Temperature | 1 |
| Tools | None |
Retain the API key and the Assistant ID you just generated. We will execute the remainder of the recipe in DX Engine.
DX Engine Configuration Details
The topics in this section explain how to implement the elements involved in this recipe.
Context Fields
We need to create a Context Field for managing Relay's Connection.
- Navigate to the Context Fields page (Manage Flows --> Context Fields).
- Click Add Context Field. The Create Context Field page appears.
- For Context Field Name, enter
relay-openai. - For Display Name, enter
Relay OpenAI. - Optionally, enter a Description for the Context Field.
- For Data Type, select String.
- Click Submit.
Secrets
We need to create a Secret to store the OpenAI API Key.
- Navigate to the Secrets page (Manage Flows --> Secrets).
- Click the + Add Secret button.
- Enter the following and click Submit:
| Field | Value |
|---|---|
| Secret Code | openAI |
| Secret Name | openAI (ChatGPT) Key |
| Secret Value | Enter your openAI API key. |
Connections
Relay OpenAI Connection
To create a Connection used to direct Relay to engage with OpenAI, in the DX Engine UI:
- Navigate to the Connections page (Manage Flows --> Components).
- Click the + Add Connection button.
- Enter the following and click Submit.
| Field | Value |
|---|---|
| Connection Code | relay-openai |
| Connection Name | Relay: OpenAI |
| Connector | Universal API Connector |
| Base URL | the url provided by the host of your microservice |
| Connection | Get value from: Literal DX Graph |
| Path | /start-job |
| Method | POST |
Components
Relay Rules Component
- Navigate to the Experience Components page (Manage Flows --> Components).
- Click the + Add Component button.
- Enter the following and click Submit.
| Field | Form Tab | Value |
|---|---|---|
| Component Code | Main | relay-rules |
| Component Name | Main | Relay Rules |
| No Rules | Main | Not Checked |
| Component Type | Main | Conscia - Metadata |
| Execution based on dependencies | Conditions | Skip on Failed Dependency Do not Skip on Skipped Dependency Skip on Invalid Dependency |
- Now, establish the following Experience Rule Attributes on the Attribute Definition tab:
| Attribute Name & Attribute Property | Attribute Description | Attribute Required | Type |
|---|---|---|---|
| apiUrl1 | The first API that Relay will call. | Required | Text |
| apiBody1 | The contents of the first call. | Required | Text |
| headers | Headers for all calls made by Relay. | Required | Text |
| responseVariables | Variables in subsequent Relay URLs. Write them like this when in use: /check-status/{!{job-id}!}/ | Not Required | Text |
| pollUrl | The URL we will poll to. | Required | Text |
| pollInterval | The interval at which Relay will poll, in ms. | Not Required | Number - default 1000 |
| doneRegex | The regex which we will match against the poll response. | Required | Text |
| apiUrl2 | The second API we call, once the pollUrl matches doneRegex. | Required | Text |
| apiBody2 | The second API call's body. If absent, Relay will GET; if present, Relay will POST. | Not Required | Text |
Relay Rules Transform Component
- Navigate to the Experience Components page (Manage Flows --> Components).
- Click the + Add Component button.
- Enter the following and click Submit.
| Field | Form Tab | Value |
|---|---|---|
| Component Code | Main | relay-rules-transform |
| Component Name | Main | Relay Rules Transform |
| No Rules | Main | Checked |
| Component Type | Main | Conscia - Data Transformation Script |
| Execution based on dependencies | Conditions | Skip on Failed Dependency Do not Skip on Skipped Dependency Skip on Invalid Dependency |
| Data to modify | Main | Get value from: JS ExpressioncomponentExtras('relay-rules').rule.attributes |
| Script | Main | Below: |
function isJSON(str) {
    try {
        JSON.parse(str);
        return true;
    } catch (e) {
        return false;
    }
};


var retval = Object.entries(data).reduce((acc, [key, value]) => {
    acc[key] = isJSON(value) ? JSON.parse(value) : value;
    return acc;
}, {});

retval = retval;
Relay Standalone Run Component
- Navigate to the Experience Components page (Manage Flows --> Components).
- Click the + Add Component button.
- Enter the following and click Submit.
| Field | Form Tab | Value |
|---|---|---|
| Component Code | Main | relay |
| Component Name | Main | Relay: Run Relay Standalone |
| Component Description | Main | Run Relay once, making polling calls to third party endpoints. |
| No Rules | Main | Not Checked |
| Component Type | Main | Conscia - Universal API Connector |
| Connection | Main | Get value from: JS Expression `contextField('relayConnection') |
| Body | Main | Get value from: Component Response - Relay: Rules Transform |
| Response Transform | Main | response.data[0].content[0].text.value |
Experience Rules
Experience Rules for Relay to OpenAI LLM
- Navigate to the Omnichannel Experience Rules page (Manage Experiences --> Experience Rules).
- Navigate to your Relay: Rules Component under All Components.
- Click the + Add Experience Rule button.
- Enter the following and click Submit.
| Field | Form Tab | Value |
|---|---|---|
| Rule ID | Main | openAI |
| Rule Name | Main | openAI |
| Priority | Main | 10 |
| Active | Experience | Checked |
| Real-time Context Evaluation | Experience | relayConnection is equal to (=) relay-openai |
| apiUrl1 Attribute | Experience | https://api.openai.com/v1/threads/runs |
| apiBody1 Attribute | Experience | Below |
| headers Attribute | Experience | { "OpenAI-Beta": "assistants=v2", "Content-Type": "application/json" } |
| responseVariables Attribute | Experience | ["thread_id", "id"] |
| pollUrl Attribute | Experience | https://api.openai.com/v1/threads/{!{thread_id}!}/runs/{!{id}!} |
| pollInterval Attribute | Experience | 300 |
| doneRegex Attribute | Experience | `(completed |
| apiUrl2 Attribute | Experience | https://api.openai.com/v1/threads/{!{thread_id}!}/messages |
| apiBody2 Attribute | Experience | blank |
apiBody1:
{
  "assistant_id": "asst_lECeouTchuK22F5nuH43Kbwk",
  "thread": {
    "messages": [
      {
        "role": "user",
        "content": "Explain deep learning to a 5 year old."
      }
    ]
  }
}
Extending the Recipe
From this point, we could extend the recipe to allow Relay to engage with a second remote system by creating and populating a new Connection, and then creating an Experience Rule that populates the payload when that connection is provided in context. It could even be a very similar or identical set of connection attrbutes, but interacting with a different Assistant or sending a different message across.
A trivial modification to the recipe would enable the response body to be delivered from a contextField instead of from an Experience Rule, allowing a "choose-your-own-adventure" interface to any remote endpoint.
Finally, modifications to the microservice, such as creating a second function that could be called, can enable even more complex behaviours such as call-poll-poll-call, call-stream-return, or even circular or tree-traversing workflows where a function calls itself or another microservice.