Process Pricelists with DX Engine
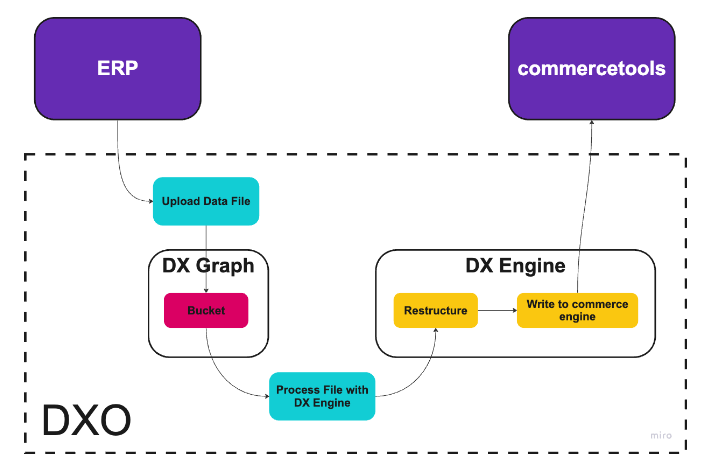
This recipe uses the processFileWithDxEngine Job to take price data from a DX Graph Bucket and process it with DX Engine. We are imagining our ERP is the source of truth for our product data, including pricelists, and we want to sync this data into our commerce engine.
Overall Orchestration Approach
In this scenario, our ERP is not accessible via API and the data files need to be exported and dropped into a DX Graph Bucket either manually or through a service. Once in the Bucket, a processFileWithDxEngine Job runs on a scheduled basis to send the data to DX Engine record-by-record. The DX Engine Orchestration Template then transforms the data into the schema required by commercetools and calls the commercetools API to create new account-based prices for the products.
The steps look like this:
Preconditions:
- Create incoming bucket (Working with Data Buckets)
- Upload pricelist file into DX Graph (Uploading Files into Buckets)
- Create products in commercetools
Recipe:
- Create Job definition to process file with DX Engine
- Create an Orchestration Component to restructure the data
- Create an Orchestration Component to write the data to commercetools
The overall orchestration approach:

DX Graph Job - Process File with DX Engine
This recipe begins with the assumption that a file with prices by account for our products is sitting in a DX Graph Bucket ready to process. We assume the file includes data like this:
{"price_id": "p_001", "product_id": "2001", "account": "default", "price": 1499.99, "currency": "USD"}
{"price_id": "p_002", "product_id": "2001", "account": "acct_abc", "price": 1450.00, "currency": "USD"}
{"price_id": "p_003", "product_id": "2001", "account": "acct_xyz", "price": 1475.00, "currency": "USD"}
...
With a data file sitting in a Bucket in DX Graph, we can use the Process File with DX Engine job type to bring it into DX Engine where we will do some transformation of the data before sending it to our commerce engine for syncing.
In our scenario it’s more efficient to do all the required transformation and schema remodeling on the fly through DX Engine. But say we have business users who need to manually fix up or enrich the data, then we would want to import the data into a DX Graph Collection, performing the required transformations on import, where it can be stored and manipulated, and use the Process Collection with DX Engine job type to sync it up with our commerce engine.
Let's create a Job definition:
POST {{engineUrl}}/vue/_api/v1/job-definitions
content-type: application/json
Authorization: Bearer {{apiKey}}
X-Customer-Code: {{customerCode}}

{
  "jobDefinition": {
    "jobDefinitionCode": "process-erp-prices-to-engine",
    "jobType": "processFileWithDxEngine",
    "name": "Process ERP Prices File with DX Engine",
    "schedule": { "cron": "0 0 12 * * MON" }, // Mondays at 12pm
    "params": {
        "dataBucketCode": "incoming",
        "filename": "erp_pricelist.jsonl",
        "environmentCode": "demo",
        "token": "{{dxEngineToken}}",
        "templateCode": "sync-commerce-prices",
        "context" : {
            "data" : "`records[0]`"
        }
    }
  }
}
The records themselves are passed through the context property to DX Engine. Here we pass the entire record, noting records is an array, so we only want the first record of this batch.
There is also a batch parameter which defaults to 1. We will be sticking with the default because we are sending updates to our commerce engine record by record and not in batches. However you could also send the records in batches to DX Engine and use Sub Components to iterate through the records to transform and send data to the commerce engine.
It is important to note that this job does not move or delete the file from the Bucket after processing. The file will be overwritten if you upload another file of the same name, however. You may also wish to implement a Bucket clean up process.
To execute the job after you've created the required Orchestration Template and Components, use the jobDefinitionCode in the path of this call:
POST {{engineUrl}}/vue/_api/v1/job-definitions/process-erp-prices-to-engine/_execute
This will return a single Job ID. If you call GET Job with this ID, you will get a list of all the spawned Job IDs. Call GET Job on any one of those spawned Jobs, and you will see the full response from the DX Engine Template.
DX Engine Steps
In order to execute the Job, we need to create one Template and four Components. Yes, four Components!

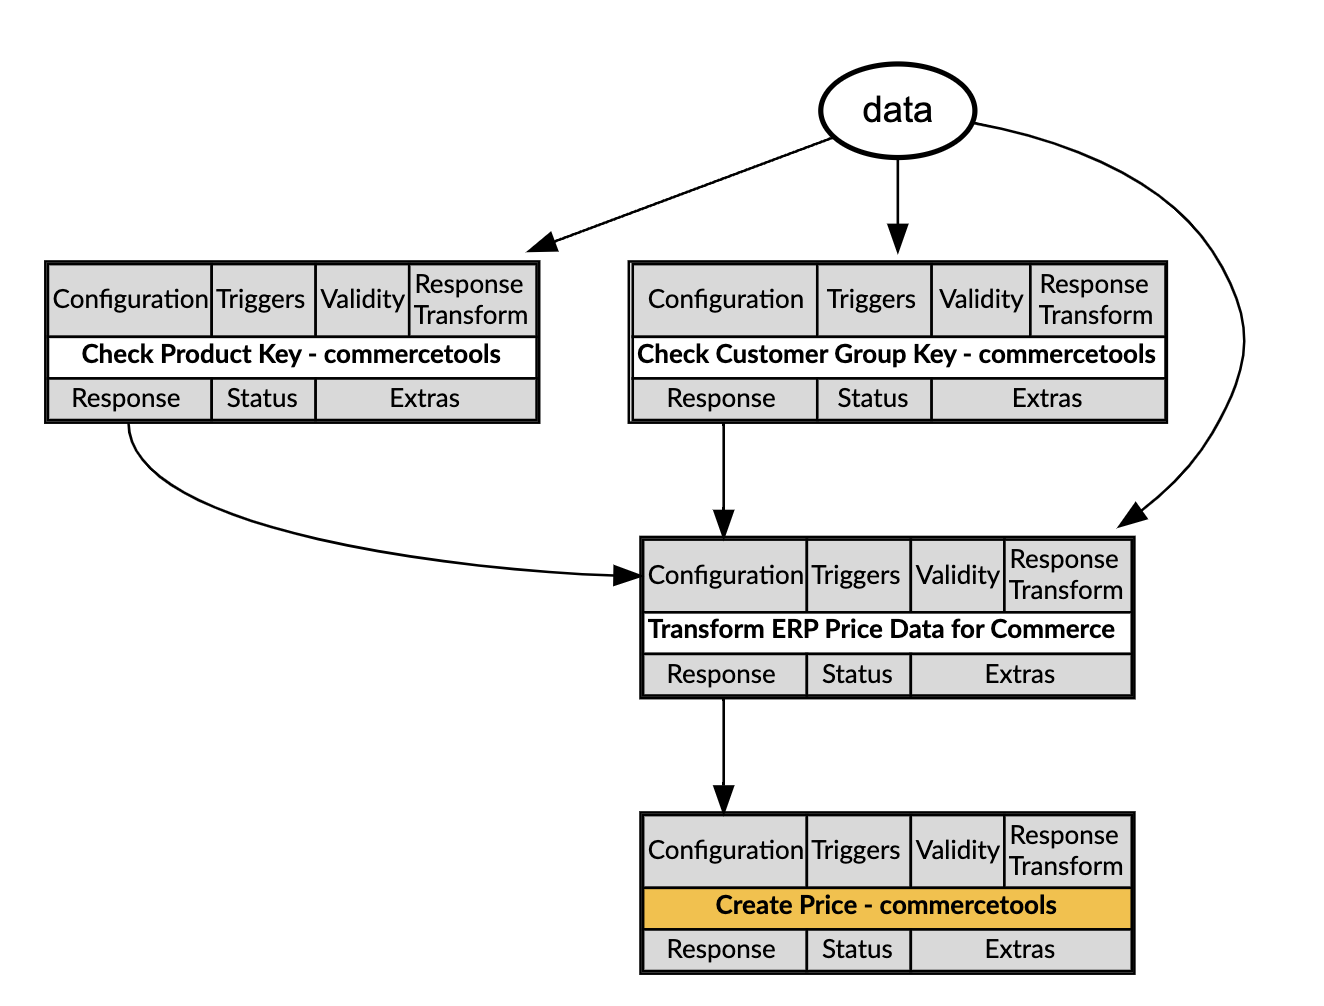
As you can see from the Visualizer diagram, the record data is passed into DX Engine as Context.
In order to create the payload for a Create Standalone Price call to commercetools, we need information that isn't available from our ERP data file -- like the product sku and the customer group ID. We need to look that information up in commercetools first. Thus the Check Product and Check Customer Group calls.
- Check Product Key - commercetools : This Component takes the ERP's product ID, which is stored in commercetools as the Product key, and requests the Product record.
- Check Customer Group Key - commercetools : This Component takes the ERP's account code, which is stored in commercetools as the Customer Group key, and requests the Customer Group record.
- Transform ERP Price Data for Commerce : This is an Object Mapper Component that takes these three sources of data (Context
data; Check Product Key response; Check Customer Group Key response) and merges just the required fields into a single response. - Create Price - commercetools : This Component takes the response from the Transform Component and passes it as the payload to commercetools to create a new Standalone Price for our products by account.
Secrets
DX Graph Token Secret
To create a Secret used to store your DX Graph token, in the DX Engine UI:
- Navigate to the Secrets page (Manage Flows --> Secrets).
- Click the + Add Secret button.
- Enter the following and click Submit:
| Field | Value |
|---|---|
| Secret Code | dxgraph-token |
| Secret Name | DX Graph Token |
| Secret Value | Enter your DX Graph token. |
commercetools Secret
To create a Secret used to store your DX Graph token, in the DX Engine UI:
- Navigate to the Secrets page (Manage Flows --> Secrets).
- Click the + Add Secret button.
- Enter the following and click Submit:
| Field | Value |
|---|---|
| Secret Code | commercetools-token |
| Secret Name | Commercetools Token |
| Secret Value | Enter your commercetools client credential. |
Connections
Connection to DX Graph
- Navigate to the Connections page (Manage Flows --> Connections).
- Click the + Add Connection button.
- Enter the following and click Submit:
| Field | Value |
|---|---|
| Connection Code | dxgraph-connection |
| Connection Name | DX Graph Connection |
| Connector | Dx Graph |
| Conscia Endpoint | {{server}} |
| API Key | Get value from: Secret DX Graph Token |
| Customer Code | {{customerCode}} |
Connection to commercetools
- Navigate to the Connections page (Manage Flows --> Connections).
- Click the + Add Connection button.
- Enter the following and click Submit:
| Field | Value |
|---|---|
| Connection Code | commercetools-connection |
| Connection Name | commercetools Connection |
| Connector | Universal API Connector |
| Base URL | Get value from: Literal https://api.us-central1.gcp.commercetools.com/{commercetools-project-id} |
| Base Headers | Header: Authorization Value: Get value from: JS Expression |
commerceTools.generateToken(
'us-central1.gcp',
'{commercetools-project-id}',
'{commercetools-client}',
secret('commercetools-token'))
.then(token => 'Bearer ' + token)
Components
Configure the Check Product Key Component
- Navigate to the Experience Components page (Manage Flows --> Components).
- Click the + Add Component button.
- Enter the following and click Submit.
| Field | Form Tab | Value |
|---|---|---|
| Component Code | Main | check-product-key-commercetools |
| Component Name | Main | Check Product Key - commercetools |
| No Rules | Main | Checked |
| Component Type | Main | Conscia - Universal API Connector |
| Connection | Main | commercetools Connection |
| Webservice Path | Main | Get value from: JS Expression/products/key=${contextField('data').product_id} |
| Method | Main | GET |
Configure the Check Customer Group Key Component
- Navigate to the Experience Components page (Manage Flows --> Components).
- Click the + Add Component button.
- Enter the following and click Submit.
| Field | Form Tab | Value |
|---|---|---|
| Component Code | Main | check-customergroup-commercetools |
| Component Name | Main | Check Customer Group Key - commercetools |
| No Rules | Main | Checked |
| Component Type | Main | Conscia - Universal API Connector |
| Connection | Main | commercetools Connection |
| Webservice Path | Main | Get value from: JS Expression/customer-groups/key=${contextField('data').account} |
| Method | Main | GET |
Configure the Transform ERP Price Data Component
- Navigate to the Experience Components page (Manage Flows --> Components).
- Click the + Add Component button.
- Enter the following and click Submit.
| Field | Value |
|---|---|
| Component Code | transform-erp-price-data |
| Component Name | Transform ERP Price Data for Commerce |
| No Rules | Checked |
| Component Type | Conscia - Object Mapper |
Under the Object Maps section of the form click the + button to add three new Object Maps to create the payload schema required for the Create Price call.
| Field | Value |
|---|---|
| Source Data | Get value from: Component ResponseCheck Product Key - commercetools |
| Expression Type | JMESPath |
| Schema | sku = masterData.current.masterVariant.sku |
| Field | Value |
|---|---|
| Source Data | Get value from: JS Expression_.assign({},{"record": contextField('data')}) |
| Expression Type | JavaScript |
| Schema | value [object]: currencyCode = data.record.currency centAmount = _.ceil(data.record.price * 100) |
| Field | Value |
|---|---|
| Source Data | Get value from: Component ResponseCheck Customer Group Key - commercetools |
| Expression Type | JMESPath |
| Schema | customerGroup [object]: typeId = 'customer-group' id = id |
Configure the Create Price Component
- Navigate to the Experience Components page (Manage Flows --> Components).
- Click the + Add Component button.
- Enter the following and click Submit.
| Field | Form Tab | Value |
|---|---|---|
| Component Code | Main | create-price-commercetools |
| Component Name | Main | Create Price - commercetools |
| No Rules | Main | Checked |
| Component Type | Main | Conscia - Universal API Connector |
| Connection | Main | commercetools Connection |
| Webservice Path | Main | Get value from: Literal/standalone-prices |
| Method | Main | POST |
| Webservice Path | Main | Get value from: Component ResponseTransform ERP Price Data for Commerce |
Templates
Configure the ERP-Commerce Price Data Sync Template
To create a Template that will be called by the Process File with DX Engine Job, in the DX Engine UI:
- In the top navigation, click Manage Experience, and then click Templates. The Manage Templates page appears.
- Click Add Template. The Create Template page appears.
- For Experience Template Code, enter an identifier for the Template:
customerId. - For Name, enter a friendly name for the Template:
customerId. - Optionally, enter a Description for the Template.
- Under Experience Components, click Add another item.
- From the dropdown, select
create-price-commercetools. - Click Submit.
What's Next
This recipe only covers the straightforward scenario of adding fresh, new prices. It assumes the prices don't exist. For a first load, this is fine. But going forward, you will undoubtedly be updating these prices. To do this, you'll need to extend the Orchestration flow to check if the price exists for that combination of sku and customer group, and then based on that response, either call a Create or Update endpoint.
If the Create or Update responses are a success, you may also want to make a call to DX Graph to delete the data file from the bucket.