CPQ (Configure, Price, Quote) Core Capabilities (Configurator)
This recipe uses DX Engine and DX Graph to provide an entry point for CPQ (Configure, Price and Quote) capabilities common in custom products, B2B/B2B2C use cases, and more. The product in this example is a custom couch, whose options we will populate in DX Graph and access from DX Engine. Prices are cumulative, with some options adding to the total cost, and others reducing it. Logic for the flow through elements lives in DX Engine.
The essential pattern is that the customers' choices at each step in the process are persisted in the context, and based on that context the appropriate options for the next step are presented. Steps can be taken out of order. When the customer's context includes selections for all options, the endpoint becomes a validator, ensuring that each component is mutually compatible with the others.
Mapping Out DX Engine Elements
When the frontend calls Conscia's Experience API, it will pass between zero and three context objects:
couch-size, an object that describes a selected couch format;couch-fabric, an object that describes a selected couch covering; andcouch-color, an object that describes a pattern applied to the couch.
Each has the same basic structure - an ID, a name and description, a price, and arrays of compatible IDs from the other two attributes.
In the default case, these would be supplied and selected in that order (size, fabric, color).
- A blank request returns an array of
couch-sizes - A request with
couch-sizereturns an array ofcouch-fabrics - A request with
couch-sizeandcouch-fabricreturns an array ofcouch-colors.
Of course, the logic holds if a customer is not following the "configuration wizard" sequence but jumping forward and back in the hypothetical page:
- A request with
couch-fabric,couch-coloror both returns an array ofcouch-sizes, - A request with
couch-sizeandcouch-colorreturns an array ofcouch-fabrics.
An example call looks like this:
POST {{engineUrl}}/experience/components/_query
X-Customer-Code: {{customerCode}}
Authorization: Bearer {{dxEngineToken}}

{
  "componentCodes": ["couch-cpq"],
  "context": {
    "couch-size": {
            "sizeId": "2",
            "sizeName": "Full-Size Couch",
            "description": "A standard three-seater.",
            "price": 600,
            "size-to-color": [ "2", "4", "1" ],
            "size-to-fabric": [ "2", "1", "3" ]
          }
  }
}
Following the sequence above, the response would be an array of valid fabrics:
"response": {
  "couch-fabrics": [
    {
      "fabricId": "2",
      "fabricName": "Polyester",
      "description": "A low-cost option.",
      "price": -125,
      "fabric-to-size": [ "2", "1", "3" ],
      "fabric-to-color": [ "1", "3", "4" ]
    },
    {
      "fabricId": "3",
      "fabricName": "Leather",
      "description": "A high-end option.",
      "price": 300,
      "fabric-to-size": [ "2", "3" ],
      "fabric-to-color": [ "2", "1" ]
    },
    {
      "fabricId": "1",
      "fabricName": "Woven Cotton",
      "description": "A nice, hard-wearing fabric.",
      "price": 0,
      "fabric-to-size": [ "1", "2", "3" ],
      "fabric-to-color": [ "1", "2", "3", "4" ]
    }
  ]
}
DX Graph Configuration Details
The topics in this section explain populating the product attribute data, including relationships between entries.
Data Models and Schema
Data Model for Couch Size
- Navigate to the Data Model page (Manage Flows --> Data Model).
- Click the + (Create Data Collection) button.
- Enter the followign and click Submit.
| Field | Value |
|---|---|
| Name | Couch Size |
| Data Collection Code | couch-size |
| Description | Sizes of Couches |
| Unique ID for Record | sizeId |
Schema for Couch Size
- Right-click the new "Couch Size" Data Model, and select Edit --> Edit Schema. Introduce the following schema:
| Field Name | Field Type | Display Name | Settings |
|---|---|---|---|
| sizeId | TEXT field | Size ID | Required Not Read-Only Unique |
| price | NUMBER field | Price | Not Required Not Read-Only Not Unique |
| sizeName | TEXT field | Size Name | Not Required Not Read-Only Not Unique |
| description | TEXT field | Description | Not Required Not Read-Only Not Unique |
Data Model for Couch Fabric
- Navigate to the Data Model page (Manage Flows --> Data Model).
- Click the + (Create Data Collection) button.
- Enter the followign and click Submit.
| Field | Value |
|---|---|
| Name | Couch Fabric |
| Data Collection Code | couch-fabric |
| Description | Fabrics of Couches |
| Unique ID for Record | fabricId |
Schema for Couch Fabric
- Right-click the new "Couch Fabric" Data Model, and select Edit --> Edit Schema. Introduce the following schema:
| Field Name | Field Type | Display Name | Settings |
|---|---|---|---|
| fabricId | TEXT field | Fabric ID | Required Not Read-Only Unique |
| price | NUMBER field | Price | Not Required Not Read-Only Not Unique |
| fabricName | TEXT field | Fabric Name | Not Required Not Read-Only Not Unique |
| description | TEXT field | Description | Not Required Not Read-Only Not Unique |
Data Model for Couch Color
- Navigate to the Data Model page (Manage Flows --> Data Model).
- Click the + (Create Data Collection) button.
- Enter the followign and click Submit.
| Field | Value |
|---|---|
| Name | Couch Color |
| Data Collection Code | couch-color |
| Description | Colors of Couches |
| Unique ID for Record | colorId |
Schema for Couch Color
- Right-click the new "Couch Color" Data Model, and select Edit --> Edit Schema. Introduce the following schema:
| Field Name | Field Type | Display Name | Settings |
|---|---|---|---|
| colorId | TEXT field | Color ID | Required Not Read-Only Unique |
| price | NUMBER field | Price | Not Required Not Read-Only Not Unique |
| colorName | TEXT field | Color Name | Not Required Not Read-Only Not Unique |
| description | TEXT field | Description | Not Required Not Read-Only Not Unique |
Relationships
Now that we have instantiated data models with schema, we can relate them to one another.
1-to-Many Relationships for Couch Size
- Right-click the "Couch Size" Data Model, and select Edit --> Edit Relationships. Introduce the following 1-to-Many Relationships:
| Lookup Key | Display Name | Data Repository & Data Collection | Display Field | Display Options |
|---|---|---|---|---|
| size-to-fabric | Size to Fabric | Master Content - > Couch Fabric | Fabric Name | Orderable, Addable, Removable |
| size-to-color | Size to Color | Master Content - > Couch Color | Color Name | Orderable, Addable, Removable |
1-to-Many Relationships for Couch Fabric
- Right-click the "Couch Fabric" Data Model, and select Edit --> Edit Relationships. Introduce the following 1-to-Many Relationships:
| Lookup Key | Display Name | Data Repository & Data Collection | Display Field | Display Options |
|---|---|---|---|---|
| fabric-to-size | Fabric to Size | Master Content - > Couch Size | Size Name | Orderable, Addable, Removable |
| fabric-to-color | Fabric to Color | Master Content - > Couch Color | Color Name | Orderable, Addable, Removable |
1-to-Many Relationships for Couch Color
- Right-click the "Couch Color" Data Model, and select Edit --> Edit Relationships. Introduce the following 1-to-Many Relationships:
| Lookup Key | Display Name | Data Repository & Data Collection | Display Field | Display Options |
|---|---|---|---|---|
| color-to-size | Color to Size | Master Content - > Couch Size | Size Name | Orderable, Addable, Removable |
| color-to-fabric | Color to Fabric | Master Content - > Couch Fabric | Fabric Name | Orderable, Addable, Removable |
Source Data
Sample Sizes
Sample Fabrics
Sample Colors
The .csv files, linked above, were used for this recipe. In order to give examples of choices being reduced and combinations becoming invalid, the following relationships are represented:
- As is common for custom couch manufacturers, a seasonal Valentines Day "Snuggle Up" print is available for a limited time only. This print can't be printed on leather, and it only makes sense when printed on the chaise section of a couch, or on a snuggly loveseat - three-seater sofas are out.
- Leather is only available in Brown and Black. It's also a premium option, not available on the price-conscious loveseat.
- Due to sheen, Polyester fabric is not available in black.

Data Upload
To set up the ingestion of the csv file, the following tasks were performed:
- In a Postman client using the Conscia Postman Collection, run Bucket --> "Upload files to a Bucket" with the following qualities:
- dataBucketCode:
incoming - Body type:
form-data - Key file[], of type File, with values
cpq-size-data.csv,cpq-fabric-data.csvandcpq-color-data.csv.
- dataBucketCode:
- In Postman, run Bucket --> "Analyze a file in a Bucket" with the following qualities:
- dataBucketCode:
incoming - Body type:
JSON - The following body text, substituting
[attribute]for size, fabric and color:
- dataBucketCode:
{
    "filename": "cpq-[attribute]-data.csv",
    "sourceSchema": {
        "type": "object",
        "properties": {
            "[attribute]Id": {
                "type": "string"
            },
            "price": {
                "type": "number"
            },
            "[attribute]Name": {
                "type": "string"
            },
            "description": {
                "type": "string"
            }
        },
        "required": [
            "[attribute]id"
        ]
    },
    "recordIdentifierField": "[attribute]id",
    "parseOptions": {
        "format": "DELIMITED",
        "delimiter": ",",
        "quoteChar": "\"",
        "escapeChar": "\""
    },
    "collectionCode": "couch-[attribute]",
    "transformers": []
}
We should see nbrFinalRecords equal 3, 3 and 4 with nbrIssues at 0.
- In Postman, run Bucket--> "Import files in a Bucket into a Collection" with the following qualities:
- dataBucketCode: incoming
- Body type: JSON
- The following body text, again subtituting
[attribute]for size, fabric and color:
{
  "skippedBucketCode": "skipped",
  "processedBucketCode": "processed",
  "invalidBucketCode": "invalid",
  "filenamePattern": "cpq-[attribute]-data.csv",
  "skipInvalidRecords": false,
    "sourceSchema": {
        "type": "object",
        "properties": {
            "[attribute]Id": {
                "type": "string"
            },
            "price": {
                "type": "number"
            },
            "[attribute]Name": {
                "type": "string"
            },
            "description": {
                "type": "string"
            }
        },
        "required": [
            "[attribute]Id"
        ]
    },
    "recordIdentifierField": "[attribute]Id",
    "parseOptions": {
        "format": "DELIMITED",
        "delimiter": ",",
        "quoteChar": "\"",
        "escapeChar": "\""
    },
    "collectionCode": "couch-[attribute]",
    "transformers": []
}
We should see nbrValidRecords equal 3, 3 and 4 with nbrValidationIssues at 0.
-
Add the new Collection to the navigation menu:
- Navigate to the Left Navigation page (Manage Flows --> Left Navigation).
- Select Left Nav - Sources.
- Select Create Record (button with three boxes and an asterisk, top-right)
- Set the following values:
Field Value Order any unique integer Label CPQ Active Checked Content Collection Add three items Content Collection Label Couch Size Data Repository Master Content Content Data Collection Couch Size Content Collection Label Couch Fabric Data Repository Master Content Content Data Collection Couch Fabric Content Collection Label Couch Color Data Repository Master Content Content Data Collection Couch Color -
Visit each Couch CPQ page (Collections --> Sources --> CPQ) and validate the row count is correct (3, 3 and 4) and the csv contents are successfully imported.
We will execute the remainder of the recipe in DX Engine.
DX Engine Configuration Details
The topics in this section explain how to implement the elements involved in this recipe.
Secrets
DX Graph Secret
To create a Secret used to store the DX Graph Offline Token in the DX Engine UI:
- Navigate to the Secrets page (Manage Flows --> Secrets).
- Click the + Add Secret button.
- Enter the following and click Submit:
| Field | Value |
|---|---|
| Secret Code | dxgraph |
| Secret Name | DX Graph |
| Description | Specify the customer code this will connect to |
| Secret Value | Enter your DX Graph Offline Token, generated via the Conscia Postman Collection. |
Connections
Connection to DX Graph
- Navigate to the Connections page (Manage Flows --> Connections).
- Click the + Add Connection button.
- Enter the following and click Submit:
| Field | Value |
|---|---|
| Connection Code | dx-graph |
| Connection Name | DX Graph Connection |
| Connector | DX Graph |
| Conscia Endpoint | Staging |
| API Key | **Get value from:**Secret DX Graph |
| Customer Code | the relevant customer code |
Components
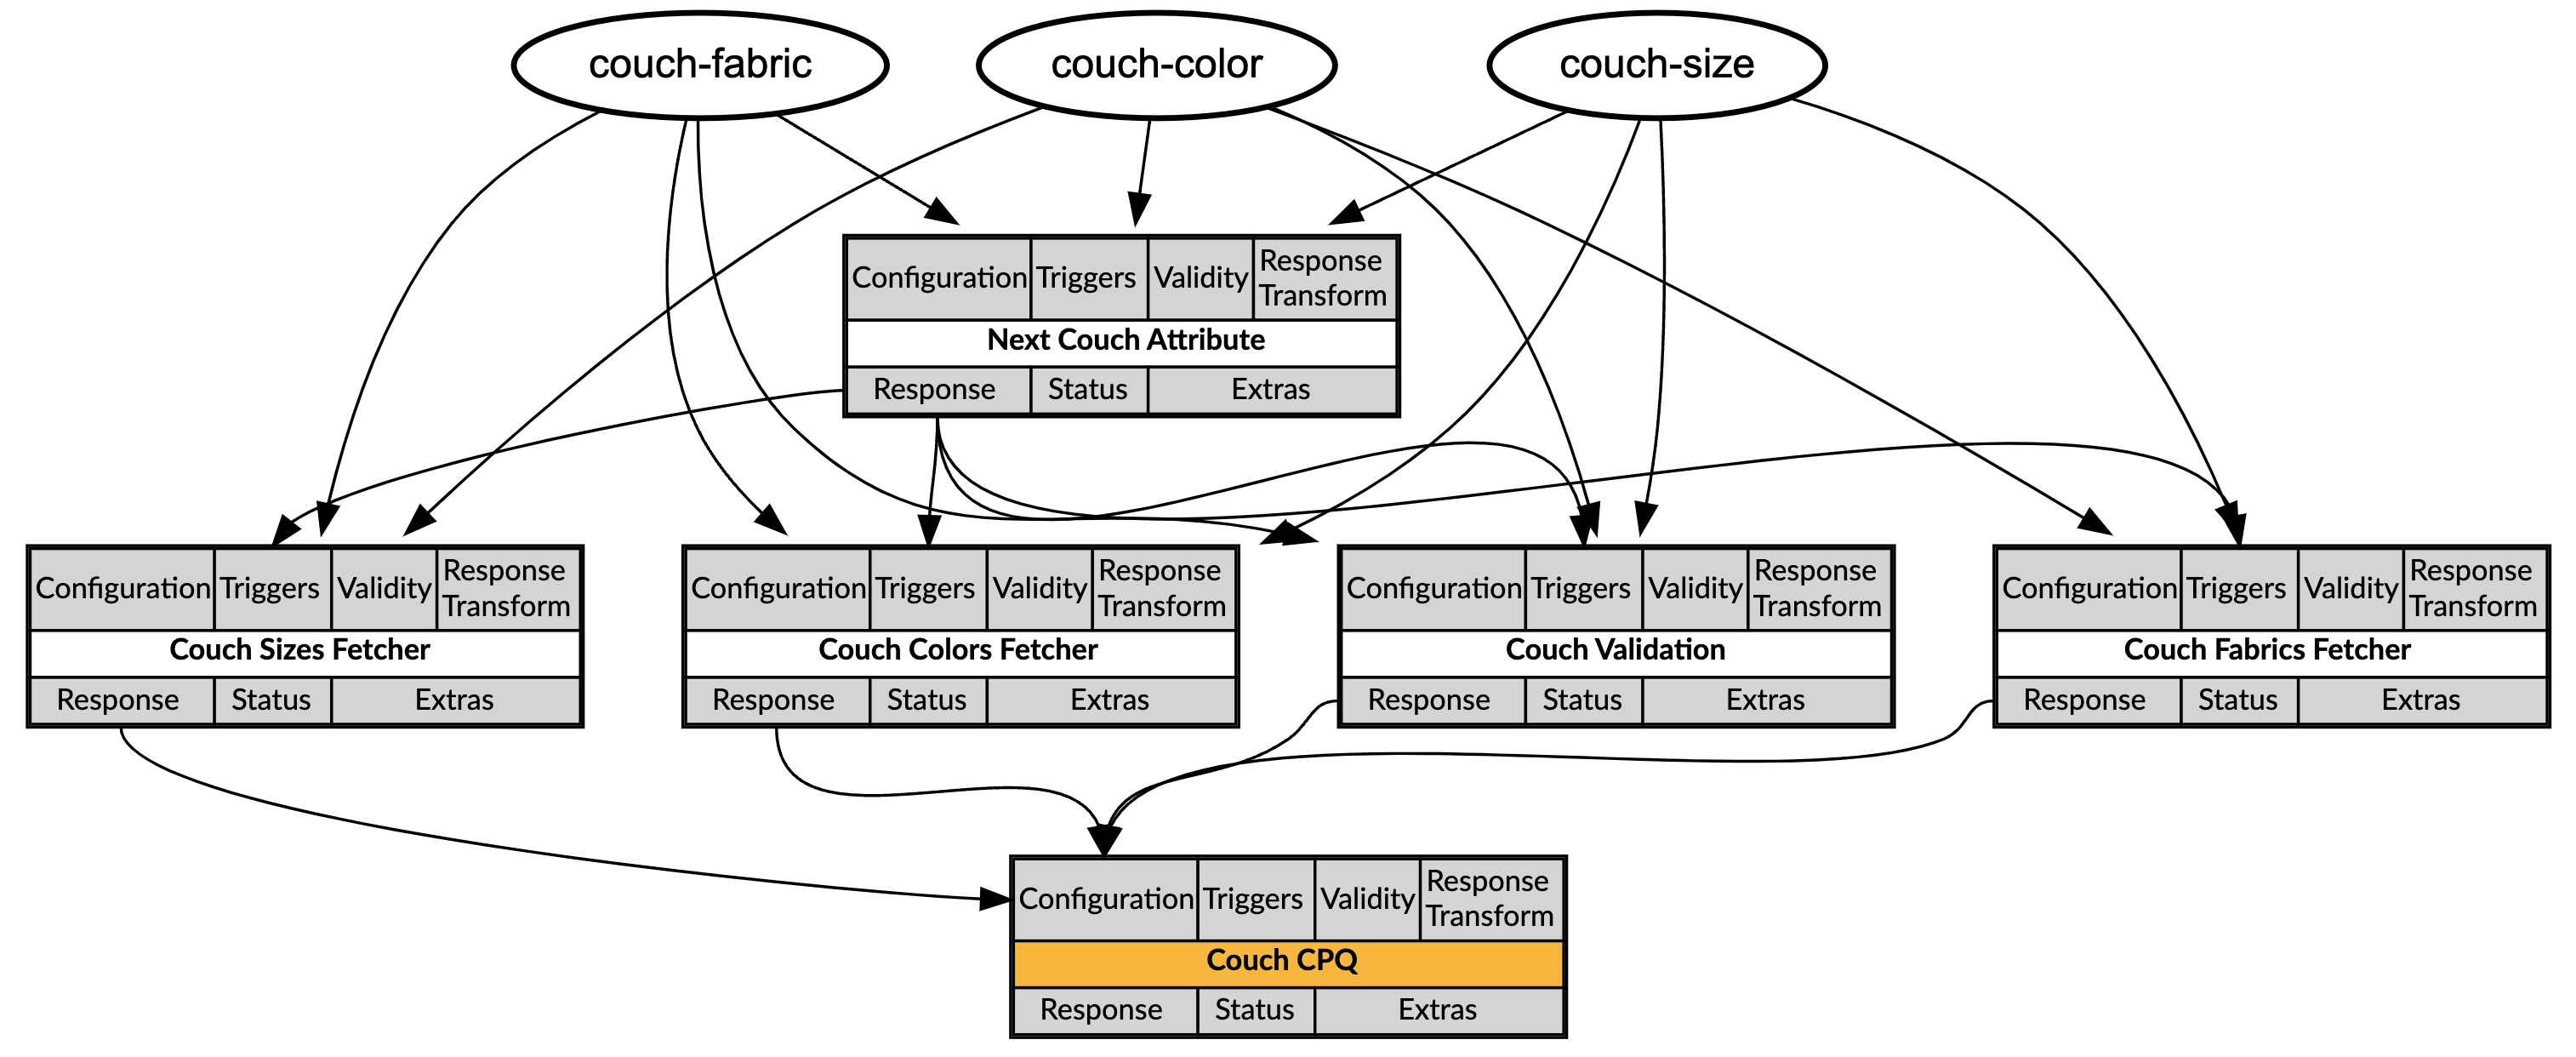
Component to Determine the Next Couch Attribute to Display
- Navigate to the Experience Components page (Manage Flows --> Components).
- Click the + Add Component button.
- Enter the following and click Submit.
| Field | Form Tab | Value |
|---|---|---|
| Component Code | Main | next-couch-attribute |
| Component Name | Main | Next Couch Attribute |
| Description | Main | A Component to select the correct Couch Attribute. |
| No Rules | Main | Checked |
| Component Type | Main | Conscia - Metadata |
| Response Transform | Main | below |
(!contextField('couch-size') ? "Size" : (!contextField('couch-fabric') ? "Fabric" : (!contextField('couch-color') ? "Color" : "Validation" )))
Component to fetch Couch Sizes from DX Graph
- Navigate to the Experience Components page (Manage Flows --> Components).
- Click the + Add Component button.
- Enter the following and click Submit.
| Field | Form Tab | Value |
|---|---|---|
| Component Code | Main | couch-sizes-fetcher |
| Component Name | Main | Couch Sizes Fetcher |
| No Rules | Main | Checked |
| Component Type | Main | DX Graph - Dynamic Record List |
| Connection | Main | Get value from: Literal DX Graph |
| Collection ID | Main | Sizes of Couches |
| Response Transform | Main | response.map(obj => _.pick(obj, ['sizeId','sizeName','description','price','size-to-color','size-to-fabric'])); |
| Query Filter | Main | Get value from: JS Expression (below) |
| Trigger Expression | Conditions | componentResponse('next-couch-attribute') == "Size" |
JSON.stringify(
  {"$and": [
  contextField('couch-fabric') ? {"$in": {"field": "size-to-fabric", "value": [contextField('couch-fabric').fabricId]}} : {}
  ,
  contextField('couch-color') ? {"$in": {"field": "size-to-color", "value": [contextField('couch-color').colorId]}} : {}
  ]}
)
Component to fetch Couch Fabrics from DX Graph
- Navigate to the Experience Components page (Manage Flows --> Components).
- Click the + Add Component button.
- Enter the following and click Submit.
| Field | Form Tab | Value |
|---|---|---|
| Component Code | Main | couch-fabrics-fetcher |
| Component Name | Main | Couch Fabrics Fetcher |
| No Rules | Main | Checked |
| Component Type | Main | DX Graph - Dynamic Record List |
| Connection | Main | Get value from: Literal DX Graph |
| Collection ID | Main | Fabrics of Couches |
| Response Transform | Main | response.map(obj => _.pick(obj, ['fabricId','fabricName','description','price','fabric-to-size', 'fabric-to-color'])); |
| Query Filter | Main | Get value from: JS Expression (below) |
| Trigger Expression | Conditions | componentResponse('next-couch-attribute') == "Fabric" |
JSON.stringify(
  {"$and": [
  contextField('couch-size') ? {"$in": {"field": "fabric-to-size", "value": [contextField('couch-size').sizeId]}} : {}
  ,
  contextField('couch-color') ? {"$in": {"field": "fabric-to-color", "value": [contextField('couch-color').colorId]}} : {}
  ]}
)
Component to fetch Couch Colors from DX Graph
- Navigate to the Experience Components page (Manage Flows --> Components).
- Click the + Add Component button.
- Enter the following and click Submit.
| Field | Form Tab | Value |
|---|---|---|
| Component Code | Main | couch-colors-fetcher |
| Component Name | Main | Couch Colors Fetcher |
| No Rules | Main | Checked |
| Component Type | Main | DX Graph - Dynamic Record List |
| Connection | Main | Get value from: Literal DX Graph |
| Collection ID | Main | Colors of Couches |
| Response Transform | Main | response.map(obj => _.pick(obj, ['colorId','colorName','description','price','color-to-size','color-to-fabric'])); |
| Query Filter | Main | Get value from: JS Expression (below) |
| Trigger Expression | Conditions | componentResponse('next-couch-attribute') == "Color" |
JSON.stringify(
  {"$and": [
  contextField('couch-size') ? {"$in": {"field": "color-to-size", "value": [contextField('couch-size').sizeId]}} : {}
  ,
  contextField('couch-fabric') ? {"$in": {"field": "color-to-fabric", "value": [contextField('couch-fabric').fabricId]}} : {}
  ]}
)
Component to Validate the selected Size, Fabric and Color
If all three options have values selected, instead of visiting DX Graph we will use a Data Transformation component to validate that the attributes are valid. We will also calculate the total price of the final product.
- Navigate to the Experience Components page (Manage Flows --> Components).
- Click the + Add Component button.
- Enter the following and click Submit.
| Field | Form Tab | Value |
|---|---|---|
| Component Code | Main | couch-validation |
| Component Name | Main | Couch Validation |
| No Rules | Main | Checked |
| Component Type | Main | Conscia - Data Transformation Script |
| Data to modify | Main | Get value from: JS ExpressioncombinedObject = { "couch-size":contextField('couch-size'), "couch-fabric": contextField('couch-fabric'), "couch-color": contextField('couch-color'), "couch-price": contextField('couch-size').price + contextField('couch-fabric').price + contextField('couch-color').price } |
| Script | Main | below |
| Trigger Expression | Conditions | componentResponse('next-couch-attribute') == "Validation" |
//establish a return payload for the success condition.
var retval = {"status": "Valid", "message": "Selected Size, Fabric and Color are compatible!", "price": data["couch-price"]};

//test each pair of (size, fabric, color) in each direction.
if (!data["couch-size"]["size-to-fabric"].includes(data["couch-fabric"].fabricId)) {
  retval = {"status": "Error", "message": "Selected Fabric incompatible with selected Size"}
}
if (!data["couch-size"]["size-to-color"].includes(data["couch-color"].colorId)) {
  retval = {"status": "Error", "message": "Selected Color incompatible with selected Size"}
}
if (!data["couch-fabric"]["fabric-to-size"].includes(data["couch-size"].sizeId)) {
  retval = {"status": "Error", "message": "Selected Size incompatible with selected Fabric"}
}
if (!data["couch-fabric"]["fabric-to-color"].includes(data["couch-color"].colorId)) {
  retval = {"status": "Error", "message": "Selected Color incompatible with selected Fabric"}
}
if (!data["couch-color"]["color-to-size"].includes(data["couch-size"].sizeId)) {
  retval = {"status": "Error", "message": "Selected Size incompatible with selected Color"}
}
if (!data["couch-color"]["color-to-fabric"].includes(data["couch-fabric"].fabricId)) {
  retval = {"status": "Error", "message": "Selected Fabric incompatible with selected Color"}
}
//assign retval to itself, so it's returned in all cases.
retval = retval
Component to Access Couch CPQ from the Frontend
Finally, it all comes together in this Component. Each Fetcher and Validator is amalgamated here, but only one will fire due to the conditional trigger expressions in each Component. This Component provides a singular endpoint to deliver each stage of the couch CPQ experience.
In a production scenario, this would likely be replaced by a generic "Product CPQ" endpoint, where the product ID is passed and DX Engine uses that to determine the tables we look up. However we have made specific Components and tables with very specific id/name fields for ease of understanding.
- Navigate to the Experience Components page (Manage Flows --> Components).
- Click the + Add Component button.
- Enter the following and click Submit.
| Field | Form Tab | Value |
|---|---|---|
| Component Code | Main | couch-cpq |
| Component Name | Main | Couch CPQ |
| Component Description | Main | Enabling custom couch configurators on web experiences |
| No Rules | Main | Checked |
| Component Type | Main | Conscia - Property Mapper |
| Property Mapper Configuration 1 | Main | Source data - Get value from: Component Response, Couch Sizes Fetcher Expression Type javascript Add one Mapping Target property: couch-sizes Source expression: data |
| Property Mapper Configuration 2 | Main | Source data - Get value from: Component Response, Couch Fabrics Fetcher Expression Type javascript Add one Mapping Target property: couch-fabrics Source expression: data |
| Property Mapper Configuration 3 | Main | Source data - Get value from: Component Response, Couch Colors Fetcher Expression Type javascript Add one Mapping Target property: couch-colors Source expression: data |
| Property Mapper Configuration 4 | Main | Source data - Get value from: Component Response, Couch Validation Expression Type javascript Add one Mapping Target property: couch-validation Source expression: data |