Stripe Payment Authorization and Capture
In the following recipe, we will walk through a flow where a shopper checks out on the storefront and their payment is authorized and then captured following the merchant's order validation. We will use Stripe and Elastic Path Commerce Cloud APIs as well as a Postman call to simulate a webhook event from an Order Management System (or similar).
Overall Orchestration Approach
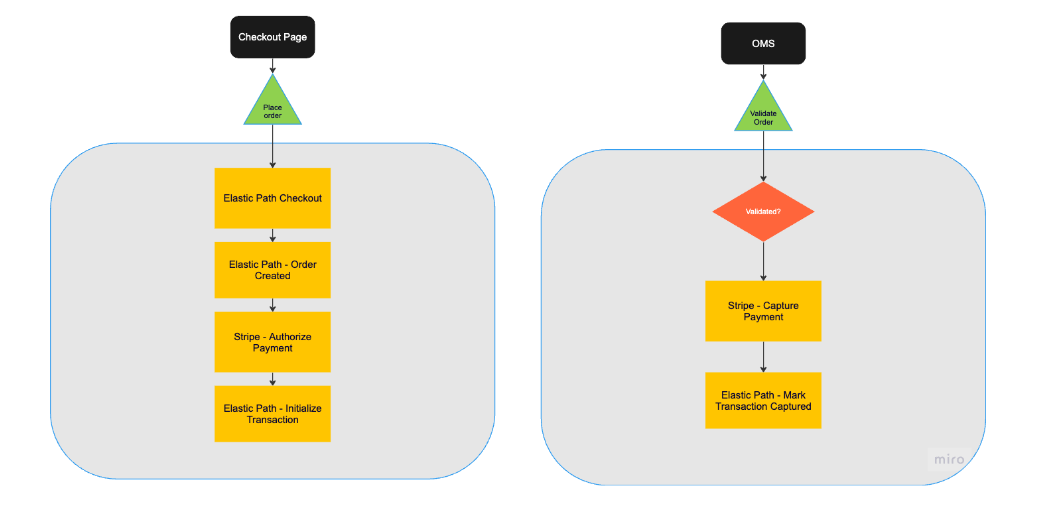
Here is the flow that we will be modeling in the DX Engine:
- A shopper checks out, providing payment and shipping information.
- A Stripe Payment Intent is created to authorize the payment.
- An Elastic Path order and authorization transaction are created.
- The merchant validates the order, triggering a webhook with the order status.
- A Conscia listener hears the event and triggers Stripe to capture the payment, and Elastic Path to update its transaction to captured and to complete the order.

Mapping Out Orchestration Components, Templates, and Listeners
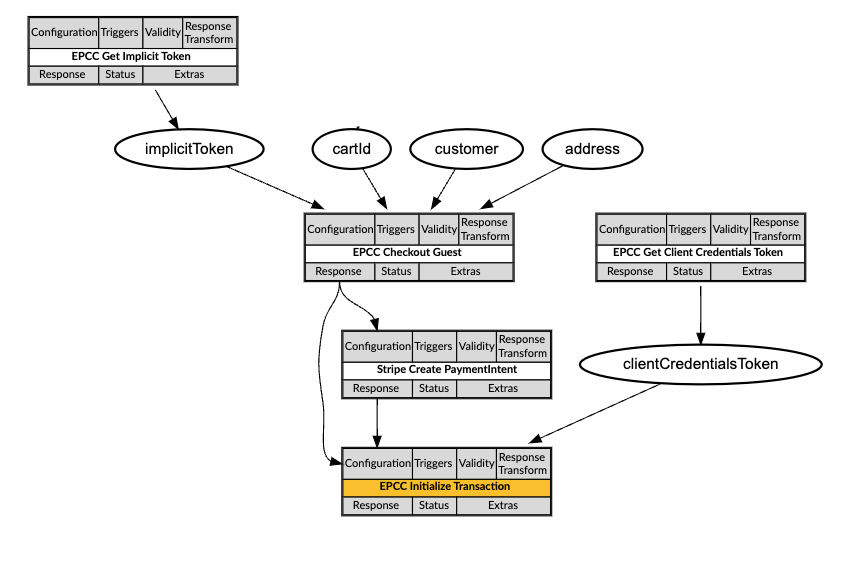
Translating this to Conscia’s Orchestration, the Checkout and Payment Authorization flow consists of the following Components and Context values in the Checkout Template:

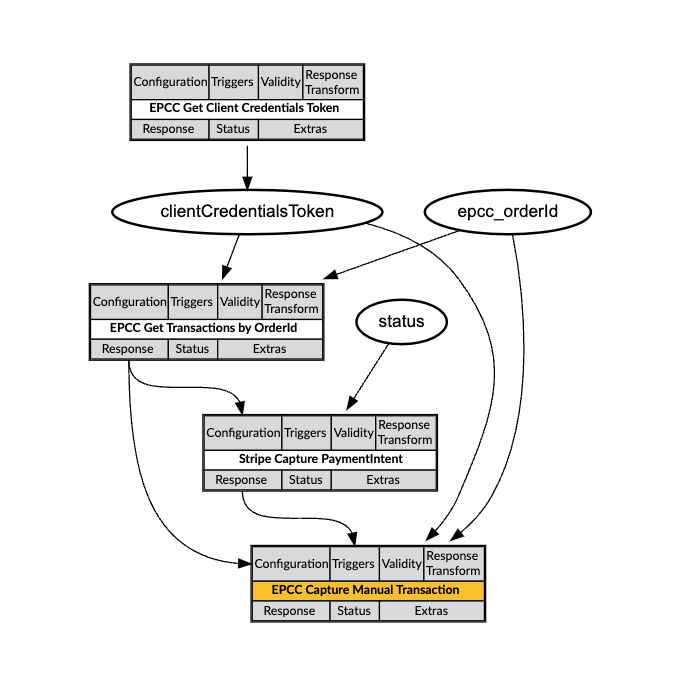
Then there is a Conscia Order Validated listener that triggers the Payment Capture flow, which consists of the following Components and Context values in the Capture Template:

When the anonymous shopper completes checkout in the storefront after entering their shipping and payment details, the storefront sends off a query request to the DX Engine. It calls the Checkout Template and supplies the cartId along with the shopper's shipping information. The call looks like this:
POST {{engineUrl}}/experience/templates/_query
X-Customer-Code: {{customerCode}}
Authorization: Bearer {{dxEngineToken}}

{
	"templateCode": "epcc-guest-checkout",
	"context": {
		"cartId" : "5634ab34o1",
		"email" : "barney@friends.com",
		...
	}
}
The Order Validated listener invokes the Capture Template once the merchant has validated the order and passes the necessary Context values through the engineRequest field on the listener:
"engineRequest": {
	"templateCode": "epcc-capture-payment",
	"context": {
		"epcc_orderId": "`body.orderId`",
		"status": "`body.status`"
	}
}
Orchestration Flow
When the Checkout Template is called by the storefront, it triggers the Elastic Path checkout process well as the Stripe payment authorization.
-
Elastic Path Checkout Guest: The checkout call in Elastic Path automatically converts the cart into an order, and returns the new order information. This call uses an implicit token. (See the Add Product to Cart recipe for more information on how to configure an Elastic Path Get Implicit Token component).
-
Stripe Create PaymentIntent (Authorize Payment): This component makes a call to Stripe to create a payment intent and sets the amount owing from the Elastic Path order, the payment method to card, the payment capture method to manual, and confirmation to true. We can also add the Elastic Path order id as custom metadata to help track payments. The payment intent is then sitting in a state of
requires_capture. -
Elastic Path Initialize Transaction (Authorize Payment): Once the Stripe PaymentIntent is created, we can initialize an authorization transaction in Elastic Path to track payment through the manual gateway. The amount owing is set and the Stripe reference id is added also as custom metadata. This automatically changes the related Elastic Path order status to
processing.
And that's where the flow sits until the merchant is able to verify the order on their end, perhaps allocate inventory, and do any other checks required to ensure they will be able to fulfill the order.
We're making the assumption that the merchant will manually mark the order verified in their order management system before the Stripe authorization expires in 7 days. The order management system will emit a webhook containing the order id and status.
In Conscia, we have created an Order Validated listener waiting for this order validated event. It's looking in particular for the order id and status, and then triggering the Elastic Path Capture Payment Template.
-
Elastic Path Get Transactions: Because the order management system only passes back the order id, we need to make a call to Elastic Path to retrieve the rest of the required information: the Stripe reference and the Elastic Path transaction id.
-
Stripe Capture PaymentIntent: If the order validation status is
verified, we'll run this Component, which uses the Stripe reference id we saved to the Elastic Path transaction to call Stripe to capture the payment. -
Elastic Path Capture Transaction: If the Stripe capture is a success, this component runs to capture the transaction in Elastic Path and mark the order complete.
Note: This recipe uses Stripe's test tokens and payment methods, and does not include methods for passing PCI data from the storefront to Stripe.
DX Engine Configuration Details
You will need to configure a connection to Stripe and to Elastic Path Commerce Cloud.
Below are instructions on how to configure the two connections, the listener, and each of the Components discussed above.
Create a Connection to Stripe
- Navigate to the Connections page (Manage Flows --> Connections).
- Click the Configure Connection button.
- Enter the following and click Submit:
| Field | Value |
|---|---|
| Connection Code | stripe-connection |
| Connection Name | Stripe Connection |
| Connector | Universal API Connector |
| Base URL | Get value from: Literal https://api.stripe.com |
| Base Header | Header: AuthorizationValue (JS Expression): 'Bearer ' + secret('stripe-secret-test-key') |
Create a Connection to Elastic Path Commerce Cloud
- Navigate to the Connections page (Manage Flows --> Connections).
- Click the Configure Connection button.
- Enter the following and click Submit:
| Field | Value |
|---|---|
| Connection Code | epcc-connection |
| Connection Name | Elastic Path Commerce Cloud Connection |
| Connector | Universal API Connector |
| Base URL | Get value from: Literal https://useast.api.elasticpath.com |
Create a Component to checkout as a guest in Elastic Path
- Navigate to the Experience Components page (Manage Flows --> Components).
- Click the Create Experience Component button.
- Enter the following and click Submit:
| Field | Value |
|---|---|
| Component Code | epcc-checkout-guest |
| Component Name | EPCC Checkout Guest |
| No Rules | Checked |
| Component Type | Conscia - Universal API Connector |
The DX Engine will create and prepare the Component for further configuration. You should see the new component appear in the Component listing.
- Click Edit
- Enter the following and click Submit
| Field | Form Tab | Value |
|---|---|---|
| Connection | Main | Elastic Path Commerce Cloud Connection |
| Webservice Path | Main | Get value from: JS Expression/v2/carts/${contextField('cartId')}/checkout |
| Method | Main | POST |
| Headers | Main | Header: AuthorizationValue (Context Field): implicitToken |
| Headers | Main | Header: Content-TypeValue (Literal): application/json |
| Body | Main | Get value from: JS Expression |
 {
  "data": {
    "customer": {
      "email": "${contextField('customer').email}",
      "name": "${contextField('customer').firstName} ${contextField('customer').lastName}"
    },
    "billing_address": {
      "first_name": "${contextField('customer').firstName}",
      "last_name": "${contextField('customer').lastName}",
      "company_name": "${contextField('address').companyName}",
      "line_1": "${contextField('address').addressLine1}",
      "line_2": "${contextField('address').addressLine2}",
      "city": "${contextField('address').city}",
      "county": "${contextField('address').county}",
      "region": "${contextField('address').state}",
      "postcode": "${contextField('address').postCode}",
      "country": "${contextField('address').country}"
    },
    "shipping_address": {
      "first_name": "${contextField('customer').firstName}",
      "last_name": "${contextField('customer').lastName}",
      "company_name": "${contextField('address').companyName}",
      "line_1": "${contextField('address').addressLine1}",
      "line_2": "${contextField('address').addressLine2}",
      "city": "${contextField('address').city}",
      "county": "${contextField('address').county}",
      "region": "${contextField('address').state}",
      "postcode": "${contextField('address').postCode}",
      "country": "${contextField('address').country}"
    }
  }
}
Create a Component to create a payment intent in Stripe
- Navigate to the Experience Components page (Manage Flows --> Components).
- Click the Create Experience Component button.
- Enter the following and click Submit:
| Field | Value |
|---|---|
| Component Code | stripe-create-payment-intent |
| Component Name | Stripe Create PaymentIntent |
| No Rules | Checked |
| Component Type | Conscia - Universal API Connector |
The DX Engine will create and prepare the Component for further configuration. You should see the new component appear in the Component listing.
- Click Edit
- Enter the following and click Submit
| Field | Form Tab | Value |
|---|---|---|
| Connection | Main | Stripe Connection |
| Webservice Path | Main | Get value from: Literal/v1/payment_intents |
| Method | Main | POST |
| Headers | Main | Header: Content-TypeValue (Literal): application/x-www-form-urlencoded |
| Body | Main | Get value from: JS Expression'amount=' + componentResponse('epcc-checkout-guest').data.meta.display_price.balance_owing.amount + '¤cy=usd&payment_method_types[]=card&payment_method_options[card][capture_method]=manual&confirm=true&payment_method=pm_card_visa&metadata[orderId]=' + componentResponse('epcc-checkout-guest').data.id |
Create a Component to initialize a transaction in Elastic Path
- Navigate to the Experience Components page (Manage Flows --> Components).
- Click the Create Experience Component button.
- Enter the following and click Submit:
| Field | Value |
|---|---|
| Component Code | epcc-initialize-transaction |
| Component Name | EPCC Initialize Transaction |
| No Rules | Checked |
| Component Type | Conscia - Universal API Connector |
The DX Engine will create and prepare the Component for further configuration. You should see the new component appear in the Component listing.
- Click Edit
- Enter the following and click Submit
| Field | Form Tab | Value |
|---|---|---|
| Connection | Main | Elastic Path Commerce Cloud Connection |
| Webservice Path | Main | Get value from: Literal/v2/orders/${componentResponse('epcc-checkout-guest').data.id}/payments |
| Method | Main | POST |
| Headers | Main | Header: AuthorizationValue (Context Field): clientCredentialsToken |
| Headers | Main | Header: Content-TypeValue (Literal): application/json |
| Body | Main | Get value from: JS Expression |
 {
  "data": {
    "gateway": "manual",
    "method": "authorize",
    "amount": ${componentResponse('epcc-checkout-guest').data.meta.display_price.balance_owing.amount},
    "paymentmethod_meta": {
       "custom_reference": "${componentResponse('stripe-create-payment-intent').id}",
       "name": "Stripe Payment Intents"
     }
  }
}
Create a Listener to listen for the order validated webhook
To create a listener you will need to make a direct API call to DX Engine.
POST https://engine-staging.conscia.io/api/listeners
{
  "listener": {
    "listenerCode": "order-validated",
    "name": "Order Validated",
    "sync": true,
    "endpointRequestSpec": {
      "methods": ["POST", "PUT"]
    },
    "engineRequest": {
      "templateCode": "epcc-capture-payment",
      "context": {
        "epcc_orderId": "`body.orderId`",
        "status": "`body.status`"
      }
    },
    "endpointResponse": {
      "status": 200,
      "body": {
        "epcc_trx_response": "`engineResponse.components['epcc-capture-manual-transaction']`"
      },
      "headers": [
        {
          "header": "content-type",
          "value": "application/json"
        }
      ]
    }
  }
}
The mocked webhook event looks like this:
POST https://engine-staging.conscia.io/api/experience/_listener/:listenerLocator/:listenerUuid
Body: {"orderId":"75856901-b433-40da-bdbd-c2265769944d", "status":"verified"}
Create a Component to get transactions in Elastic Path
- Navigate to the Experience Components page (Manage Flows --> Components).
- Click the Create Experience Component button.
- Enter the following and click Submit:
| Field | Value |
|---|---|
| Component Code | epcc-get-transactions-by-orderid |
| Component Name | EPCC Get Transactions by OrderId |
| No Rules | Checked |
| Component Type | Conscia - Universal API Connector |
The DX Engine will create and prepare the Component for further configuration. You should see the new component appear in the Component listing.
- Click Edit
- Enter the following and click Submit
| Field | Form Tab | Value | Description |
| ---- | ---- | ---- |
| Connection | Main | Elastic Path Commerce Cloud Connection |
| Webservice Path | Main | Get value from: JS Expression/v2/orders/${contextField('epcc_orderId')}/transactions |
| Method | Main | POST |
| Headers | Main | Header: Authorization
Value (Context Field): implicitToken |
Create a Component to capture a payment intent in Stripe
- Navigate to the Experience Components page (Manage Flows --> Components).
- Click the Create Experience Component button.
- Enter the following and click Submit:
| Field | Value |
|---|---|
| Component Code | stripe-capture-payment-intent |
| Component Name | Stripe Capture PaymentIntent |
| No Rules | Checked |
| Component Type | Conscia - Universal API Connector |
The DX Engine will create and prepare the Component for further configuration. You should see the new component appear in the Component listing.
- Click Edit
- Enter the following and click Submit
| Field | Form Tab | Value |
|---|---|---|
| Connection | Main | Stripe Connection |
| Webservice Path | Main | Get value from: Literal/v1/payment_intents/${componentResponse('epcc-get-transactions-by-orderid').data[0].custom_reference}/capture |
| Method | Main | POST |
| Headers | Main | Header: Content-TypeValue (Literal): application/x-www-form-urlencoded |
| Trigger Expression | Conditions | contextField('status') === 'verified' |
Create a Component to capture a transaction in Elastic Path
- Navigate to the Experience Components page (Manage Flows --> Components).
- Click the Create Experience Component button.
- Enter the following and click Submit:
| Field | Value |
|---|---|
| Component Code | epcc-capture-transaction |
| Component Name | EPCC Capture Transaction |
| No Rules | Checked |
| Component Type | Conscia - Universal API Connector |
The DX Engine will create and prepare the Component for further configuration. You should see the new component appear in the Component listing.
- Click Edit
- Enter the following and click Submit
| Field | Form Tab | Value |
|---|---|---|
| Connection | Main | Elastic Path Commerce Cloud Connection |
| Webservice Path | Main | Get value from: JS Expression/v2/orders/${contextField('epcc_orderId')}/transactions/${componentResponse('epcc-get-transactions-by-orderid').data[0].id}/capture |
| Method | Main | POST |
| Headers | Main | Header: AuthorizationValue (Context Field): clientCredentialsToken |
| Headers | Main | Header: Content-TypeValue (Literal): application/json |
| Trigger Expression | Conditions | componentResponse('stripe-capture-payment-intent').status === 'succeeded' |