Elastic Path - Apply Custom Discount
In the following recipe, we will walk through an add custom discount to cart flow that includes validating a user-supplied coupon code against an external promotions engine, and mapping that response back to the schema required by Elastic Path in order to add the custom discount. We will use Elastic Path Commerce Cloud APIs as well as an API mock service to serve in the place of external systems.
Overall Orchestration Approach
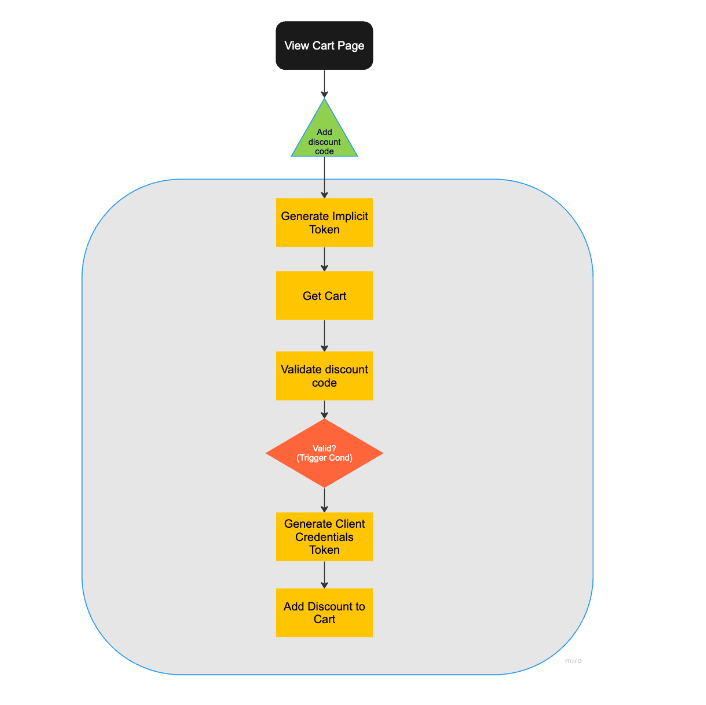
Here is the flow that we will be modeling in the DX Engine:
- A shopper is viewing their cart.
- They add a coupon code for a cart-level discount.
- The code must be validated by the external promotions engine.
- The engine's response is mapped to the schema model required by Elastic Path.
- The discount is applied to the cart.

Mapping Out DX Engine Components and Templates
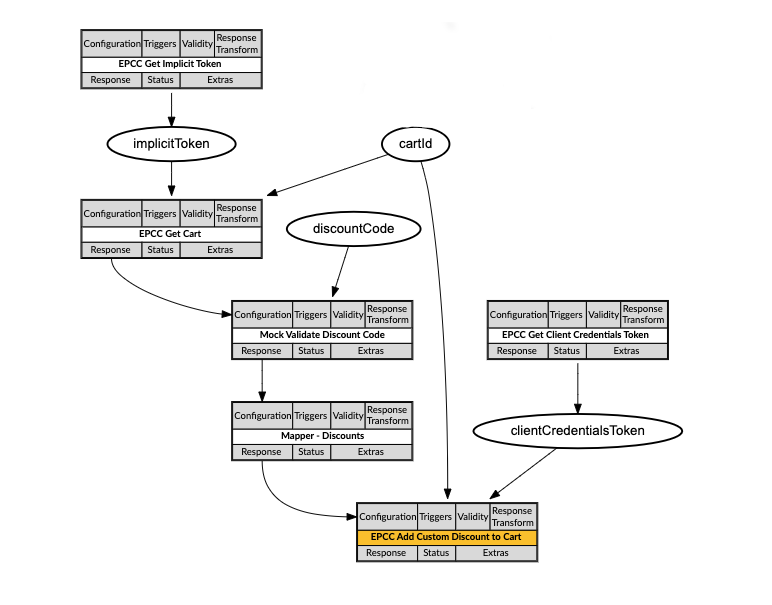
Translating this to Conscia’s Orchestration Components, the Add Custom Discount Code flow consists of the following Components and Context values:

When the shopper inputs a discount code on the View Cart page, the storefront sends off a query request to the DX Engine. It calls the Add Custom Discount to Cart component and supplies the discount code. The call looks like this:
POST {{engineUrl}}/experience/components/_query
X-Customer-Code: {{customerCode}}
Authorization: Bearer {{dxEngineToken}}

{
"componentCodes": ["epcc-add-custom-discount-to-cart"],
"context": {
	"discountCode" : "SAVE10",
	"cartId" : "5634ab34o1"
	}
}
This is the orchestration flow that is then executed by the DX Engine:
In order to validate the coupon code, the external promotions engine may require a number of pieces of information about the cart and the customer. This information may be available on the frontend already to pass through the Context; this information may be cached already in Conscia; or a fresh call may need to be made to the commerce engine. In this flow recipe, we will do the last of these options and assume the required information is not readily available.
After generating an implicit token (if necessary), the DX Engine performs a Get Cart query to pull back any and all relevant information for the external promotions engine to validate the coupon code. In this example, we need only the cart total, before taxes and before discounts.
Next a mock API service is called to represent the external promotions engine. We pass through the coupon code and the cart total. The promotions engine will determine if this is a valid code and that it applies to a cart with this total value. If true, it will pass back a response that includes the actual discount to apply to the cart.
In order to apply this discount to the cart, we next need to map the promotions engine response to the Elastic Path custom discount schema. A mapper component is used to take the response, pull out the necessary properties, and map them the properties expected by the Add Custom Discount call.
After generating a client credentials token, we can now make the Add Custom Discount call to apply this coupon code to the cart.
DX Engine Configuration Details
You will need to configure a connection to Elastic Path Commerce Cloud. For the mock calls to external systems for discounts, we have not created a connection and are just calling the web service directly from the Components. You would want to create a connection for your own external systems, whether that’s a promotions engine or ERP, etc.
Below are instructions on how to configure the Elastic Path Commerce Cloud connection and each of the Components discussed above.
Create a Connection to Elastic Path Commerce Cloud
- Navigate to the Connections page (Manage Flows --> Connections).
- Click the Configure Connection button
- Enter the following and click Submit:
| Field | Value |
|---|---|
| Connection Code | epcc-connection |
| Connection Name | Elastic Path Commerce Cloud Connection |
| Connector | Universal API Connector |
| Base URL | Get value from: Literal https://useast.api.elasticpath.com |
| Method | GET |
Create a Component to generate an implicit token
- Navigate to the Experience Components page (Manage Flows --> Components).
- Click the Create Experience Component button
- Enter the following and click Submit:
| Field | Value |
|---|---|
| Component Code | epcc-get-implicit-token |
| Component Name | EPCC Get Implicit Token |
| No Rules | Checked |
| Component Type | Conscia - Universal API Connector |
The DX Engine will create and prepare the Component for further configuration. You should see the new component appear in the Component listing.
- Click Edit
- Enter the following and click Submit
| Field | Form Tab | Value | Description |
|---|---|---|---|
| Connection | Main | Elastic Path Commerce Cloud Connection | |
| Webservice Path | Main | Get value from: Literal/oauth/access_token | |
| Method | Main | POST | |
| Headers | Main | Header: Content-TypeValue (Literal): application/x-www-form-urlencoded | |
| Body | Main | Value (Literal): client_id={{clientId}}&grant_type=implicit | |
| Cached | Caching | Checked | |
| Cache Time-to-live | Caching | 3600 | |
| Context Field Enrichments | Update Context | Context Field: implicitTokenExpression: 'Bearer' + response.access_token |
Create a Component to validate the discount code
- Navigate to the Experience Components page (Manage Flows --> Components).
- Click the Create Experience Component button
- Enter the following and click Submit:
| Field | Value |
|---|---|
| Component Code | mock-validate-discount |
| Component Name | Mock Validate Discount Code |
| No Rules | Checked |
| Component Type | Conscia - Universal API Connector |
The DX Engine will create and prepare the Component for further configuration. You should see the new component appear in the Component listing.
- Click Edit
- Enter the following and click Submit
| Field | Form Tab | Value | Description |
|---|---|---|---|
| Connection | Main | N/A | |
| Webservice Path | Main | Get value from: Literalhttps://r7jqm.wiremockapi.cloud/inventory/validate | Use any API mocking service of your choice. |
| Method | Main | POST | |
| Body | Main | Get value from: JS Expression{"code" : "${contextField('discountCode')}", "amount": "${componentResponse('epcc-get-cart').data.meta.display_price.without_discount.amount}"} |
Create a Component to map custom discount schema
- Navigate to the Experience Components page (Manage Flows --> Components).
- Click the Create Experience Component button
- Enter the following and click Submit:
| Field | Value |
|---|---|
| Component Code | discount-mapper |
| Component Name | Mapper - Discounts |
| No Rules | Checked |
| Component Type | Conscia - Object Mapper |
The DX Engine will create and prepare the Component for further configuration. You should see the new component appear in the Component listing.
- Click Edit
- Enter the following and click Submit
Under the Object Maps section of the form click the + button to add a new Object Map.
| Field | Value |
|---|---|
| Source Data | Get value from: Component ResponseMock Validate Discount Code |
| Expression Type | Javascript |
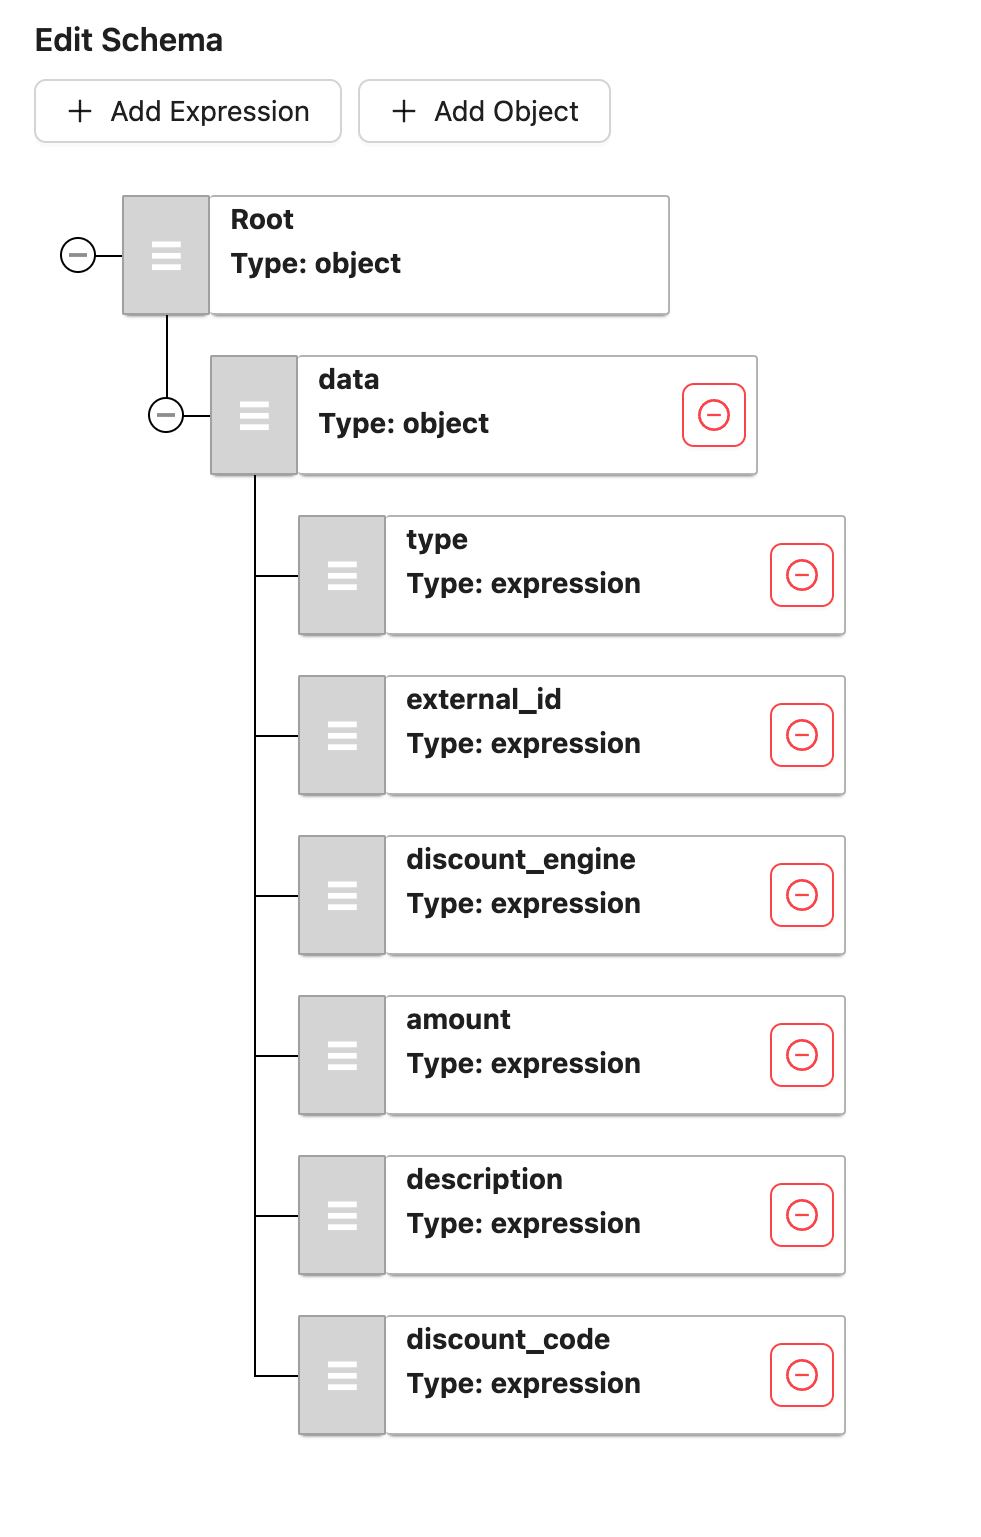
| Schema | type = 'custom_discount' external_id = data.id discount_engine = 'External Discount Engine' amount = -(data.discount.amount_off) description = data.campaign discount_code = 'data.code |
The schema to look like this:

Create a Component to generate an client credentials token
- Navigate to the Experience Components page (Manage Flows --> Components).
- Click the Create Experience Component button
- Enter the following and click Submit:
| Field | Value |
|---|---|
| Component Code | epcc-get-client-credentials-token |
| Component Name | EPCC Get Client Credentials Token |
| No Rules | Checked |
| Component Type | Conscia - Universal API Connector |
The DX Engine will create and prepare the Component for further configuration. You should see the new component appear in the Component listing.
- Click Edit
- Enter the following and click Submit
| Field | Form Tab | Value | Description |
|---|---|---|---|
| Connection | Main | Elastic Path Commerce Cloud Connection | |
| Webservice Path | Main | Get value from: Literal/oauth/access_token | |
| Method | Main | POST | |
| Headers | Main | Header: Content-TypeValue (Literal): application/x-www-form-urlencoded | |
| Body | Main | Value (Literal): client_id={{clientId}}&client_secret={{clientSecret}}&grant_type=client_credentials | |
| Cached | Caching | Checked | |
| Cache Time-to-live | Caching | 3600 | |
| Context Field Enrichments | Update Context | Context Field: clientCredentialsTokenExpression: 'Bearer' + response.access_token |
Create a Component to add custom discount to cart
- Navigate to the Experience Components page (Manage Flows --> Components).
- Click the Create Experience Component button
- Enter the following and click Submit:
| Field | Value |
|---|---|
| Component Code | epcc-add-custom-discount-to-cart |
| Component Name | EPCC Add Custom Discount to Cart |
| No Rules | Checked |
| Component Type | Conscia - Universal API Connector |
The DX Engine will create and prepare the Component for further configuration. You should see the new component appear in the Component listing.
- Click Edit
- Enter the following and click Submit
| Field | Form Tab | Value | Description |
|---|---|---|---|
| Connection | Main | Elastic Path Commerce Cloud Connection | |
| Webservice Path | Main | Get value from: JS Expression/v2/carts/${contextField('cartId')}/custom-discounts | |
| Method | Main | POST | |
| Headers | Main | Header: AuthorizationValue (Context Field): clientCredentialsToken | |
| Headers | Main | Header: Content-TypeValue (Literal): application/json | |
| Body | Main | Get value from: Component ResponseMapper - Discounts | |
| Trigger Expression | Conditions | componentStatus('mock-validate-discount') === "VALID" | |
| Execution based on dependencies | Conditions | Skip On Failed Dependency: Checked Skip On Skipped Dependency: Checked Skip On Invalid Dependency: Checked |