Convert a commercetools Cart to an Order with the Adyen Payment Provider
You can implement a solution based on this recipe that converts a commercetools cart to an order after authorizing payment with the Adyen payment provider. This approach should apply to almost any commerce and payment system integration and wherever one web service depends on the response from another.
Overall Orchestration Flow
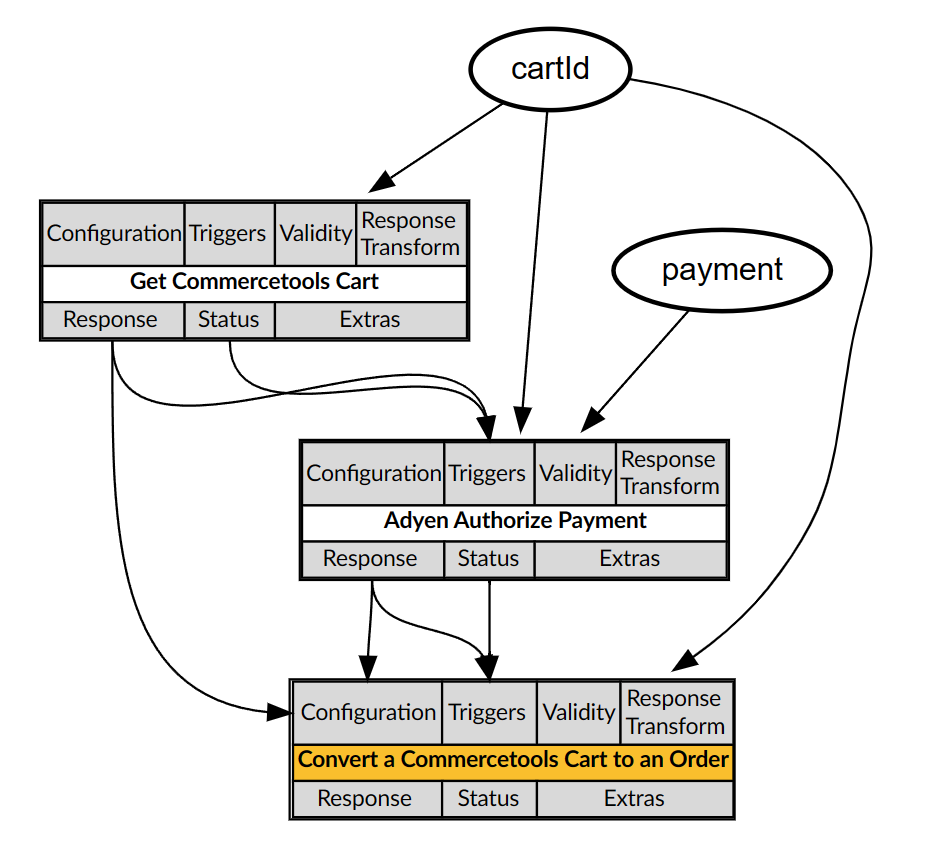
When a customer places an order through the website, the solution must authorize the payment using a payment provider before finalizing the order in the commerce system. Therefore, the general flow is to invoke Adyen to authorize the payment, and then to call commercetools to finalize the order. Technically, we need to get the cart from commercetools first, which contains a version number that we need to use to convert that cart to an order.
Mapping Out DX Engine Components and Templates

One of the Orhcestration Components in this flow depends on a DX Engine Connection to Adyen and another for commercetools. You can follow this recipe to create the required DX Connections:
This recipe involves three components.
This solution uses the Retrieve commercetools Cart (retrieve-commercetools-cart) Component recipe that retrieves a cart from commercetools.
The Adyen Authorize Payment Component (adyen-authorize-payment) performs basic financial validation and authorizes payment for the cart total.
On succesful payment authorization, the Convert commercetools Cart to Order Component (convert-commercetools-cart-to-order) converts a commercetools cart to an order. A separate process Captures the payment, typically during order fulfillment. To support that process, this solution stores the Adyen PSP reference in the commercetools order. This value belongs in a Payment record associated with the order, which is out of scope for this recipe. Instead, this recipe uses the PSP Reference as the commercetools order number.
This recipe involves a template, which helps developers recognize and manage Components to invoke as a collection, whether or not they depend on each other, and without necessarily lising even component on which every other component depends.
DX Engine Configuration Details
To create the Adyen Authorize Payment Component, in the Conscia DX UI:
- In the top navigation, click Manage Experiences, and then click Components. The Manage Components page appears.
- Click Add Component. The Create Component wizard appears.
- For Component Code, enter an identifier for the component, such as adyen-authorize-payment.
- For Name, enter a name for the component, such as Adyen Authorize Payment**.
- Optionally, enter a Component Description.
- Select the No Rules checkbox. Experience Rules are not relevant to this Component.
- For Component Type, select Conscia - Universal API Connector. This Component Type can connect to almost any Webservice API.
- Click Submit.
To configure the Adyen Authorize Payment** Orchestration Component, on the Manage Components page:
- Next to the Adyen Authorize Payment component, click the Edit button. The Edit Component wizard appears.
- For Connection, select the Adyen DX Engine Connection.
- For Webservice Path, select Literal, and enter /payments for the value. This is the URL path of the Adyen API relative to the base URL defined by the Adyen Connection.
- For Method, select POST.
- Under Body, select JS Expression and enter:
_.assign(contextField('payment'), {
  "reference": contextField('cartId'),
  "returnUrl": "https://your-company.com/...",
  "captureDelayHours": 672,
  "merchantAccount": "ConsciaECOM"
})
This is the body that Conscia will post to the Adyen API. You may wish to replace the static values using a solution such as that described in Managing Static Values.
- In the Conditions area of the DX Engine UI, set Trigger Expression to:
`componentStatus('retrieve-commercetools-cart') === 'VALID'
  && componentResponse('retrieve-commercetools-cart').totalPrice.currencyCode === contextField('payment').amount.currency
  && componentResponse('retrieve-commercetools-cart').totalPrice.centAmount === contextField('payment').amount.value`
This applies basic cart total validation.
- Click Submit.
To create the Convert commercetools Cart to Order Component, follow the same process used for the Retrieve commercetools Cart Component, but:
- Set Webservice Path to /orders.
- Use the following JS Expression as the Body:
_.assign({}, {
  "id": contextField('cartId'),
  "version": componentResponse('retrieve-commercetools-cart').version,
  "paymentState": "BalanceDue",
  "orderState": "Confirmed",
  "orderNumber": componentResponse('adyen-authorize-payment').pspReference
})
In addition to creating a dependency on the components that retrieve a cart and auhtorize payment, this expression passes the cart ID passed in DX Engine context, its version determined by the Retrieve commercetools Cart Component, two hard-coded values appropriate for the order, and the Adyen PSP reference in the response from the Adyen Authorize Payment Component as the customer order number to the commercetools API that converts a cart to an order. You may choose to store the two static values as described in Managing Static Values.
- In the Conditions area of the UI, for trigger Expression:
`componentStatus('retrieve-commercetools-cart') === 'VALID'
  && componentResponse('retrieve-commercetools-cart').totalPrice.currencyCode === contextField('payment').amount.currency
  && componentResponse('retrieve-commercetools-cart').totalPrice.centAmount === contextField('payment').amount.value`
This causes the Convert commercetools Cart to Order Component to run only if the cart is available and its value matches that specified in DX engine context.
To create the Convert commercetools Cart to Order Orchestration template, in the Conscia DX Engine UI:
- In the top navigation, click Manage Experiences, and then click Templates. The Manage Templates page appears.
- Click Add Template. The Create Template wizard appears.
- For Template Code, enter an identifier for the Template, such as convert-commercetools-cart-to-order.
- For Name, enter a name for the component, such as Convert commercetools Cart to Order**.
- Optionally, enter a Component Description.
- Under Experience Components, add the Convert commercetools Cart to Order component. You may choose to include all of the Components used implicitly.
- Click Submit.
References
- https://docs.conscia.ai/solutions/dx-engine/connections
- https://docs.conscia.ai/solutions/dx-engine/dx-engine-component-anatomy
- https://docs.conscia.ai/solutions/dx-engine/templates
- https://docs.adyen.com/api-explorer/Checkout/71/post/payments
- https://docs.commercetools.com/api/projects/orders#create-order-from-cart