Creating a commercetools Connection
This recipe explains how you can create a DX Engine Connection to the commercetools Commerce Engine.
DX Engine Components can use Connections to encapsulate the information used to connect to a system that exposes Web services. Components that access commercetools APIs can use a commercetools Connection created based on this recipe.
To create the value used for the Authorization HTTP header required by commercetools, we first need to pass client credentials to the commercetools authorization endpoint for the appropriate region to obtain an commercetools API Client token:
- https://docs.commercetools.com/api/authorization
- https://docs.commercetools.com/getting-started/create-api-client
The commerceTools.generateToken() function provided by Conscia abstracts this functionality, obtaining the full scope allowed by the client credential and caching that result token.
In the commercetools Connection, we also need to specify the API endpoint, which includes a region identifier:
Finally, the Connection also needs the commercetools project ID:
Mapping Out DX Engine Elements
This recipe involves a DX Engine Connection, which encapsulates the information used to connect to commercetools, and a DX Engine Secret, which stores the commercetools client secret.
DX Engine Configuration Details
We can store the commercetools client secret in Conscia as a Secret. To create the Secret, in the Conscia UI:
- Click Settings in the top nav, and then select Secrets.
- Click Add Secret
- Set Secret Code to a value such as commercetools-secret.
- Set Secret Name to a value such as commercetools Secret.
- Set Secret Value to the commercetools client credential.
- Optionally, enter a Description for the secret.
- Click Submit.
To create the commercetools Connection, in the Conscia UI:
- Click Settings in the top nav, and then select Connections.
- Click Add Connection.
- Set Connection Code to a value such as commercetools-connection.
- Set Connection Name to a value such as commercetools Connection.
- Optionally, enter a Connection Description for the connection.
- Select the Universal API Connector.
- Click Submit.
To configure the commercetools Connection, in the Conscia UI:
- Click the Edit button for the commercetools Connection.
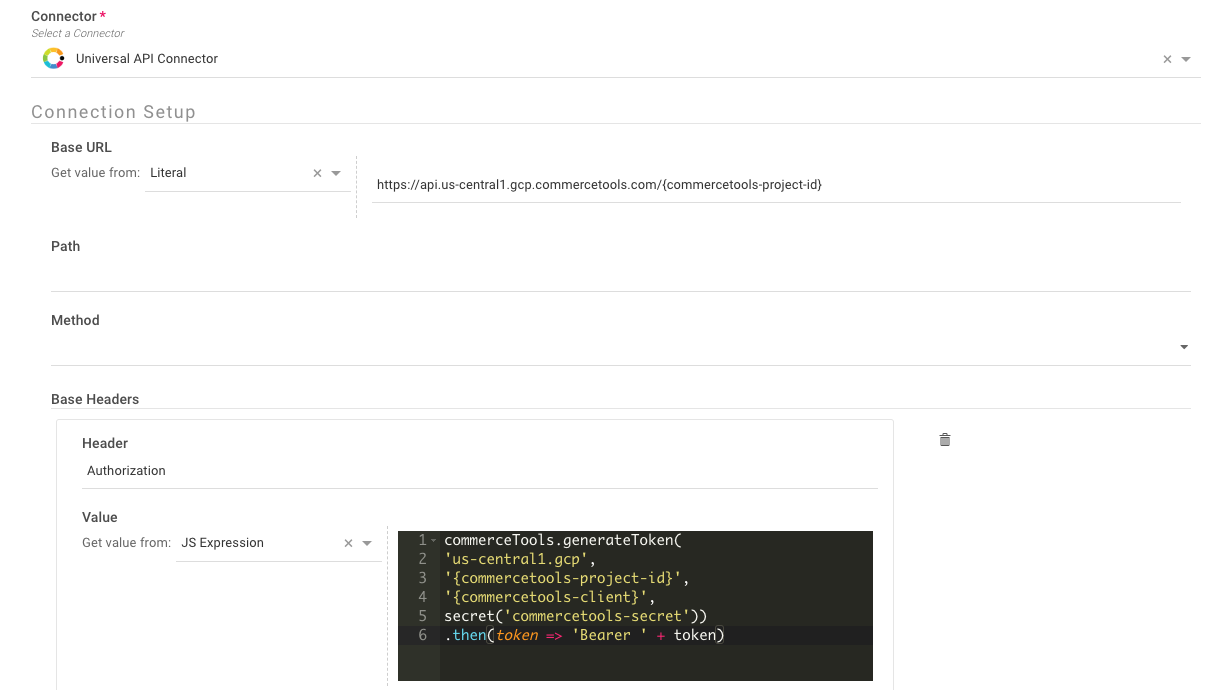
- Under Base URL, for Get value from, select Literal.
- Set the value of Base URL to the commercetools API base URL, such as
https://api.us-central1.gcp.commercetools.com/{commercetools-project-id}, replacing{commercetools-project-id}with the ID of your commercetools project, and replacing the commercetools region (us-central1.gcp) as appropriate. - Under Base Headers, click Add another item.
- For the new header, set Header to Authorization.
- For the new header, set Get value from to JS Expression.
- For the new header, set the value to an expression such as the following, replacing
{commercetools-project-id}with the ID of your commercetools project and{commercetools-client}with your commercetools client ID, and replacing the commercetools region (us-central1.gcp) as appropriate.
commerceTools.generateToken(
'us-central1.gcp',
'{commercetools-project-id}',
'{commercetools-client}',
secret('commercetools-secret'))
.then(token => 'Bearer ' + token)
- Click Submit.
Any DX Engine Component that uses this connection can specify a URL path relative to the value of Base URL and will include the Authentication HTTP header with the value determined by the commerceTools.generateToken() function.
Remember to remove the commercetools Secret from temporary storage if desired.
Note that the same Connection in a test, production, and any other Conscia Environments may use different Base URL and Authentication values than that of the Connection in your Preview environment.