Salesforce Sandbox Walkthrough
Please be sure to have the following handy:
- Customer Code
- API Token (provided during sandbox creation)
- Your Credentials
To familiarize yourself with DX Engine concepts such as Orchestration Templates and Components, please visit this link.
Note the following:
- Orchestration Templates don't always map 1:1 with Web Pages
- A DX Template is a grouping of Orchestration Components that are executed within the scope of a single request. A DX Component can be used to fetch data from a backend, transform data into a frontend data model, merge data from two different sources, etc.
- Orchestration Components don't map 1:1 with visual Components on the page. The frontend will map to the output of certain Orchestration Components. By convention, we'll be naming these Orchestration Components with the prefix 'Model'.
- Some Orchestration Components can be exposed to business users to get their input and control the digital experience. For example, a DX Component that fetches content from a CMS can be exposed to business users on the Experience Rules dashboard allowing them to select what content they want to display on specific containers on the frontend.
Salesforce PWA Kit and DX Engine Integration
This guide outlines the sequence of steps to get yourself familiarized with your Salesforce DX Engine sandbox. This sandbox maps to a sample set of Pages and Components from the PWA Kit to show you how you can connect your React application to Conscia and let Conscia do the heavy lifting of connecting to the various backend systems.
This integration will ensure that your frontend is unaware of your backends and only connects to a single Experience API. This creates a layer of abstraction between your fronend and backend so that any changes to integration and business logic in the backend will not impact your frontend code.
The sandbox environment gives you an orchestration design pattern and best practices that you can follow in your own implementation. You can create as many Orchestration Templates and Orchestration Components in your sandbox as you like.
PWA Kit Pages and Components
We have mapped out the following pages from the PWA Kit in the sandbox to Orchestration Templates and Orchestration Components to provide you with examples that you can apply to your own use cases:
- Home Page
- Product Listing
- Product Detail
- Cart
- Customer Service
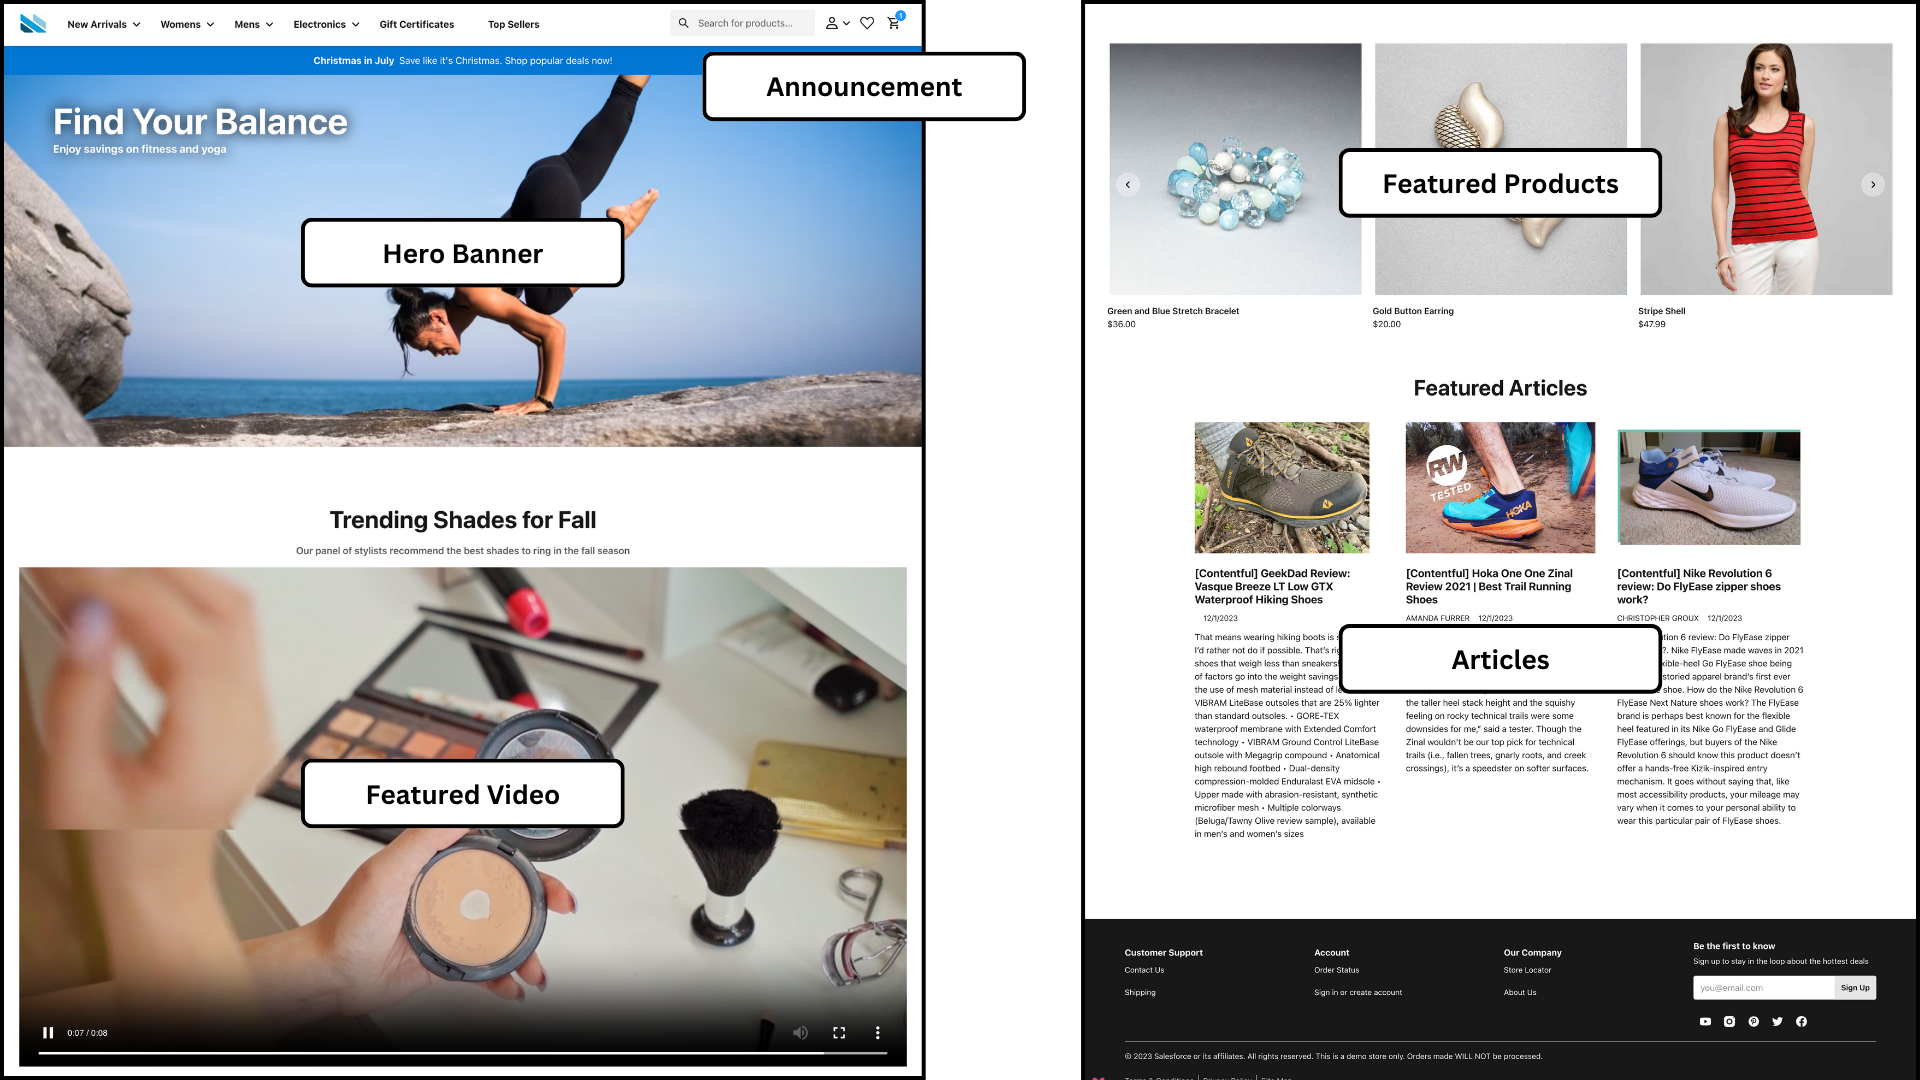
Let's start with the Home page, which has the following components:
- Announcement
- Featured Video
- Hero Banner
- Articles
- Featured Products
Here is the link to the reference ecommerce website rendered using the PWA Kit hosted within Conscia's environment:
https://salesforce-pwakit-demo.conscia.ai/
Here is the Home page:
Your Salesforce Sandbox
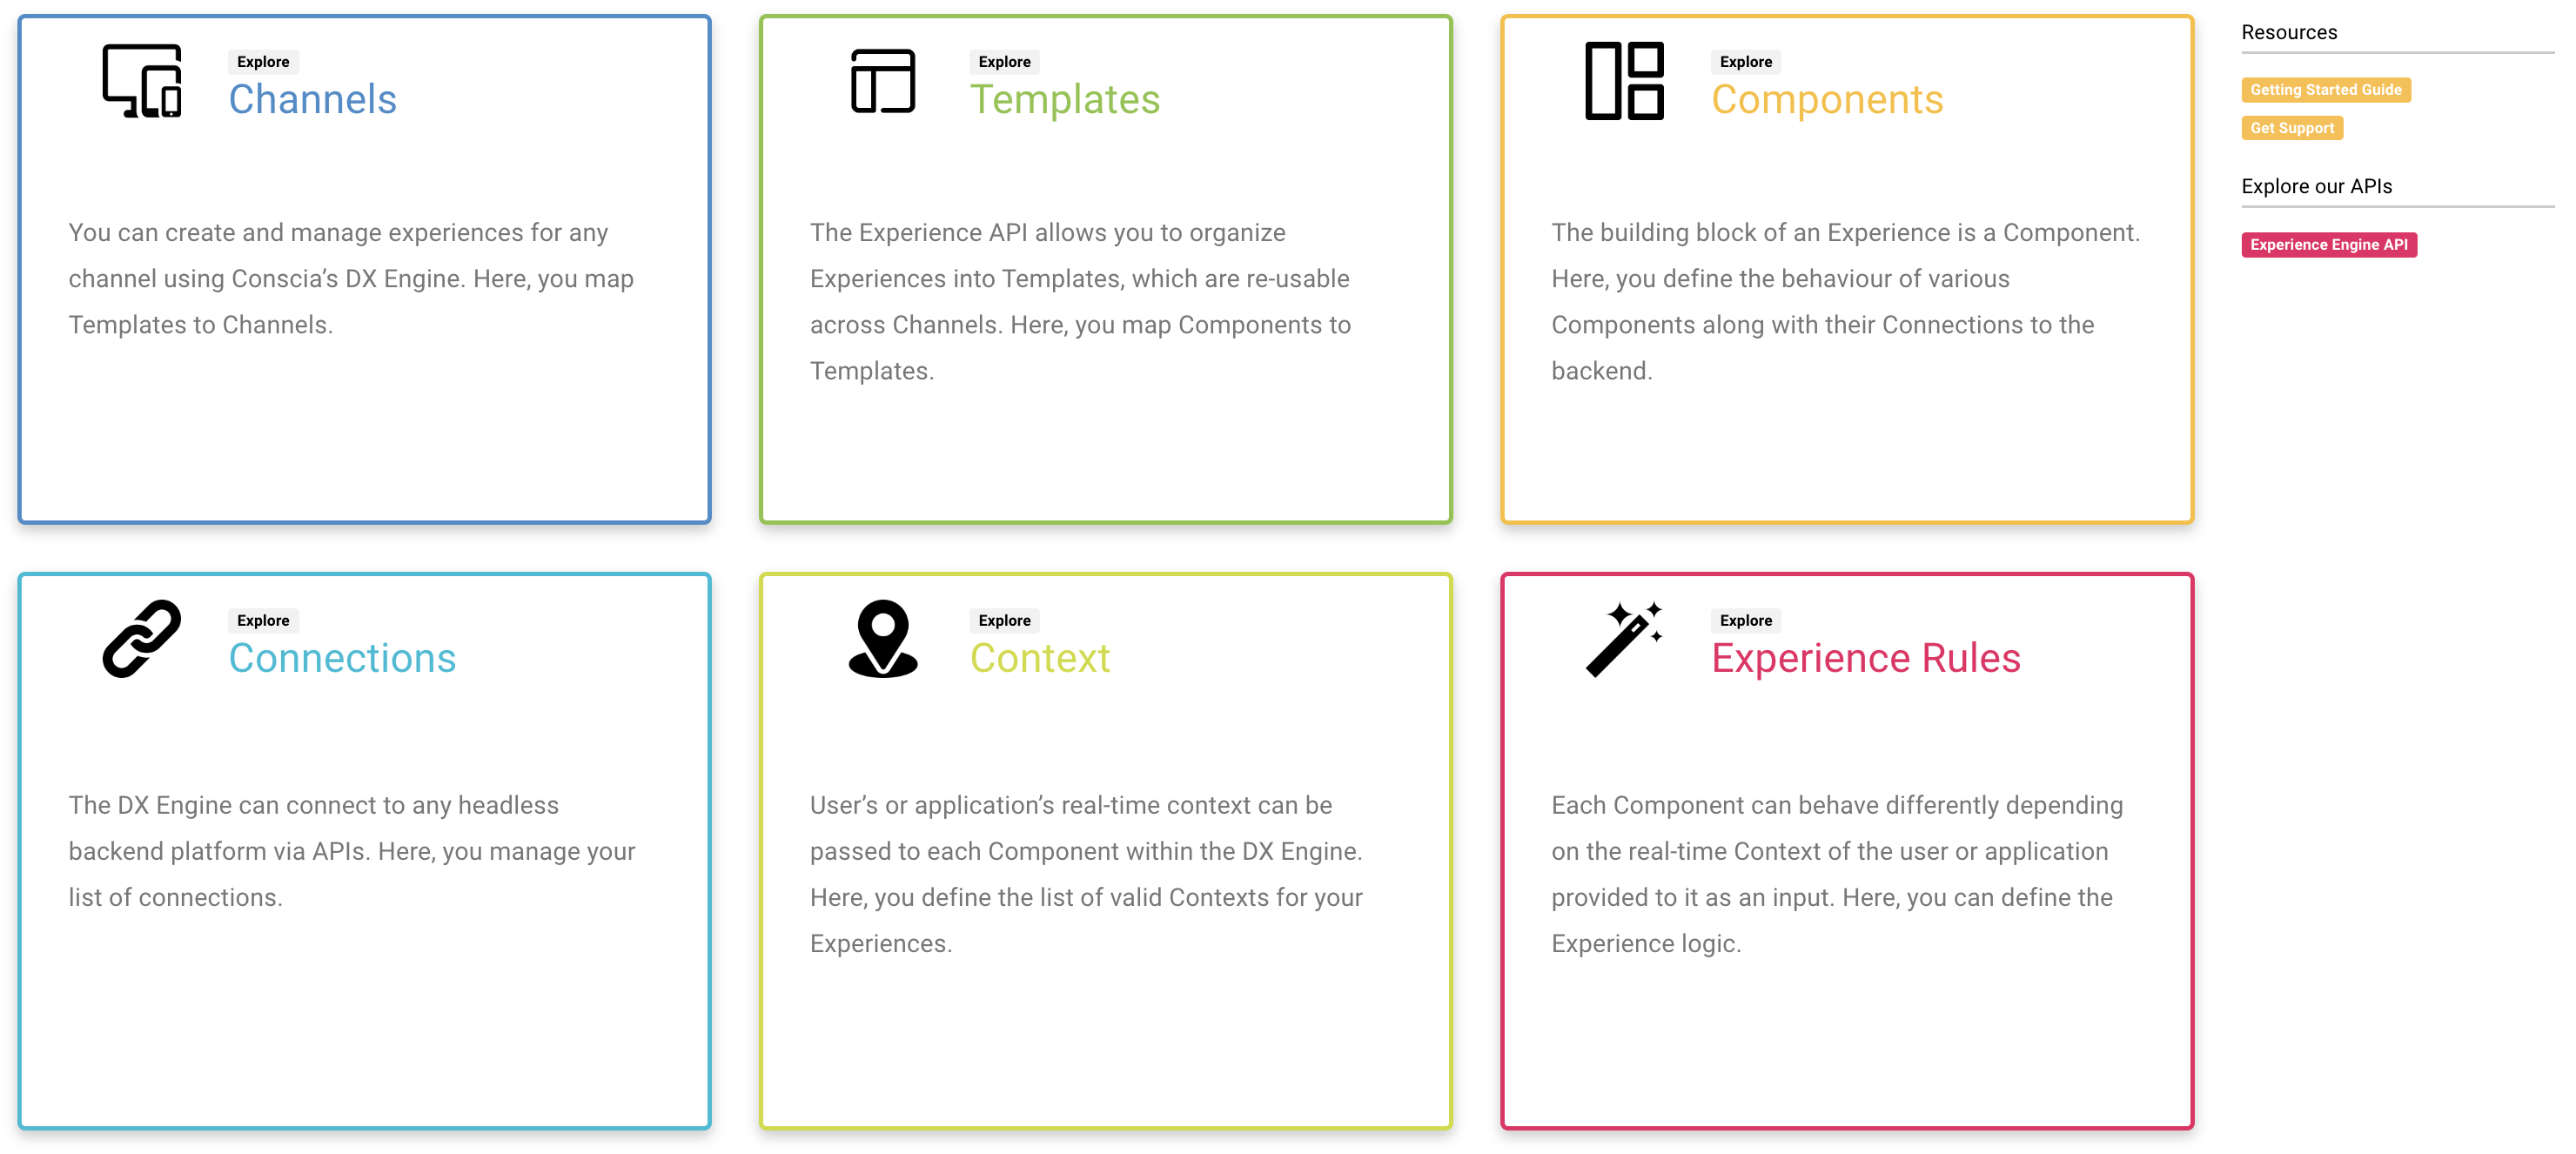
When you first log into DX Studio and select the sandbox provisioned for you, you will see this screen:
Business User Experience
Before we get into the technical details, let's familiarize ourselves with the one dashboard that business users will be interacting with i.e the Experience Rules dashboard, which looks like this:
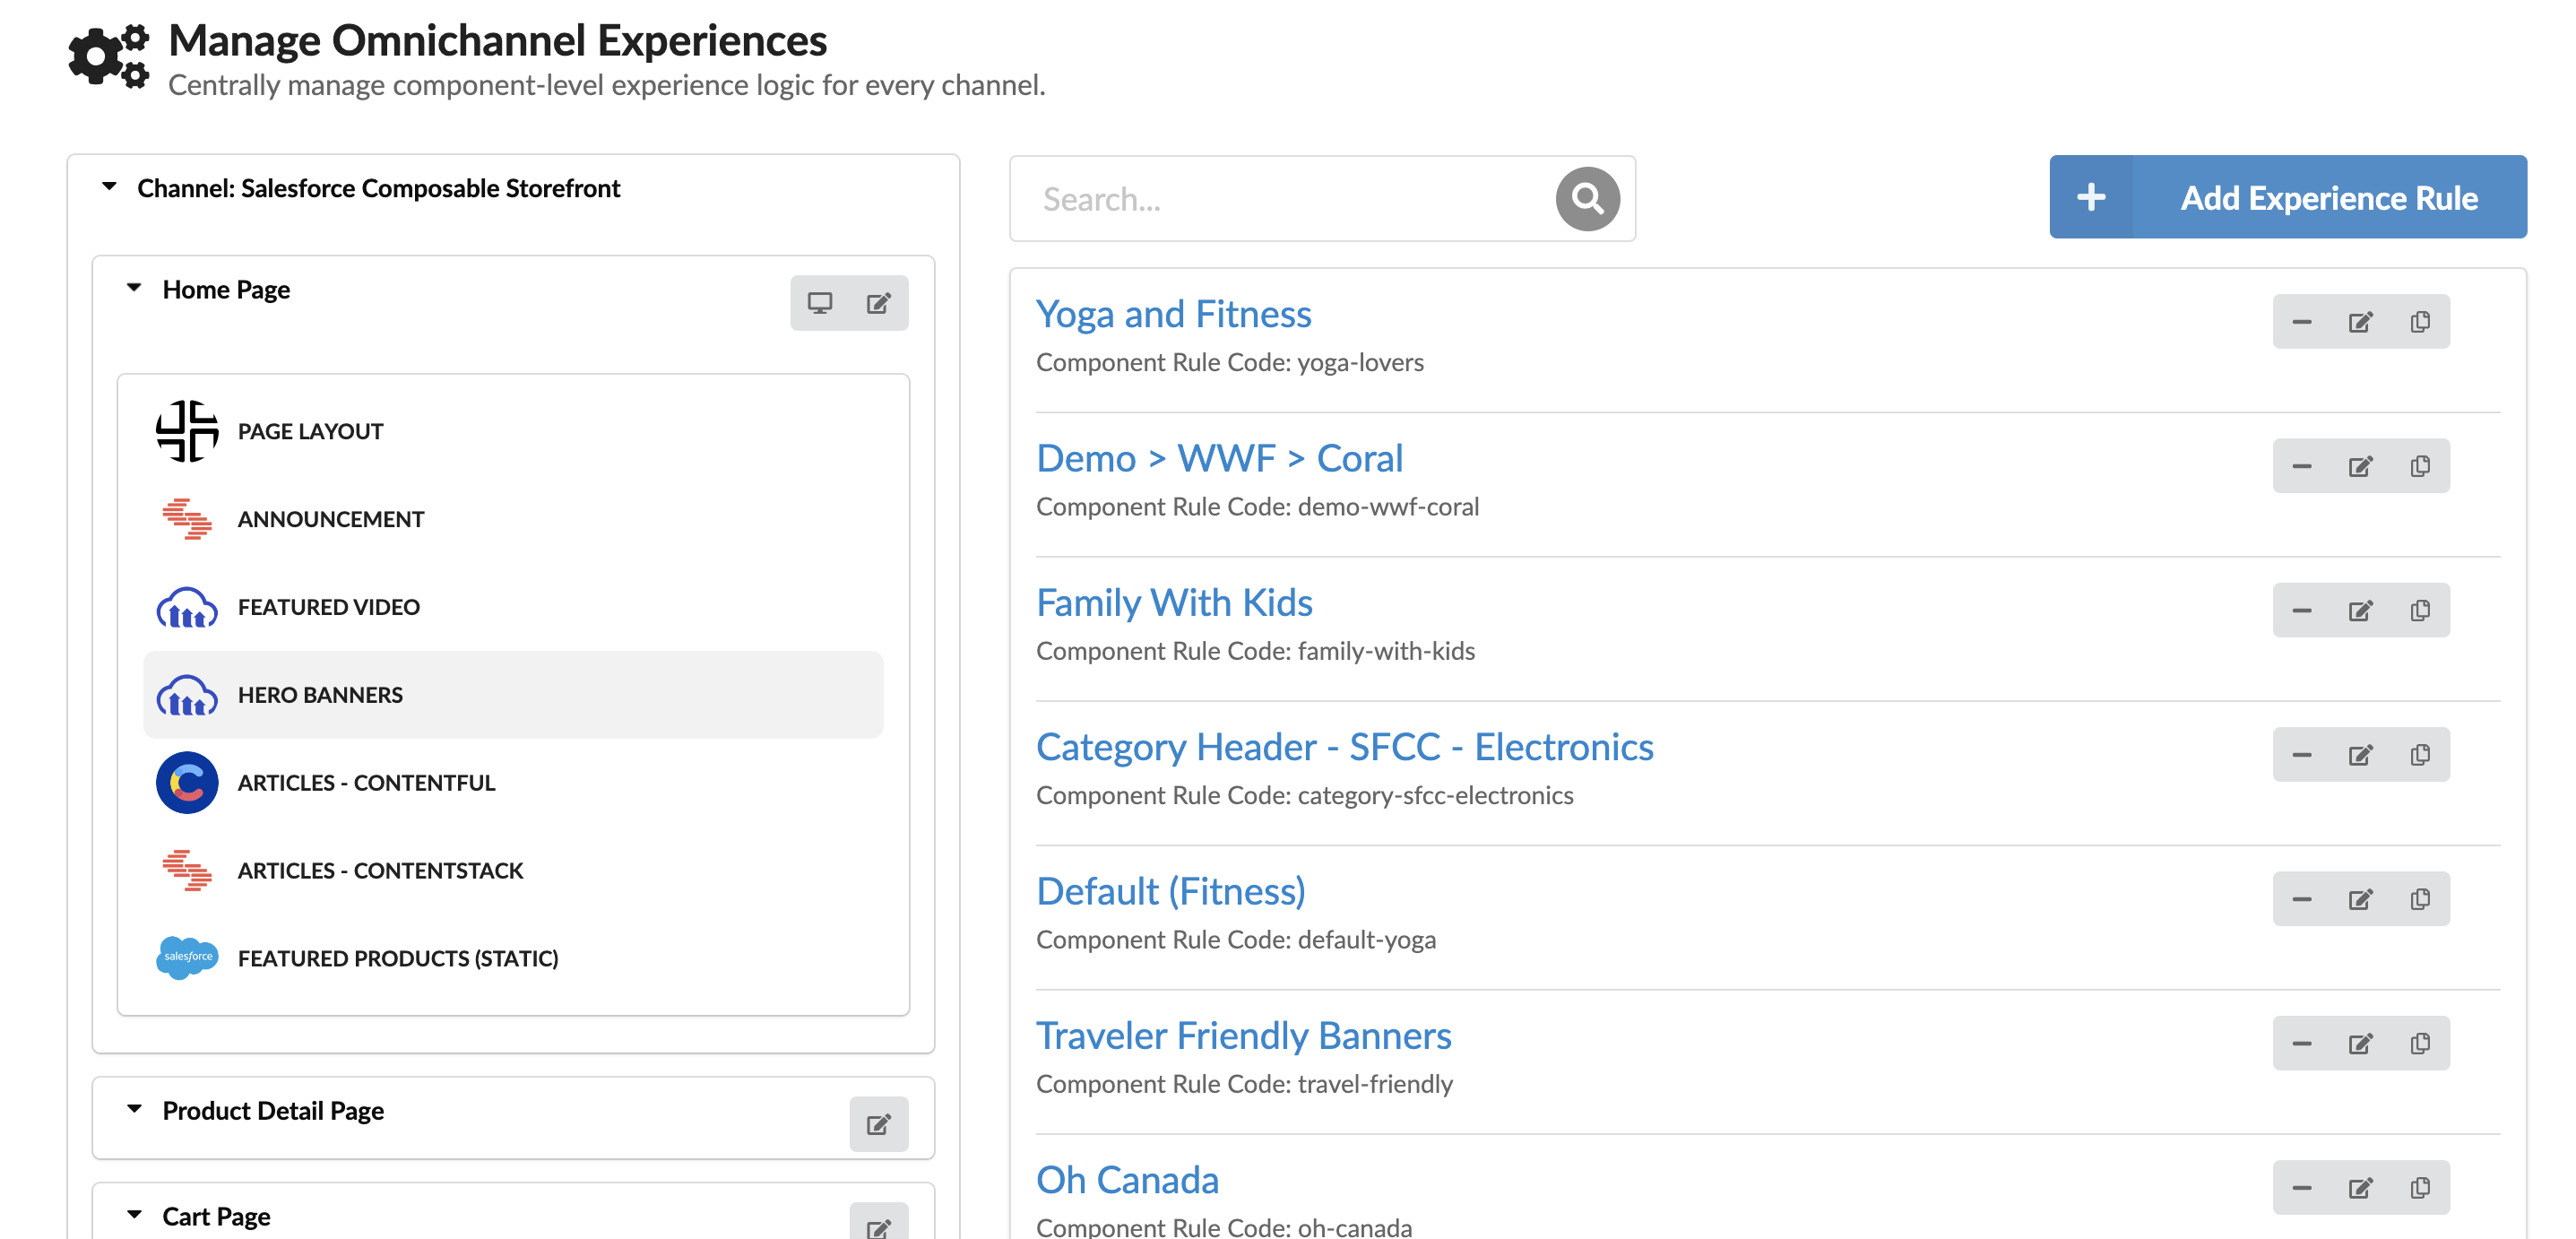
Here is what business users can do:
Navigate the Channel, Template, Component Hierarchy
The left navigation is organized to allow business users to navigate the set of Orchestration Components that they need to provide input for. For example, the Hero Banner Component requires business users to select which content should appear. This left nav is configured by the development team and only exposes the Channels, Templates, and Components that business users need access to.
Set Experience Rules
For each of the Components, business users can set rules to fetch content from the backend based on the customer's real-time context.
If you select the Home Page under Channel: Salesforce Composable Storefront, you will see the list of Orchestration Components on the left nav that are available for business users to configure. On the right hand pane, you will see the experience rules that are set for that component. Select any one of the rules and have a look at the way it is configured.
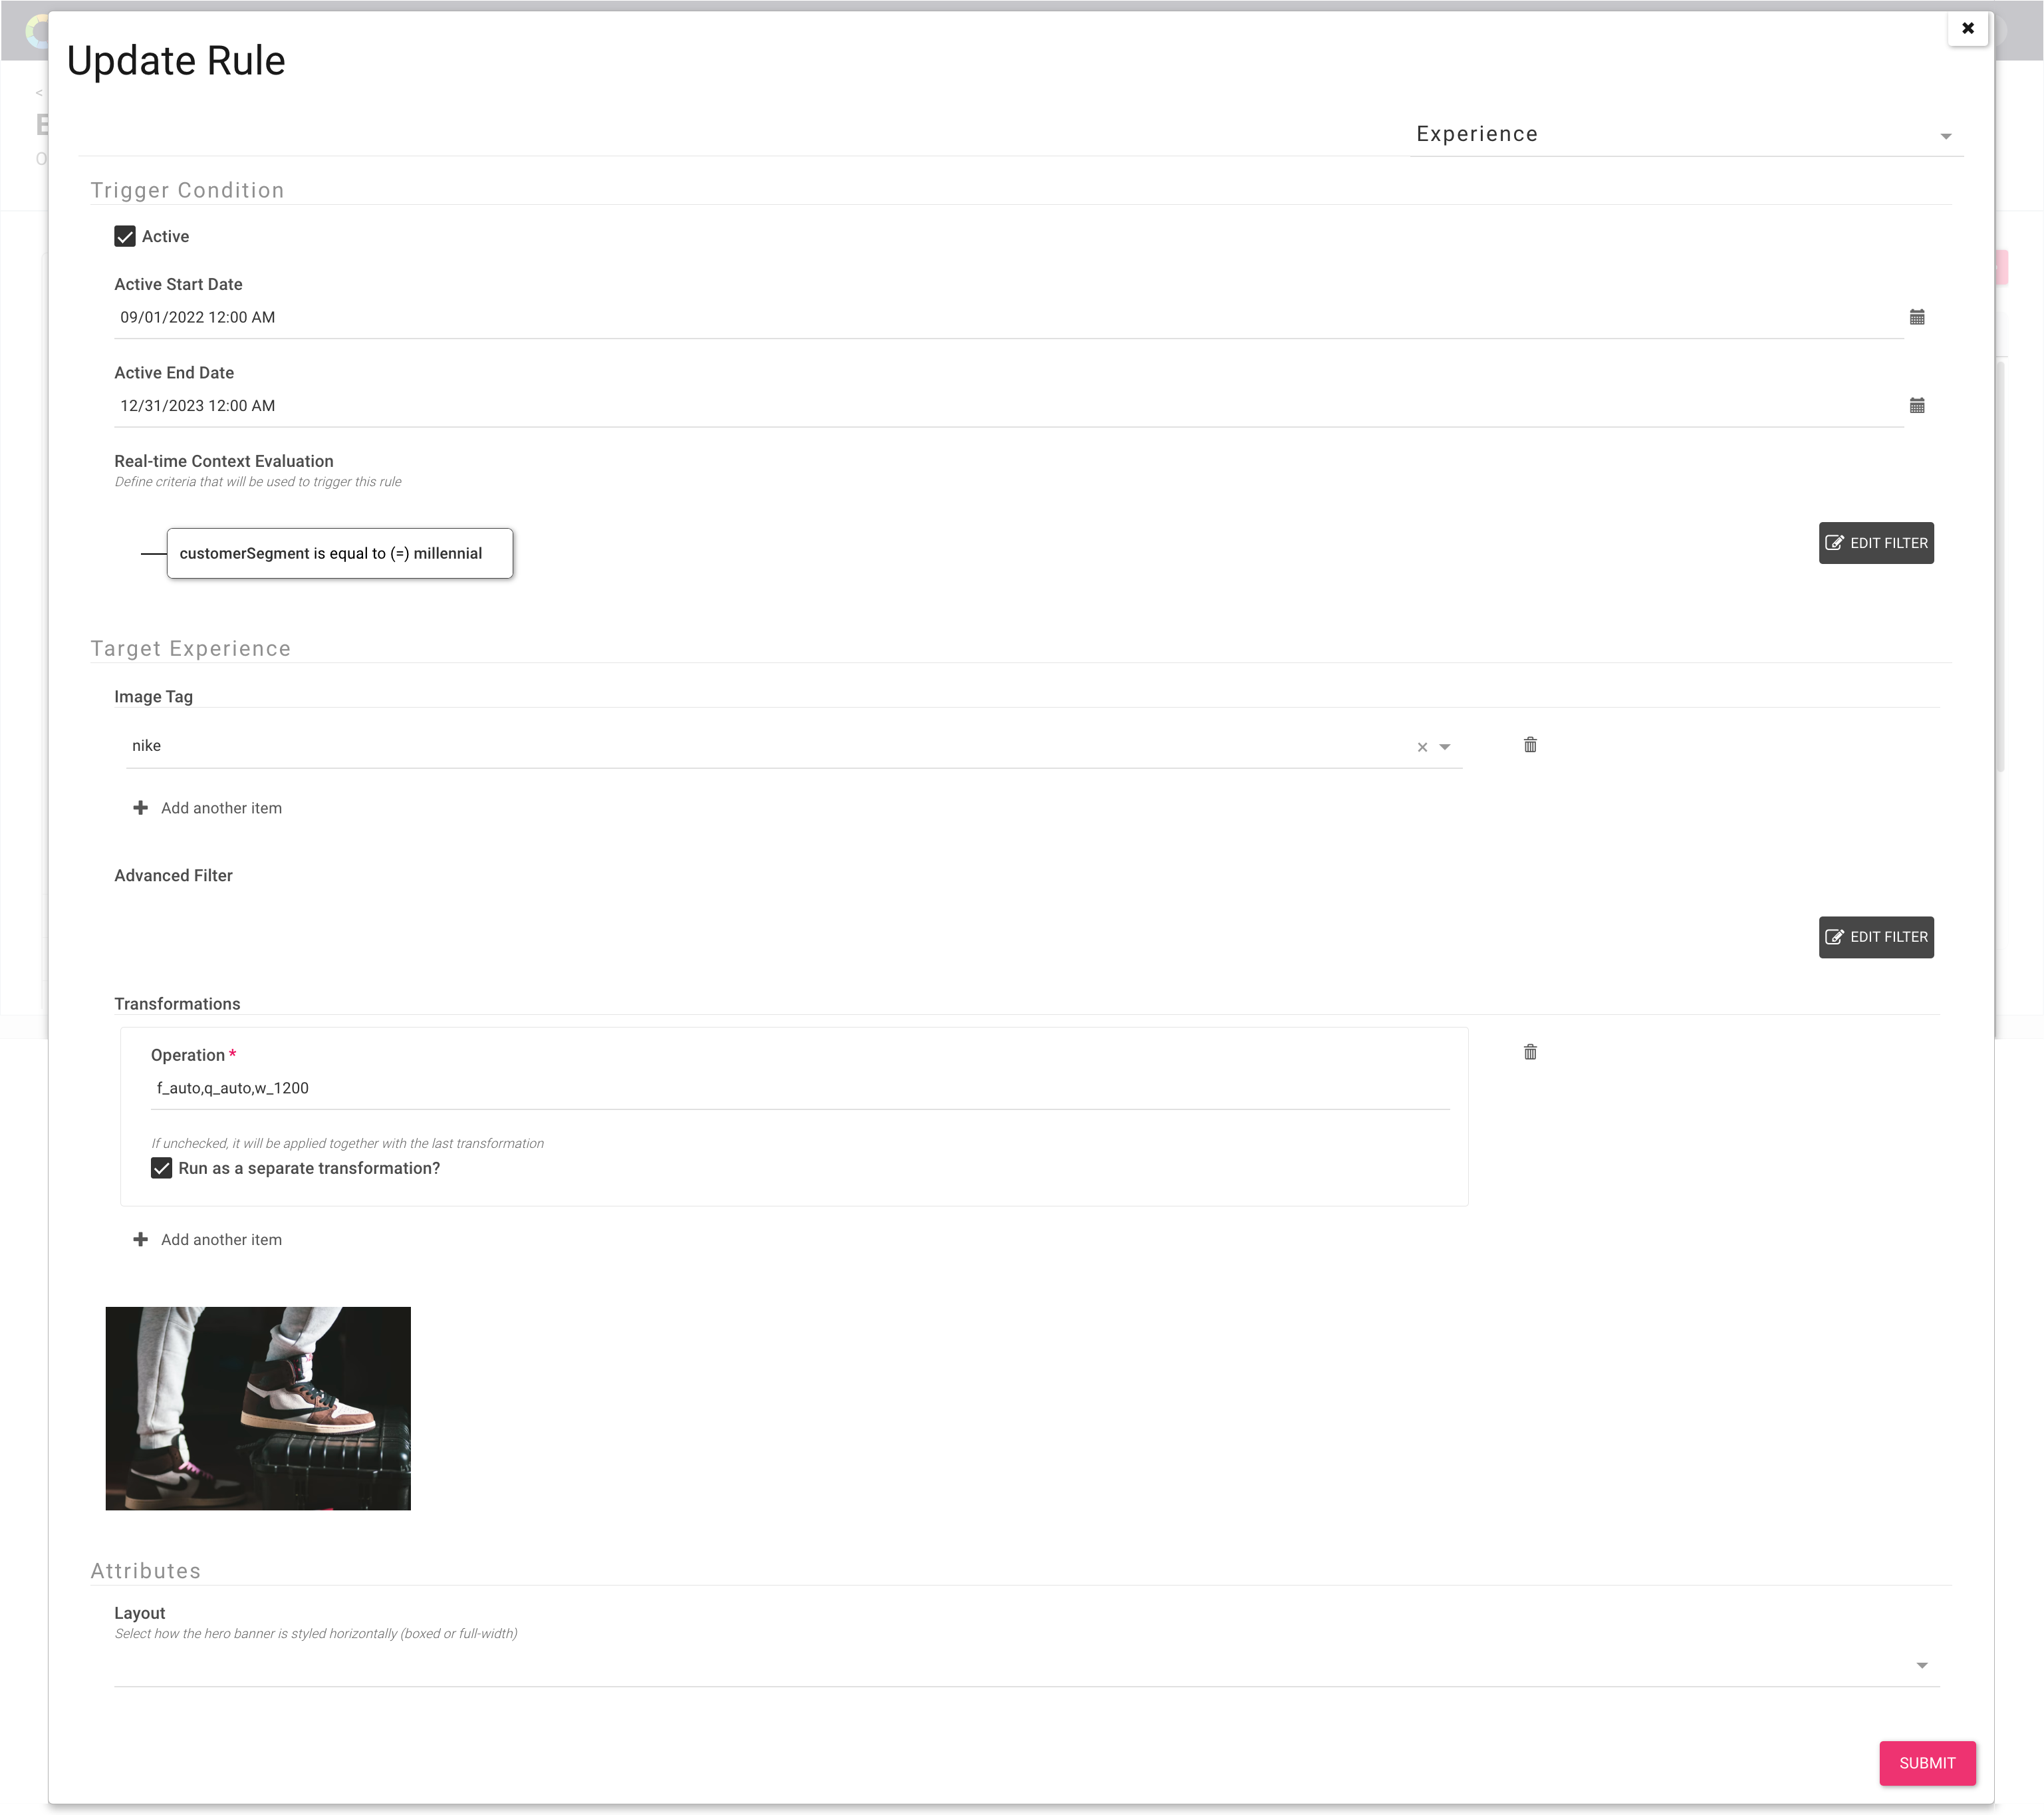
Here, business users can set the rule to be triggered within a certain time frame, personalize content for any context, run A/B tests, and more.
Preview the Experience
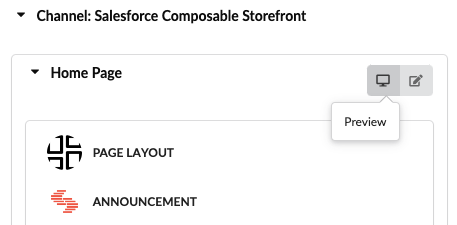
For each Template listed in the left nav, the development team can connect it to a rendered page so that the business users can validate the experience before publishing their changes.
Configuring the Orchestration Flow
When you are pulling data from various backend systems to create a unified digital experience, orchestration is needed. Orchestration involves fetching, transforming, stitching data as well as business logic to show the right content to the customer at the right time. Above, you have seen that business users have control over the frontend experience. Now, it's time to have a look at how we can set up the orchestration flow for the PWA Kit to display the content from these backend systems.
Let's start with the Hero Banner Component that you saw on the Home Page. The orchestration flow for this DX Component would look like this:

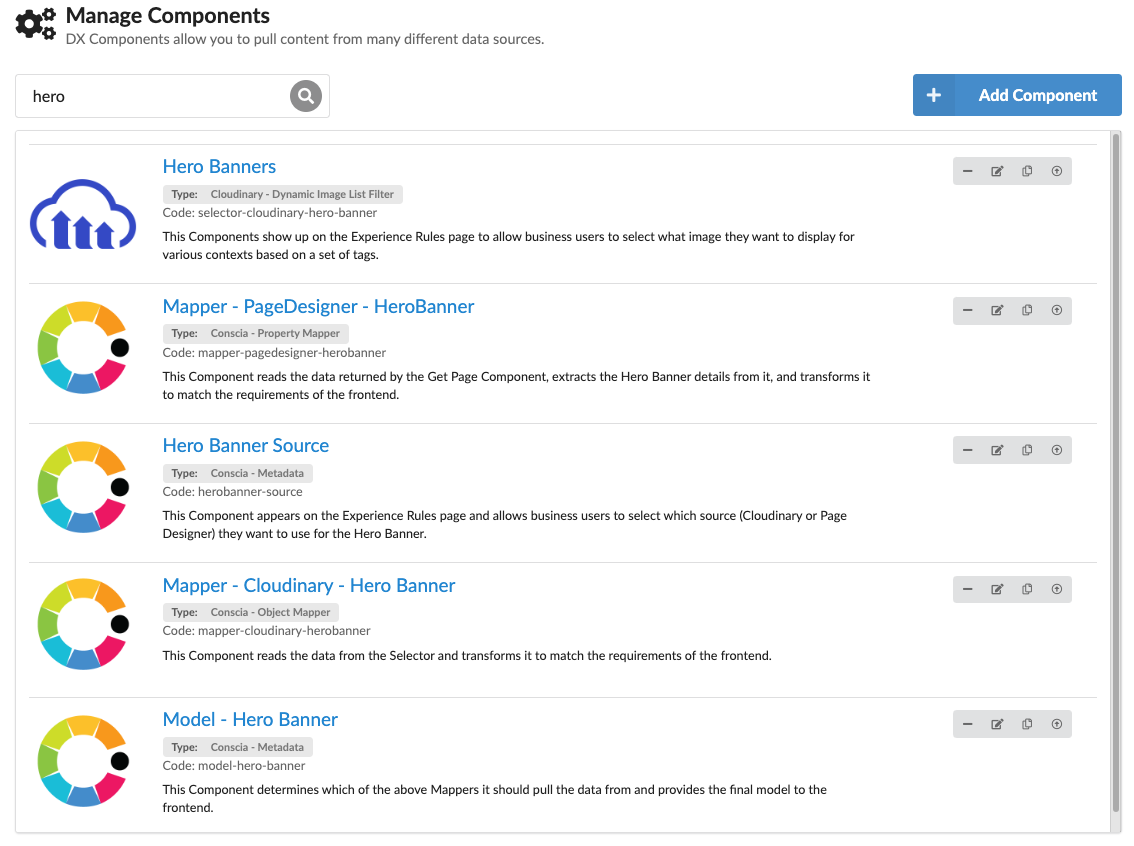
On the Components page you will find the following Orchestration Components related to this flow (search for hero to list out all the Components):
- Get Page - Page Designer - this Component extracts page information from Page Designer. Note that the Page Designer offers an API that allows you to pull the structure and metadata related to the page. No further business user input is required for this Component and hence it won't show up on the Experience Rules page.
- Selector - Cloudinary - Hero Banner - this Components show up on the Experience Rules page to allow business users to select what image they want to display for various contexts.
- Mapper - Page Designer - Hero Banner - this Component reads the data returned by the Get Page Component, extracts the Hero Banner details from it, and transforms it to match the requirements of the frontend.
- Mapper - Cloudinary - Hero Banner - this Component reads the data from the Selector and transforms it to match the requirements of the frontend.
- Hero Banner Source - this Component appears on the Experience Rules page and allows business users to select which source (Cloudinary or Page Designer) they want to use for the Hero Banner.
- Model - Hero Banners - this Component determines which of the above Mappers it should pull the data from and provides the final model to the frontend.
The frontend will bind to the Model Components in the DX Engine. The Selector Component will appear on the Experience Rules Page so that business users can configure the rules to select a specific Hero Banner to display within a specific context.
Now, let's take a look at another example i.e Articles.

In the above flow, note the following:
1) Content Source - this DX Component gives business users the opportunity to decide which CMS they want to source your articles from. Chances are that you'll only be using one specific CMS on the same page even if your overall website or application uses a hybrid of multiple CMSs. However, this is to show how orchestration can involve conditional logic.
2) The Content Selector Components are configured to fetch content from a specific CMS such as Contentstack and Contentful. Depending on the output of the Content Source, only the selected CMS Selector will be executed.
3) The Mapper Components take the output from the Selector Components and map the output to a data model expected by the frontend. For each of the frontend components that you want to fetch data from the DX Engine, you can define the data model you require and simply map the data from your backend systems using the drag and drop Object Mapper or the Property Mapper.
4) The Model Component is the final DX Component in the orchestration flow and is consumed by the frontend. It simply picks the output from the selected CMS and passes it on.
Breaking down the Home page
Now, the Home Page contains various components such as Announcements, Featured Video, Hero Banner, Articles and Featured Products.
Here are the components and the data fields required by each component on the Home Page:
| Front-end Component | Fields |
|---|---|
| Hero Banner | title, subtitle, image |
| Featured Video | videoUrl, alt, title |
| Announcement | title, message |
| Products | imageURL, productName, productPrice |
| Articles | img, alt, title, url, description, author, publishedDate |
Here are the Orchestration Components that allow business users to select content for each of the above frontend components:
| Front-end Component | Content Source | Component ID | Component Type |
|---|---|---|---|
| Hero Banner | Cloudinary | selector-cloudinary-hero-banner | Cloudinary - Static Record List |
| Hero Banner | Page Designer | get-page | Conscia - Universal API Connector |
| Featured Video | Cloudinary | selector-cloudinary-featured-video | Cloudinary - Dynamic Record List |
| Announcement | Contentstack | selector-contentstack-announcement | Contentstack - Static Record List |
| Products | Salesforce | selector-salesforce-featured-products | Salesforce - Static Record List |
| Articles | Contentful | selector-contentful-articles | Contentful - Dynamic Record List |
| Articles | Contentstack | selector-contentstack-articles | Contentstack - Dynamic Record List |
Here are the Orchestration Components that map the selector components to the schema required by the frontend:
| Front-end Component | Mapper Component | Component Type |
|---|---|---|
| Hero Banner | mapper-cloudinary-herobanner | Object Mapper |
| Hero Banner | mapper-pagedesigner-herobanner | Property Mapper |
| Featured Video | model-featured-video | Object Mapper |
| Announcement | model-announcement | Object Mapper |
| Products | model-featured-products | Object Mapper |
| Articles | mapper-contentful-articles | Object Mapper |
| Articles | mapper-contentstack-articles | Object Mapper |
For the Articles component above, we want to pick between the two backend content sources, Contentful or Contentstack.
In order to do this, we need to add another DX Component of type 'Metadata' that will simply pass one of the outputs of the object mappers above to the frontend.
In the Components page, select the DX Component called 'CMS Picker' and scroll down to the section called 'Response Transform'.
You will see the following javascript expressions:
componentExtras('cms-picker').rule.attributes['cms-selection'] === 'contentful'
  ? componentResponse('mapper-contentful-articles')
  : componentExtras('cms-picker').rule.attributes['cms-selection'] === 'contentstack'
    ? componentResponse('mapper-contentstack-articles')
    : {}
This expression looks at the CMS that was selected and passes on the appropriate response from Contentful or Contenstack.
To understand how to use javascript expressions like the one above to manipulate data as it flows between different components, see the Expressions section in our docs.
Making the Experience API Call
You can call the DX Engine by Template or list out the Orchestration Components that your frontend requires. If you ask for the 'Home Page Model' Template, you will receive all of the data you need to render the Home Page.
To test this out, select the Debug|Execution dashboard page under Dev Tools from the top menu. The Debug|Execution dashboard offers a window into the inner workings of the DX Engine and allows developers to run various Experience API calls to see how the engine responds.
You can either call the DX Engine's Experience API by Template or ask for a set of Components. Recall, Templates are just a convenient way of grouping Orchestration Components as well.
For every query, you can provide Context, so that the Orchestration Components that have Experience Rules can be triggered appropriately. Let's give it a try.
Select 'Home Page Model' from the list of Templates available in your sandbox. Leave the Context empty for now. If the Context is empty, the default rules will fire. You should see four Orchestration Components running in parallel.
If you want to add Context, the 'externalId' is already set up for you. You can try entering this in the 'Context' section:
{
    "externalId":"email:pepper@conscia.ai"
}
Here is the response you will see when you click on the 'Execute Template' button:
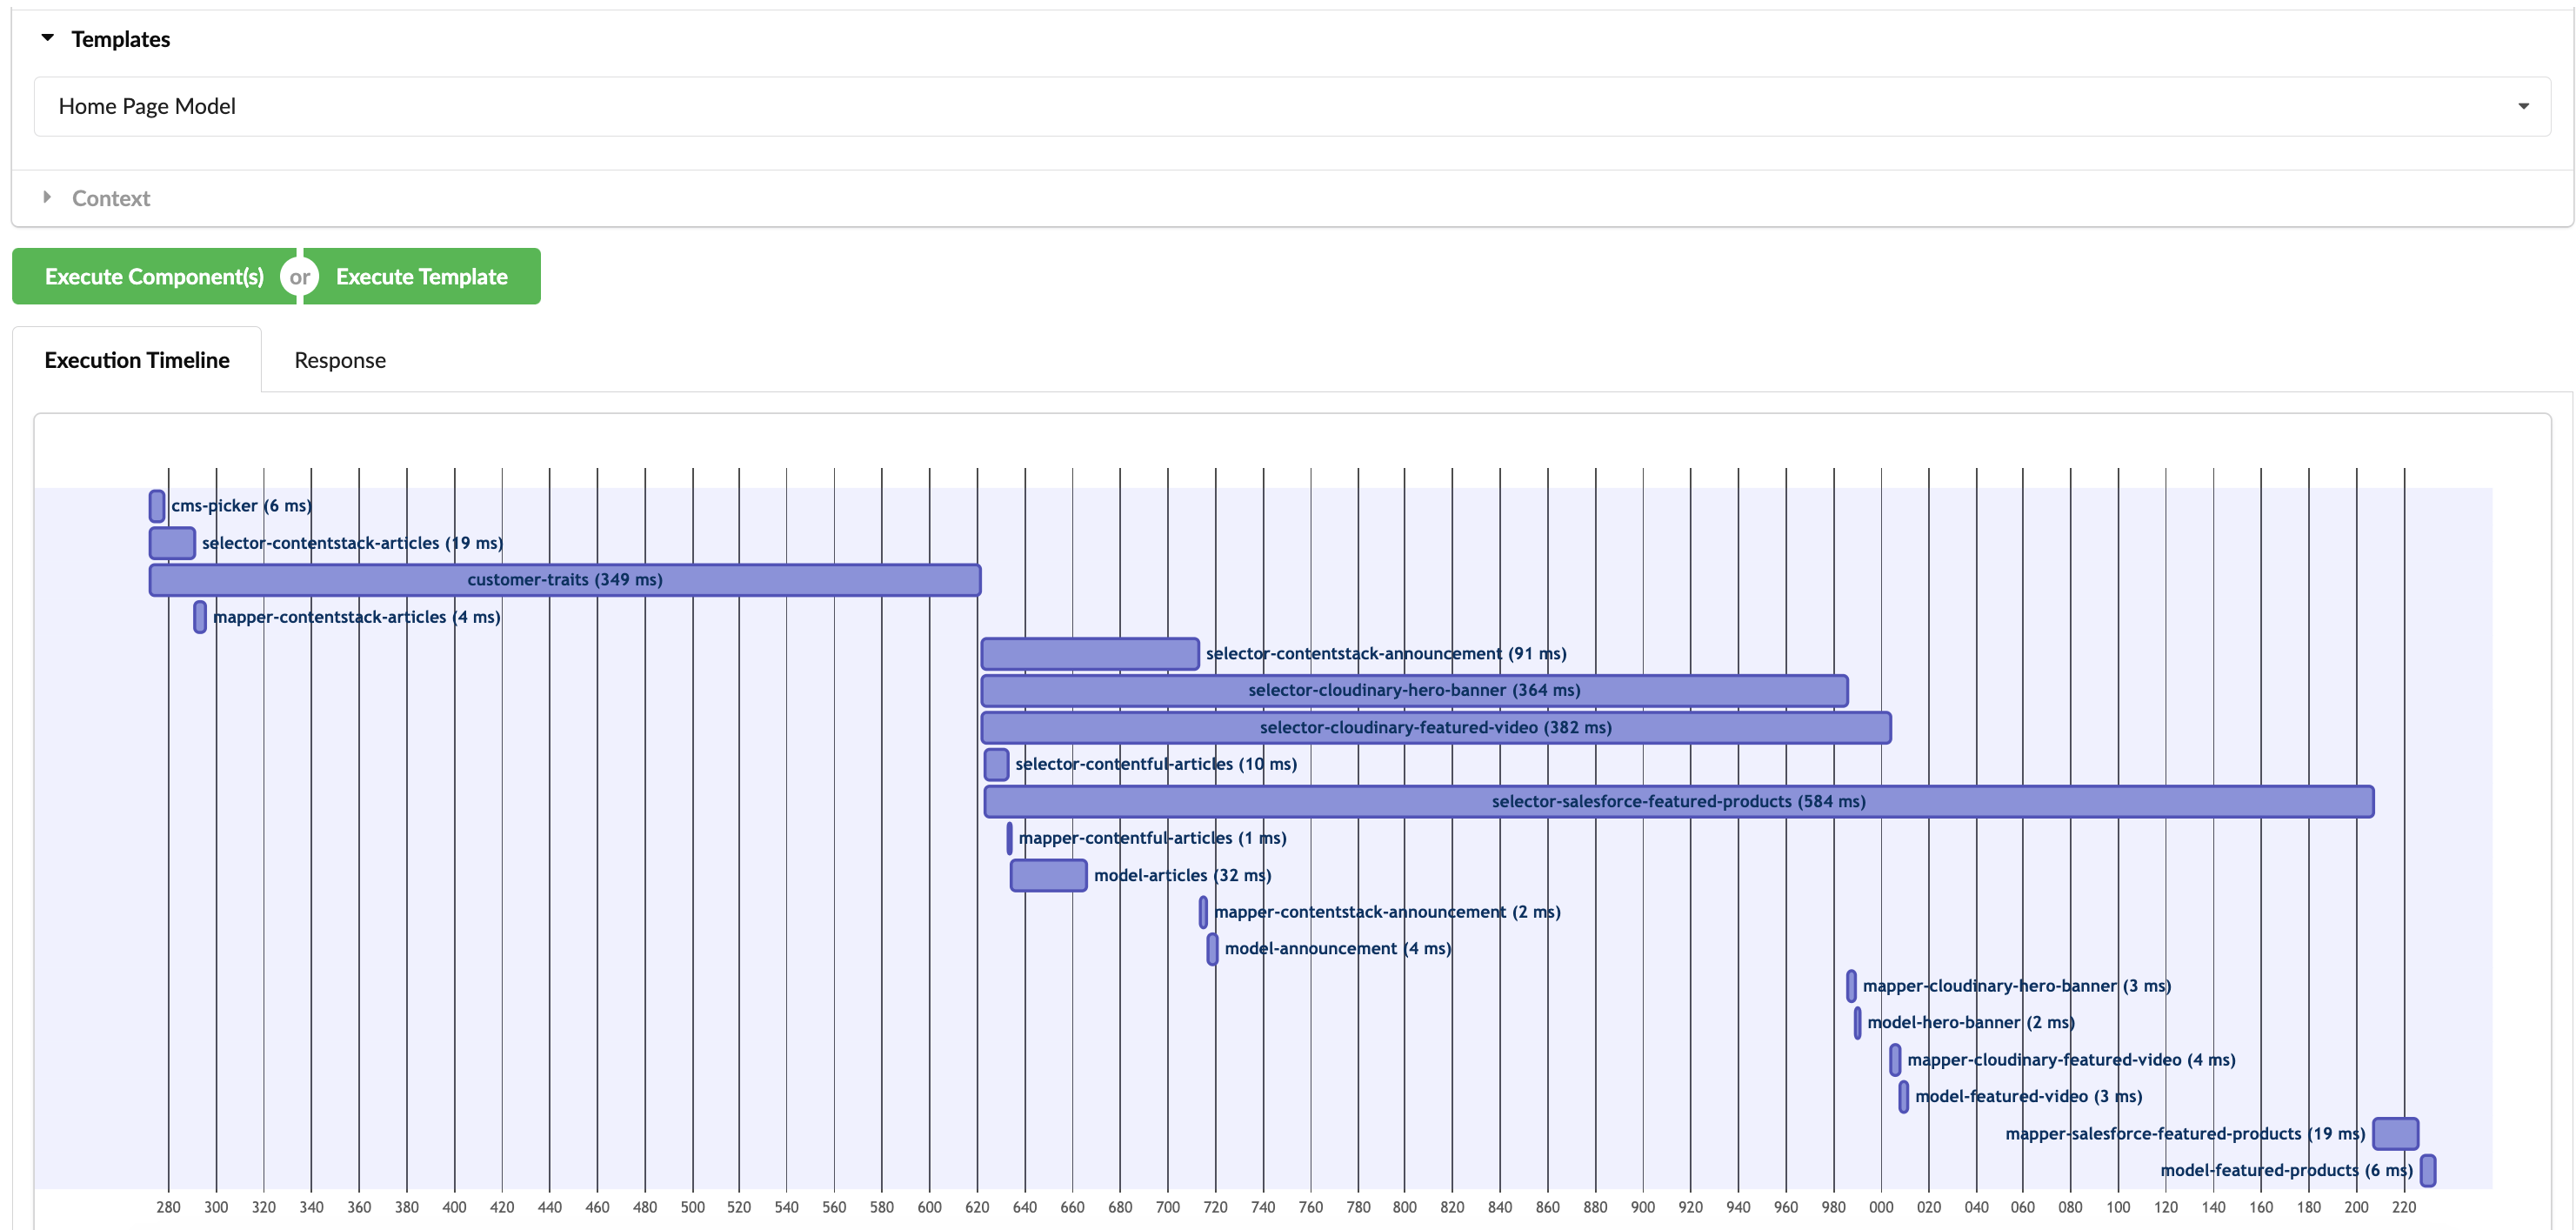
If you click on any of the Orchestration Components, you will see their individual outputs. For example, if you click on the 'model-hero-banner' Component, you will see the following:
{
  "title": "Designed for Life on the Go",
  "subtitle": "View the 2023 travel collection",
  "image": "http://res.cloudinary.com/harshil-conscia/image/upload/v1665695324/Banners/pexels-photo-1936848_xziyvf.jpg"
}
Note how the schema of the Hero Banner Model Component is quite simple compared to the original payload received from Cloudinary. To see that schema, click on the selector-cloudinary-hero-banner DX Component from the Execution Timeline.
{
  "asset_id": "cec5c19937d113b4b5e0aa491f412419",
  "public_id": "Banners/pexels-photo-1936848_xziyvf",
  "folder": "Banners",
  "filename": "pexels-photo-1936848_xziyvf",
  "format": "jpg",
  "version": 1665695324,
  "resource_type": "image",
  "type": "upload",
  "created_at": "2022-10-13T21:08:44+00:00",
  "uploaded_at": "2022-10-13T21:08:44+00:00",
  "bytes": 296341,
  "backup_bytes": 0,
  "width": 2250,
  "height": 1500,
  "aspect_ratio": 1.5,
  "pixels": 3375000,
  "pages": 1,
  "tags": [
    "luggage",
    "omnichannel"
  ],
  "context": {
    "category": "128154",
    "cta_text": "View Collection",
    "subtitle": "View the 2023 travel collection",
    "title": "Designed for Life on the Go"
  },
  "image_metadata": {
    "JFIFVersion": "1.01",
    "ResolutionUnit": "inches",
    "XResolution": "72",
    "YResolution": "72",
    "ProfileDescription": "c2",
    "Colorspace": "RGB",
    "DPI": "72"
  },
  "image_analysis": {
    "face_count": 0,
    "faces": [],
    "grayscale": false,
    "illustration_score": 0,
    "transparent": false,
    "etag": "ddb9eb20b3404e93ba2a5f85a056e11e",
    "colors": {
      "brown": 40.8,
      "orange": 24.8,
      "white": 22.7,
      "gray": 8.6
    }
  },
  "url": "http://res.cloudinary.com/harshil-conscia/image/upload/v1665695324/Banners/pexels-photo-1936848_xziyvf.jpg",
  "secure_url": "https://res.cloudinary.com/harshil-conscia/image/upload/f_auto,q_auto,w_1200/v1665695324/Banners/pexels-photo-1936848_xziyvf.jpg",
  "status": "active",
  "access_mode": "public",
  "access_control": null,
  "etag": "ddb9eb20b3404e93ba2a5f85a056e11e",
  "created_by": {
    "access_key": "214358474282893",
    "custom_id": "jason@conscia.co",
    "external_id": "a84ad2a65f98c2ba49c31fafeb2fa2"
  },
  "uploaded_by": {
    "access_key": "214358474282893",
    "custom_id": "jason@conscia.co",
    "external_id": "a84ad2a65f98c2ba49c31fafeb2fa2"
  }
}
Personalization
In a composable stack, personalization requires orchestration. If your customer data exists in an external system, the DX Engine will need to fetch the profile, parse out the customer traits from it, and pass these on as additional context to the downstream Orchestration Components that are responsible for fetching relevant content for the customer.
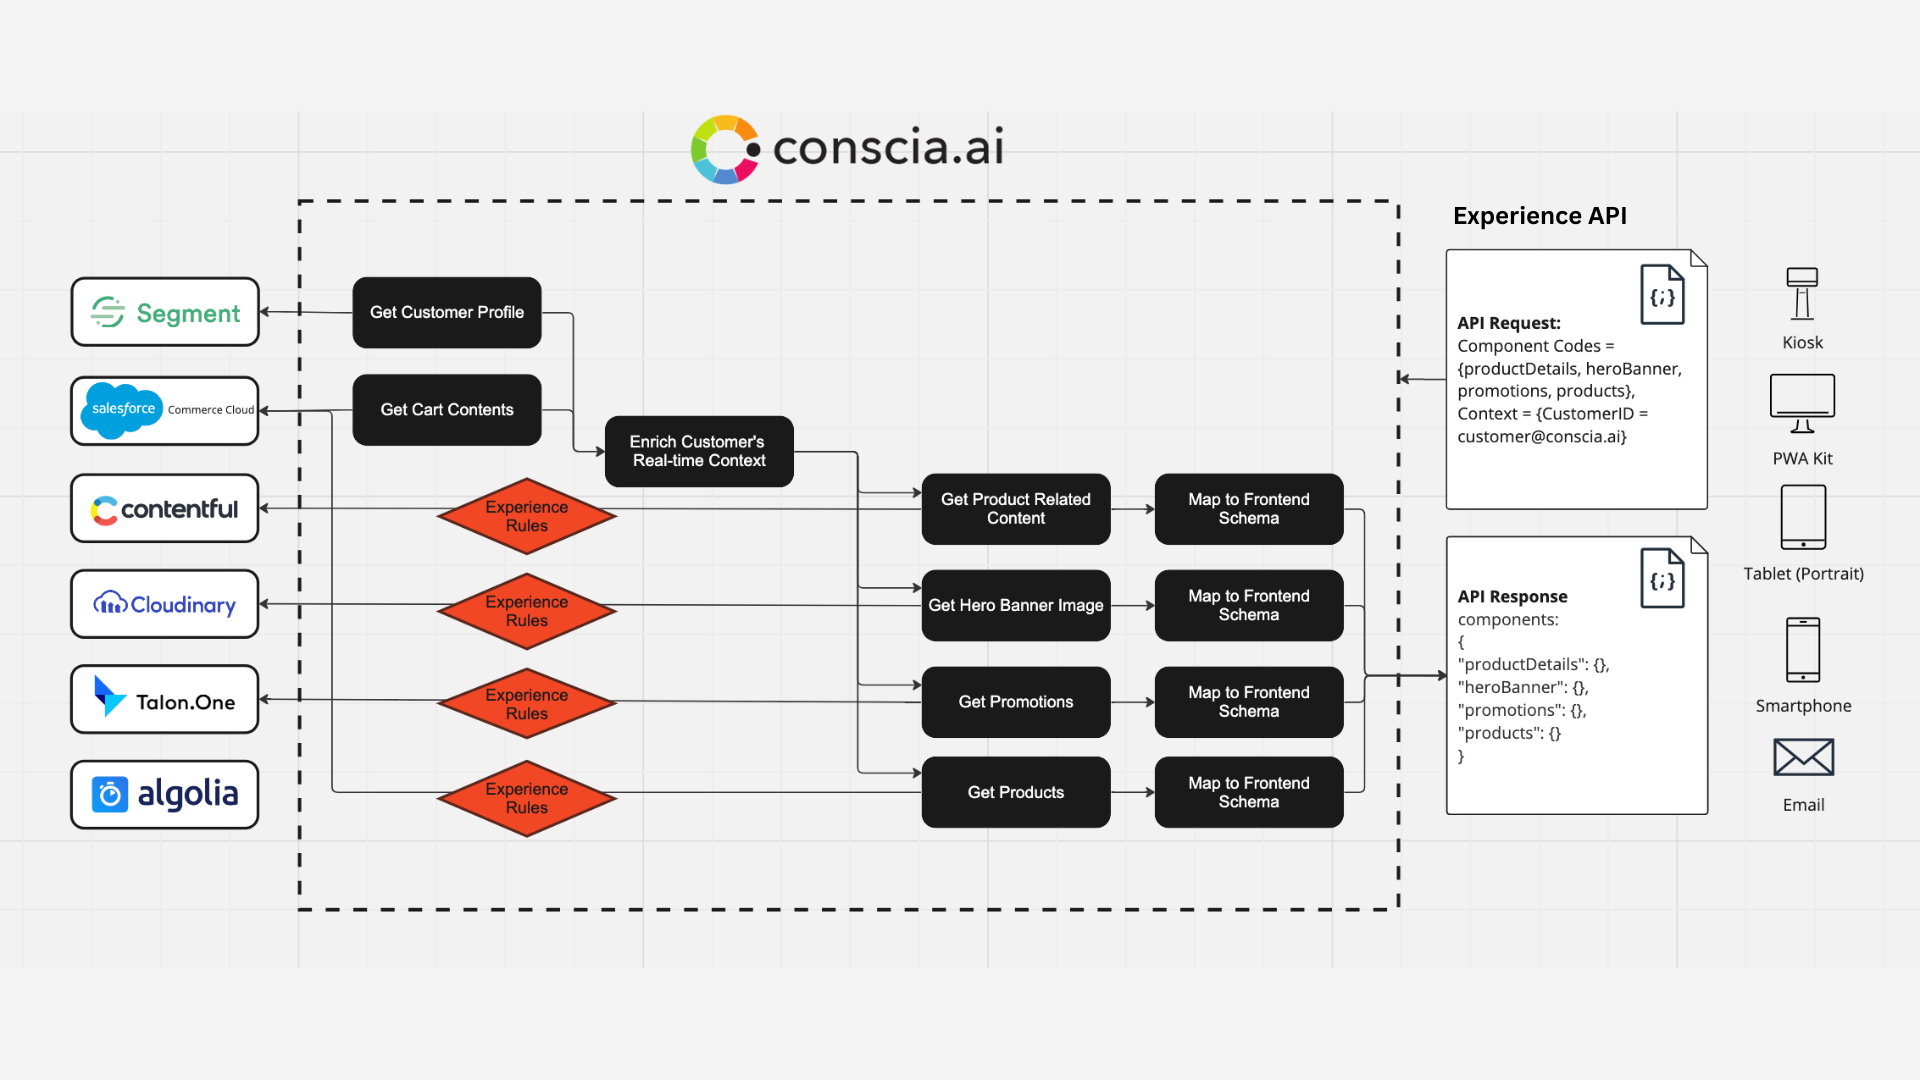
In your sandox, you will notice a DX Component that connects to the CDP, Segment, to fetch for customer data.

This DX Component updates the real-time context of the query with the customerSegment field obtained from the customer's profile in Segment CDP.

This 'customerSegment' context field is then used by other Orchestration Components such as 'Announcements' and 'Hero Banner' to set the rules for which content should be seen by which customer.

Setting Up Preview
Conscia offers the ability to provide preview for the web pages regardless of the framework used to render them using an iFrame. This is done so by updating the 'Preview URL' when defining the Templates.

Sample Preview URL:
'https://salesforce-pwakit-demo.conscia.ai/' + '?' +
  _.toArray(previewedObjectData.context)
    .filter((v) => !_.isUndefined(v.value))
    .map((v) => v.contextField + '=' + v.value)
    .join('&')
Note that this is a javascript expression that constructs the page URL that has access to the context fields as the dynamic parameter. In the above example, a resulting URL would look something like this:
https://salesforce-pwakit-demo.conscia.ai/?customerSegment=millennial
Here is what you will see when you preview the Home page:
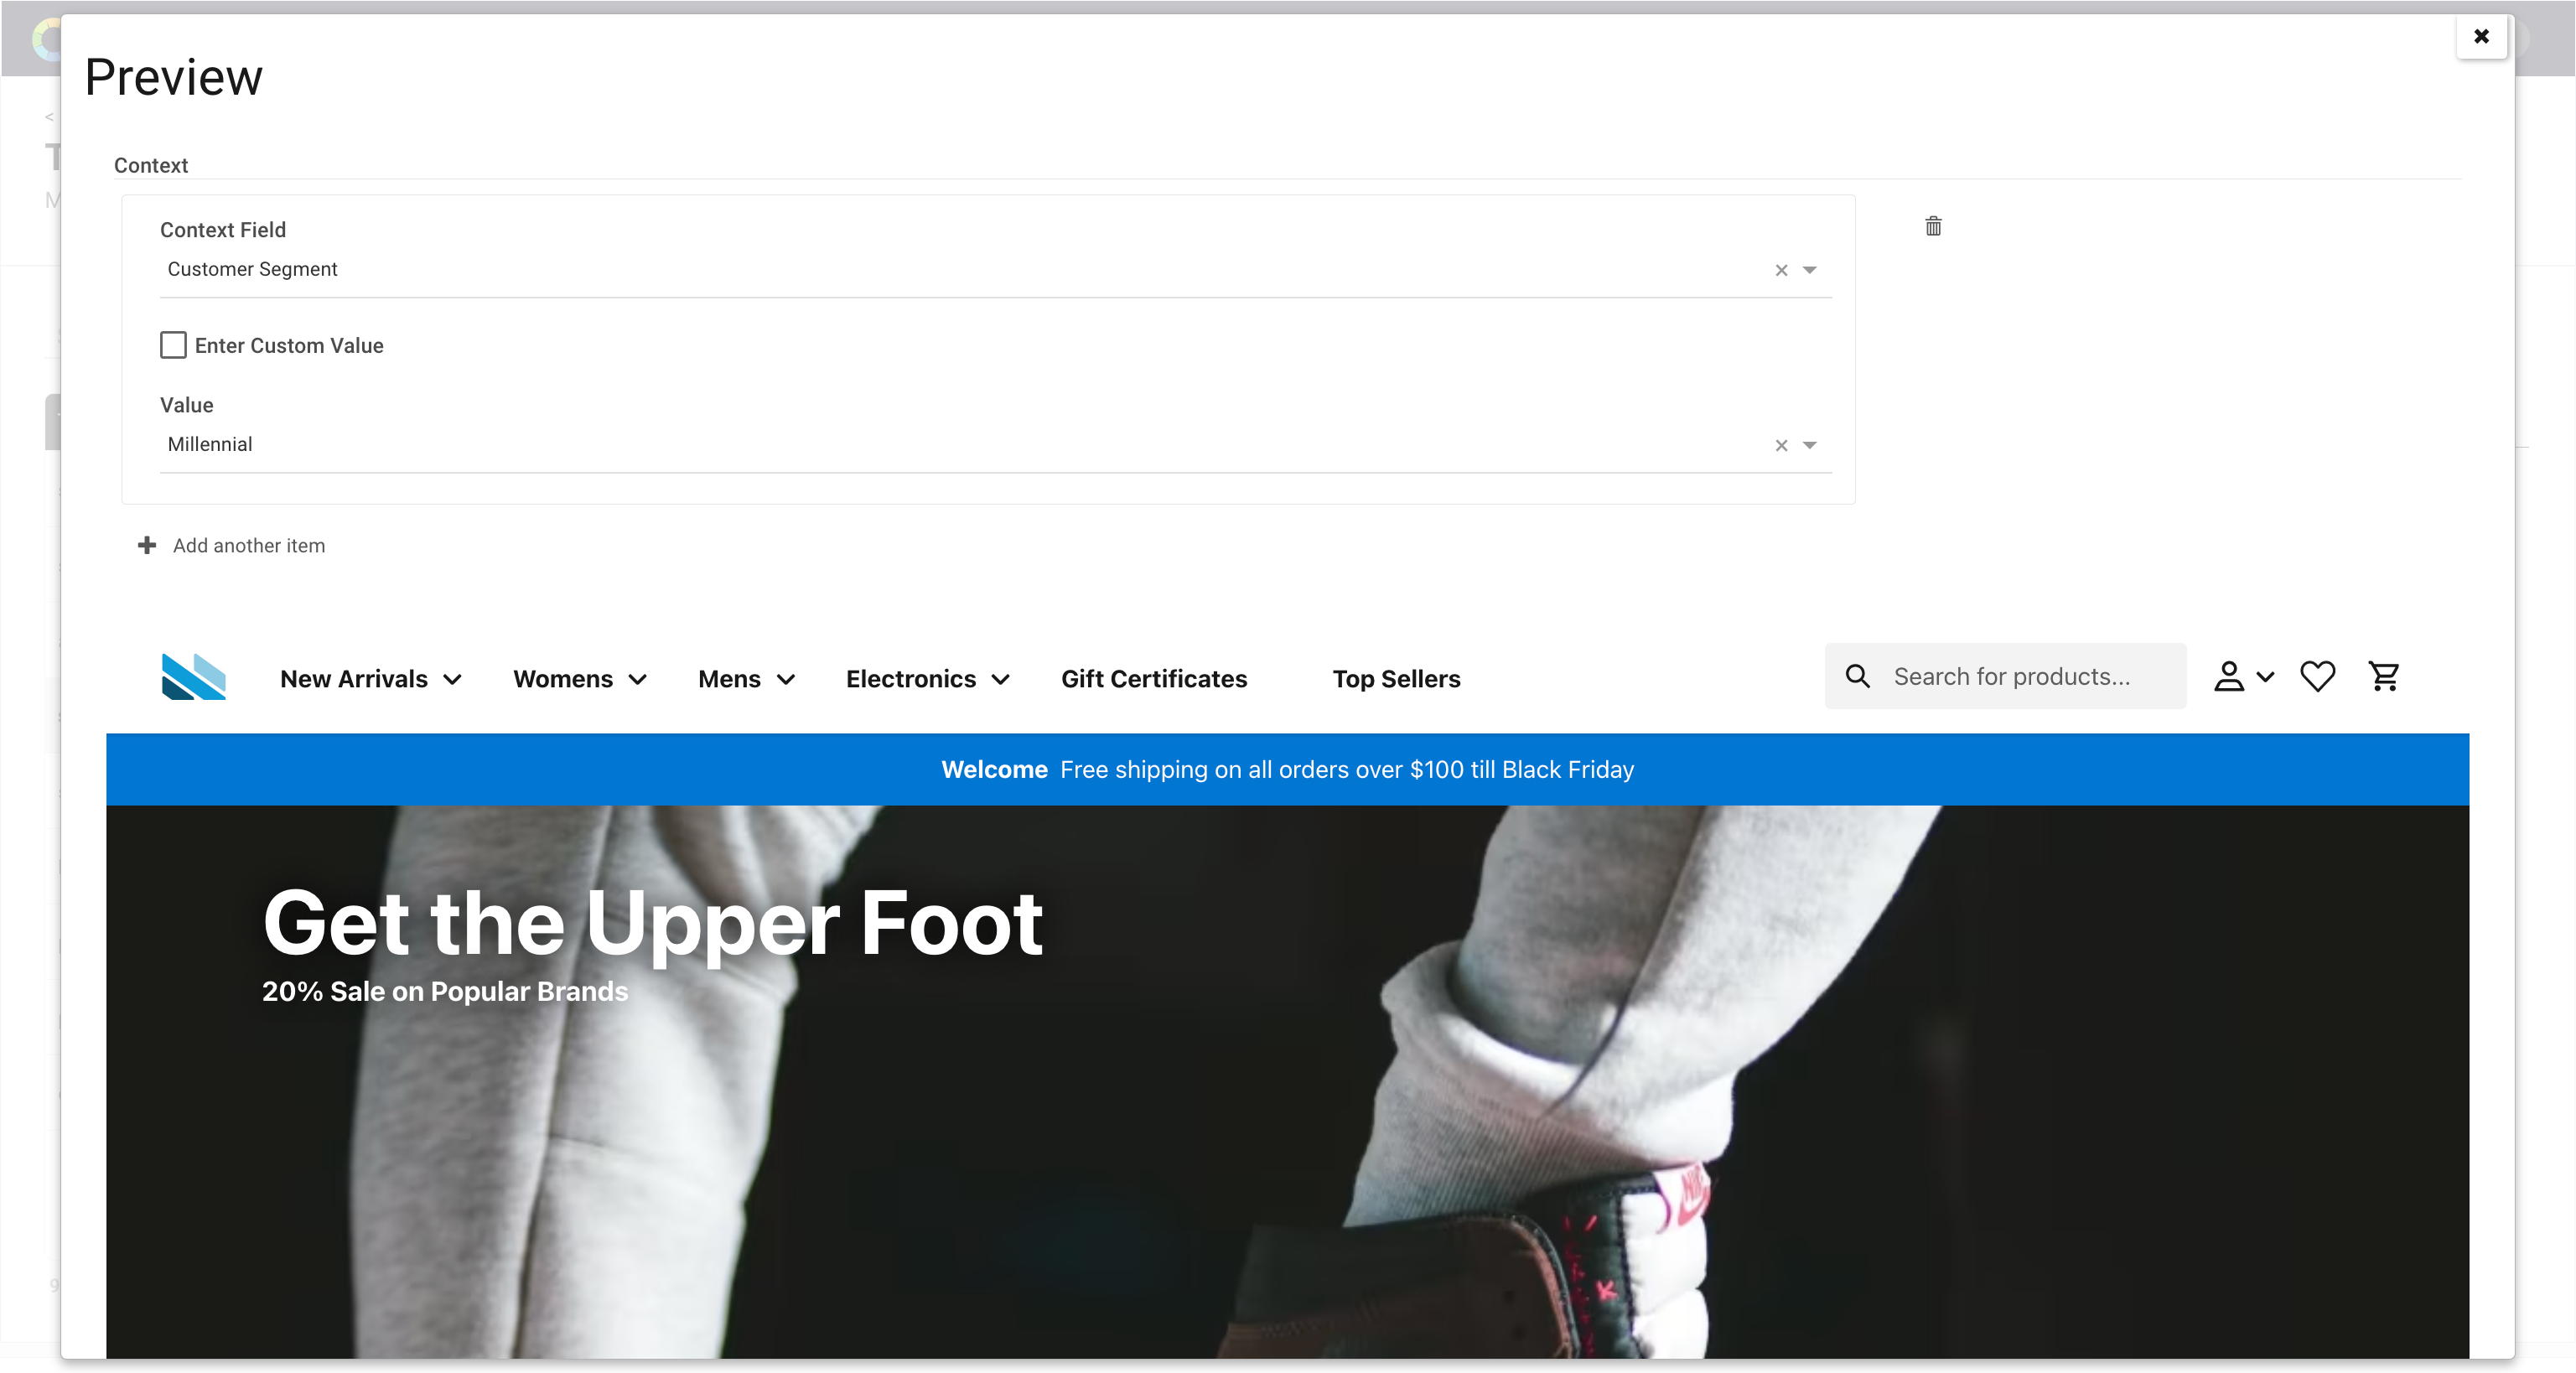
Note that the above modal allows you to select a variety of different 'Context Fields' and values so that you can validate the experience before publishing your changes to the live site.
Dynamic Pages
Constructing the URL this way allows you to preview dynamic pages such as the Product Listing page by creating a dynamic URL for each of the categories by simply selecting the categoryID for the page you want to preview.

The PWA Kit formats the Category URLs like this:
https://salesforce-pwakit-demo.conscia.ai/category/newarrivals-womens
In order to preview the Product Listing for a specific category, you'll need to write a javascript expression such as the one below:
'https://salesforce-pwakit-demo.conscia.ai/category/' +
  _.get(
    _.find(previewedObjectData.context, { contextField: 'categoryId' }),
    'value'
  ) +
  '/?' +
  _.toArray(previewedObjectData.context)
    .filter((v) => !_.isUndefined(v.value))
    .map((v) => v.contextField + '=' + v.value)
    .join('&')
Design Attributes
To empower digital teams to pass along additional information and directions to the frontend, the DX Engine offers Component Level Attributes. One of the use cases for Component Level Attributes is Design Properties/Attributes that the frontend could use to render certain elements or components. An example of this would be to control the layout or styling of a component.
As an example, we have a Component that returns the hero banner. A business user may want to control the presentation and decide whether to show a full width banner or a split where one side is the banner and the other side is the title, subtitle, call to action, etc. This can be configured as an 'Attribute' which would be included in the Component response as additional instructions for the frontend so that it can change it's presentation or behaviour.
Here is an example of what the business user may see for the Hero Banner component when configuring the page.

To learn how to create and use attributes, please see this page.
DX Engine Application Setup
For business users to be able to configure the experience for each of your frontend applications, the DX Engine application needs to be setup the DX Engine application. Let's have a look at how this is done.
Connections
You will find these Connections under the 'Settings' Menu. Your sandbox contains connections to Salesforce Shopper API, Core API as well as Contentful, Contentstack, and Cloudinary.
If you right click and hit 'Update', a modal will pop up that will show how each Connection is using a Secret.
To learn more about how to create and manage Connections, please visit the Connections page.
Secrets
You will find 'Secrets' under the 'Settings' Menu in the top nav. Secrets allow you to define API tokens which can be used by Connections without the need to display them in clear text. In your sandbox environment, we have created a few Secrets for you.
To learn more about how to create and manage Secrets, please visit the Secrets page.
Orchestration Components
In your sandbox, various Orchestration Components have already been created for you.
If you browse to the 'Components' dashboard, you will see the following:
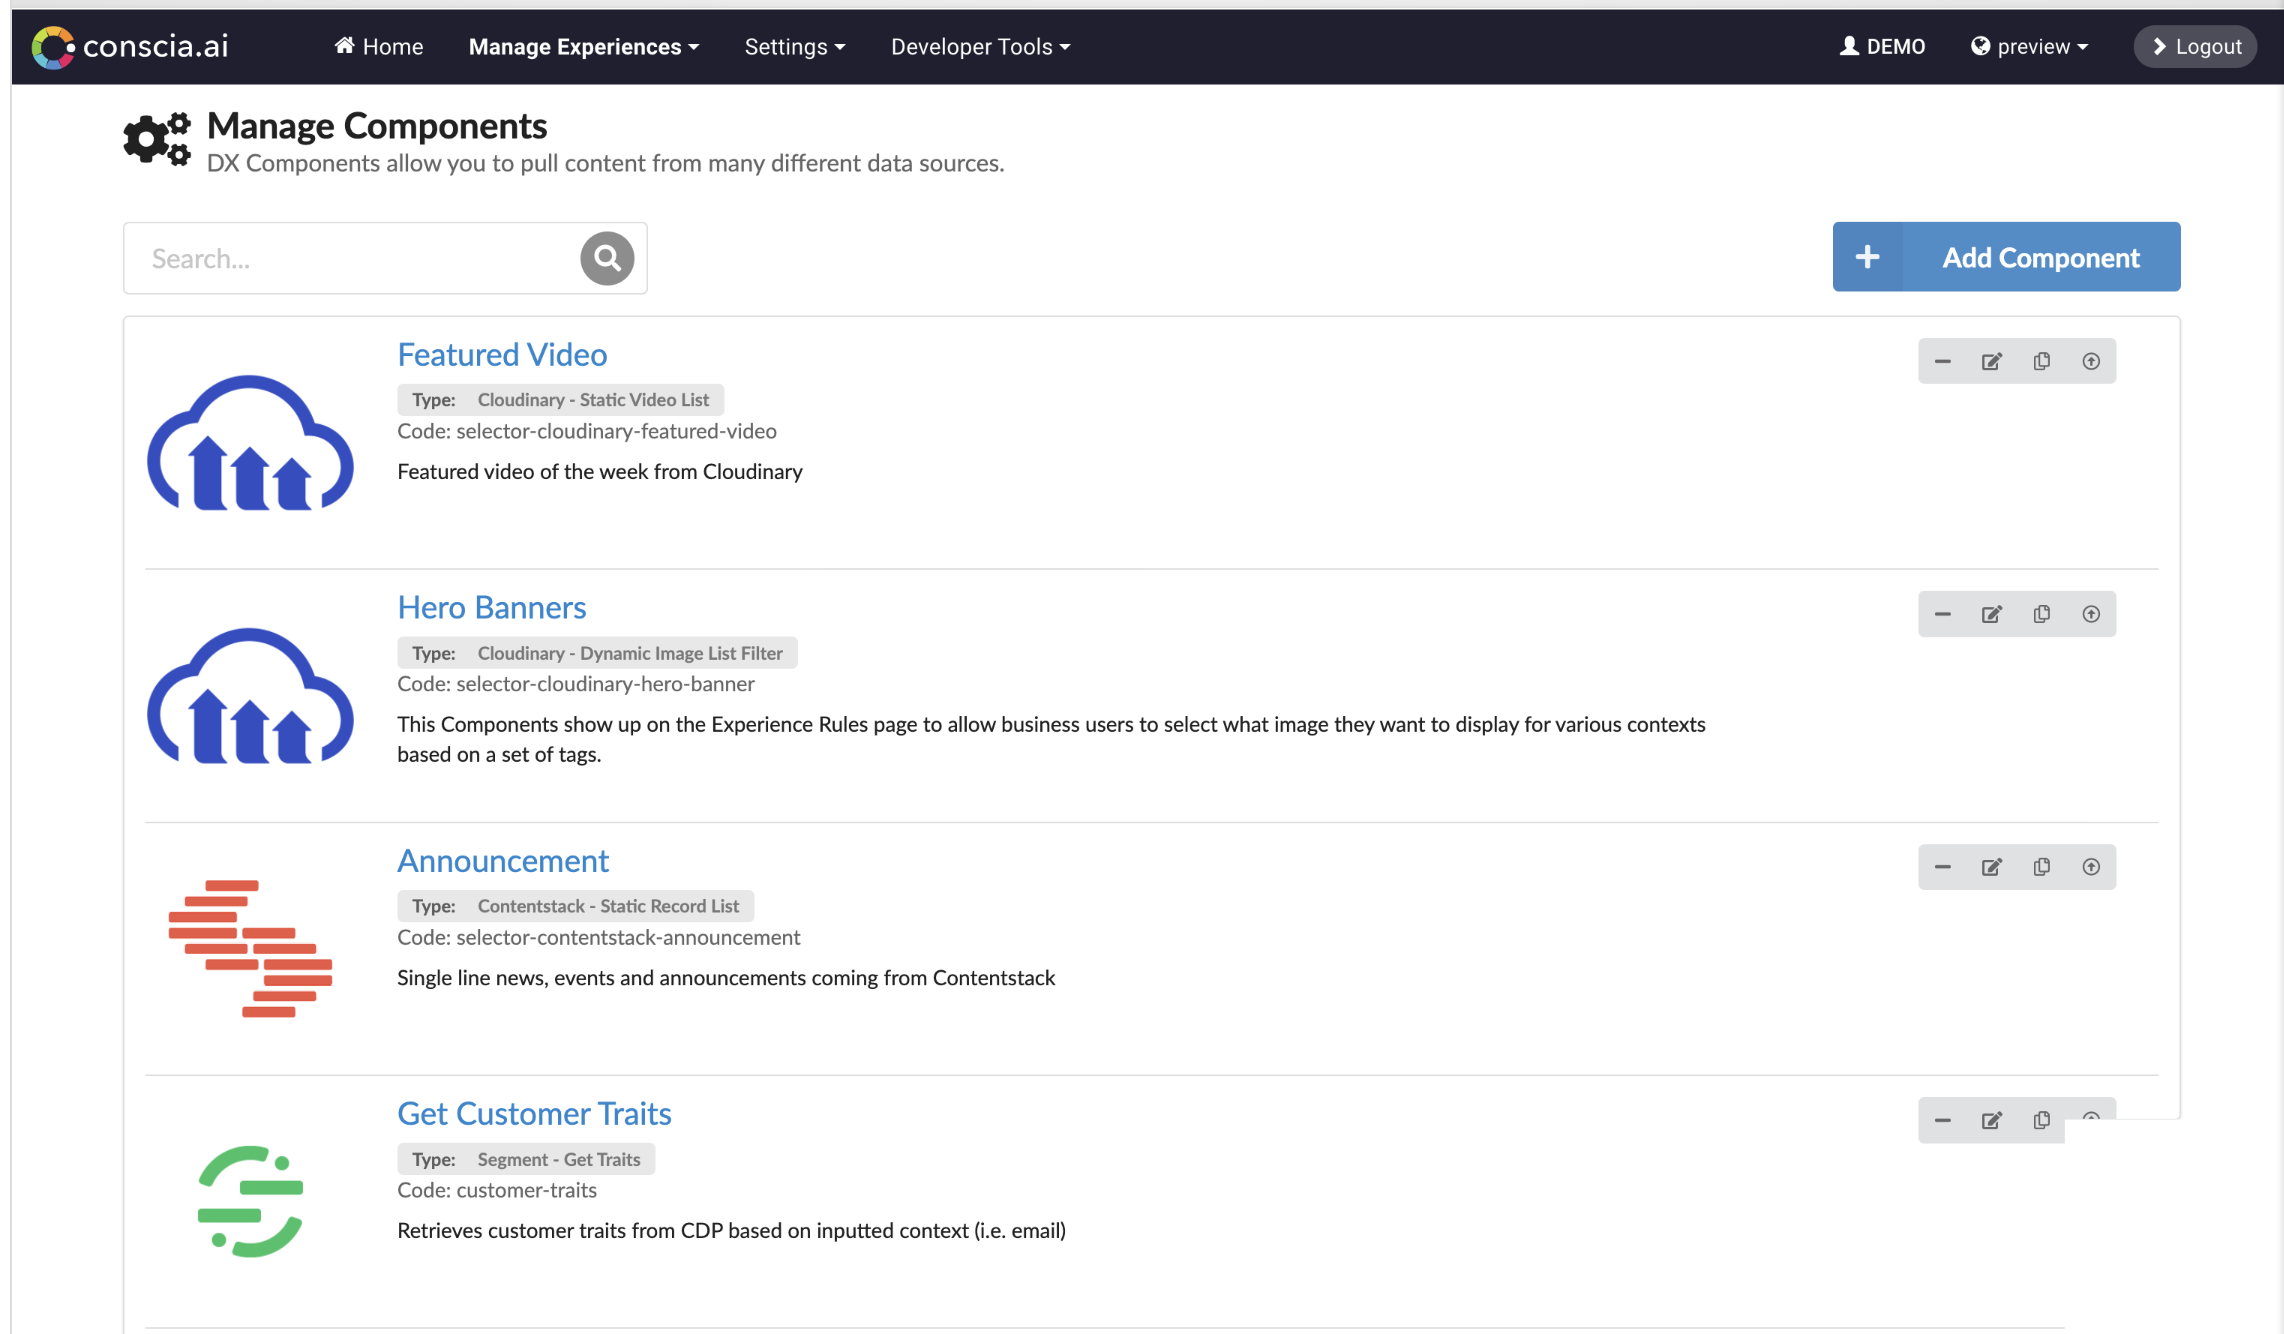
You can click the Edit button on the right to view the DX Engine Component configurations. The naming convention of the Components is based on the Selector and Model pattern we discussed earlier.
Explore the following tabs in the Component editor modal, available in the top right:
- Conditions
- Validation
- Caching
- Update Context
- Attribute Definition
If you are interested in understanding all of the configurations available within a DX Component, you should visit the Orchestration Components page.
Orchestration Templates
A Template is a grouping of Components that are executed within a scope of a single Experience API request. For example, to deliver a Home Page, you may call the DX Engine requesting a Home Page Template that includes the Hero Banner, Product Carousel, Blog, Promotion, etc.
Templates serve two objectives:
1) It organizes Orchestration Components for business users to manage experiences in an intuitive fashion. Note that only the Orchestration Components with rules will show up in the left nav of the Experience Rules page.
2) It allows developers to group Orchestration Components so that the DX Engine can return them to the client application with a single Experience API call instead of having to query each of the Orchestration Components separately. These Orchestration Templates are named to have the suffix, Model, to differentiate them from Templates that appear on the Experience Rules page. For example, the Home Page Model Template contains all of the Orchestration Components that provide the response ready for the frontend to consume.
Browse to the Templates dashboard. Here are the list of Templates that have been set up for your sandbox.
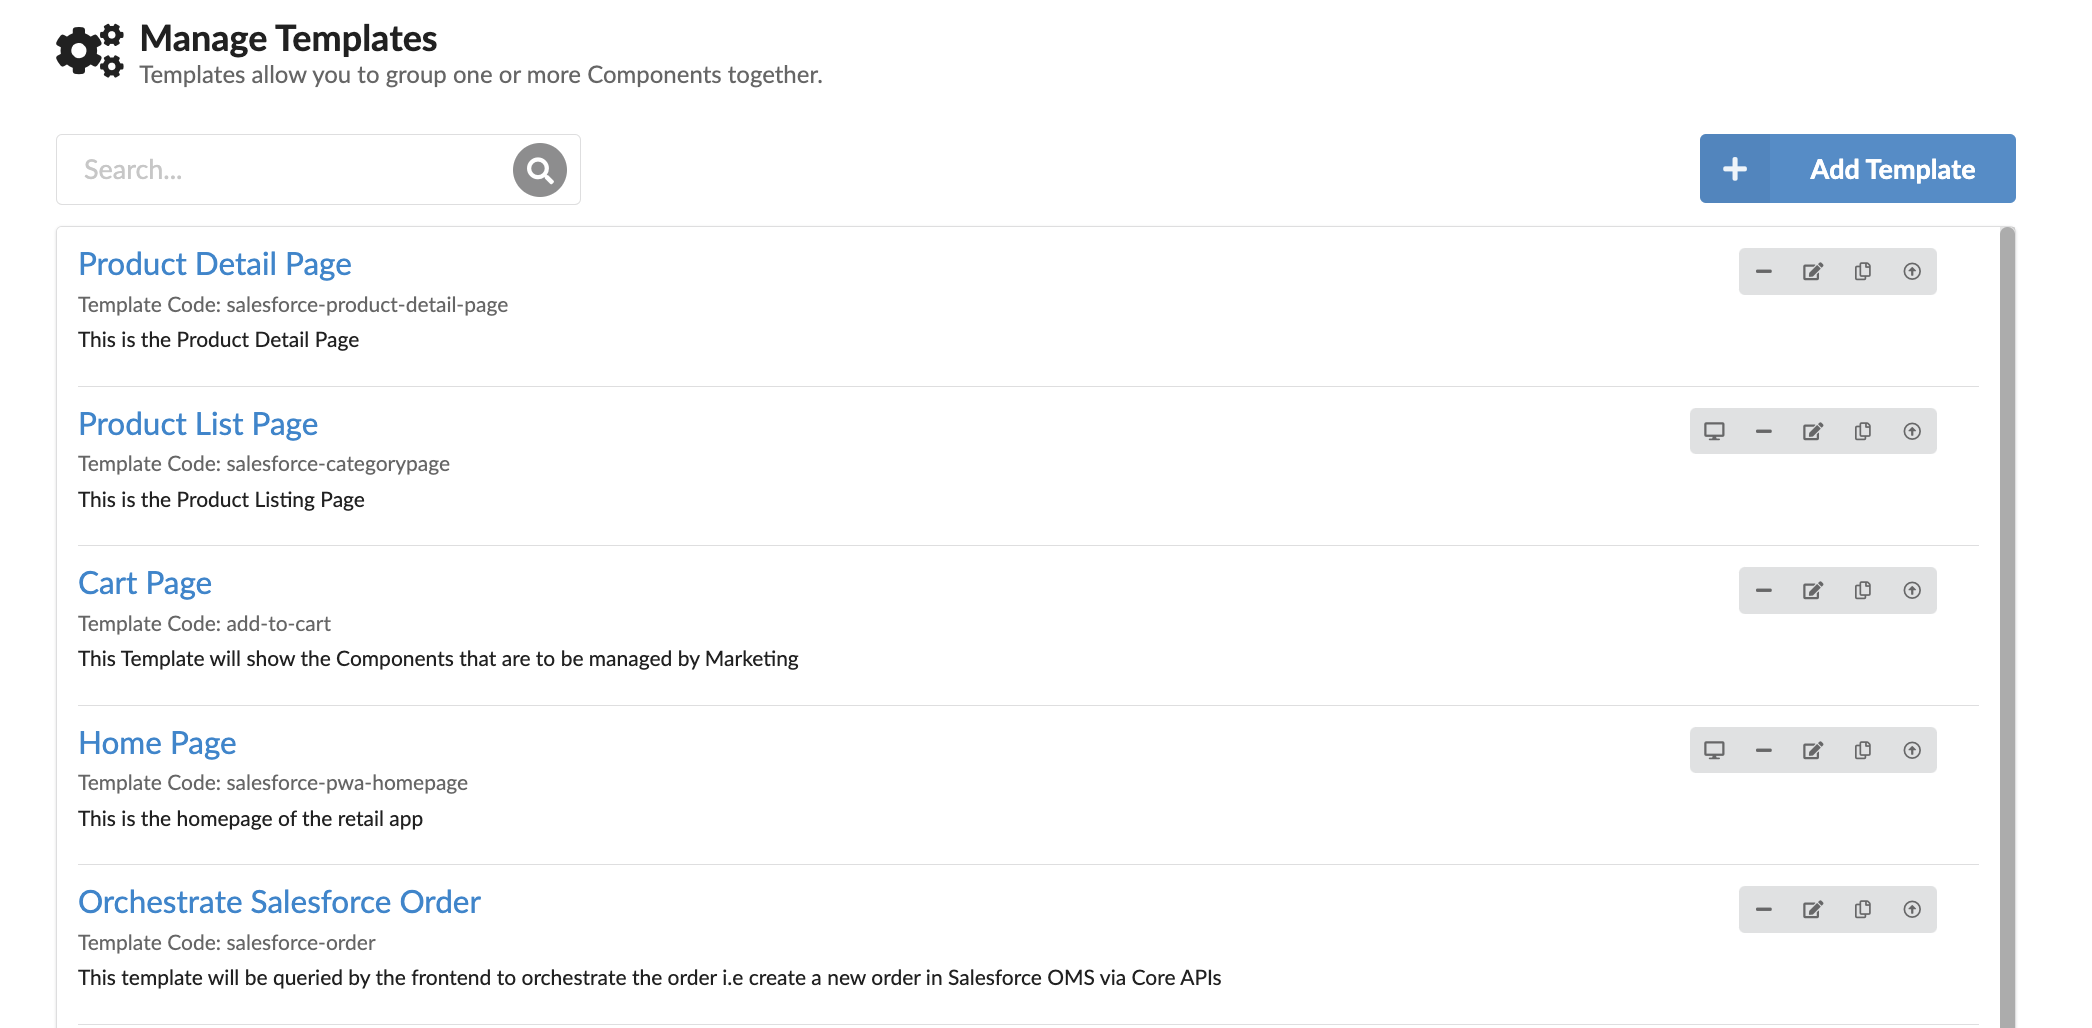
To learn more about how to create and manage Templates, please visit the Templates page.
Channels
Channels allow you to group one or more Templates together. The business users will see the Channel->Template->Component Hierarchy in the Experience Rules dashboard.
Navigate to the Channels dashboard in your sandbox.
You will see the following Channels present in your sandbox:
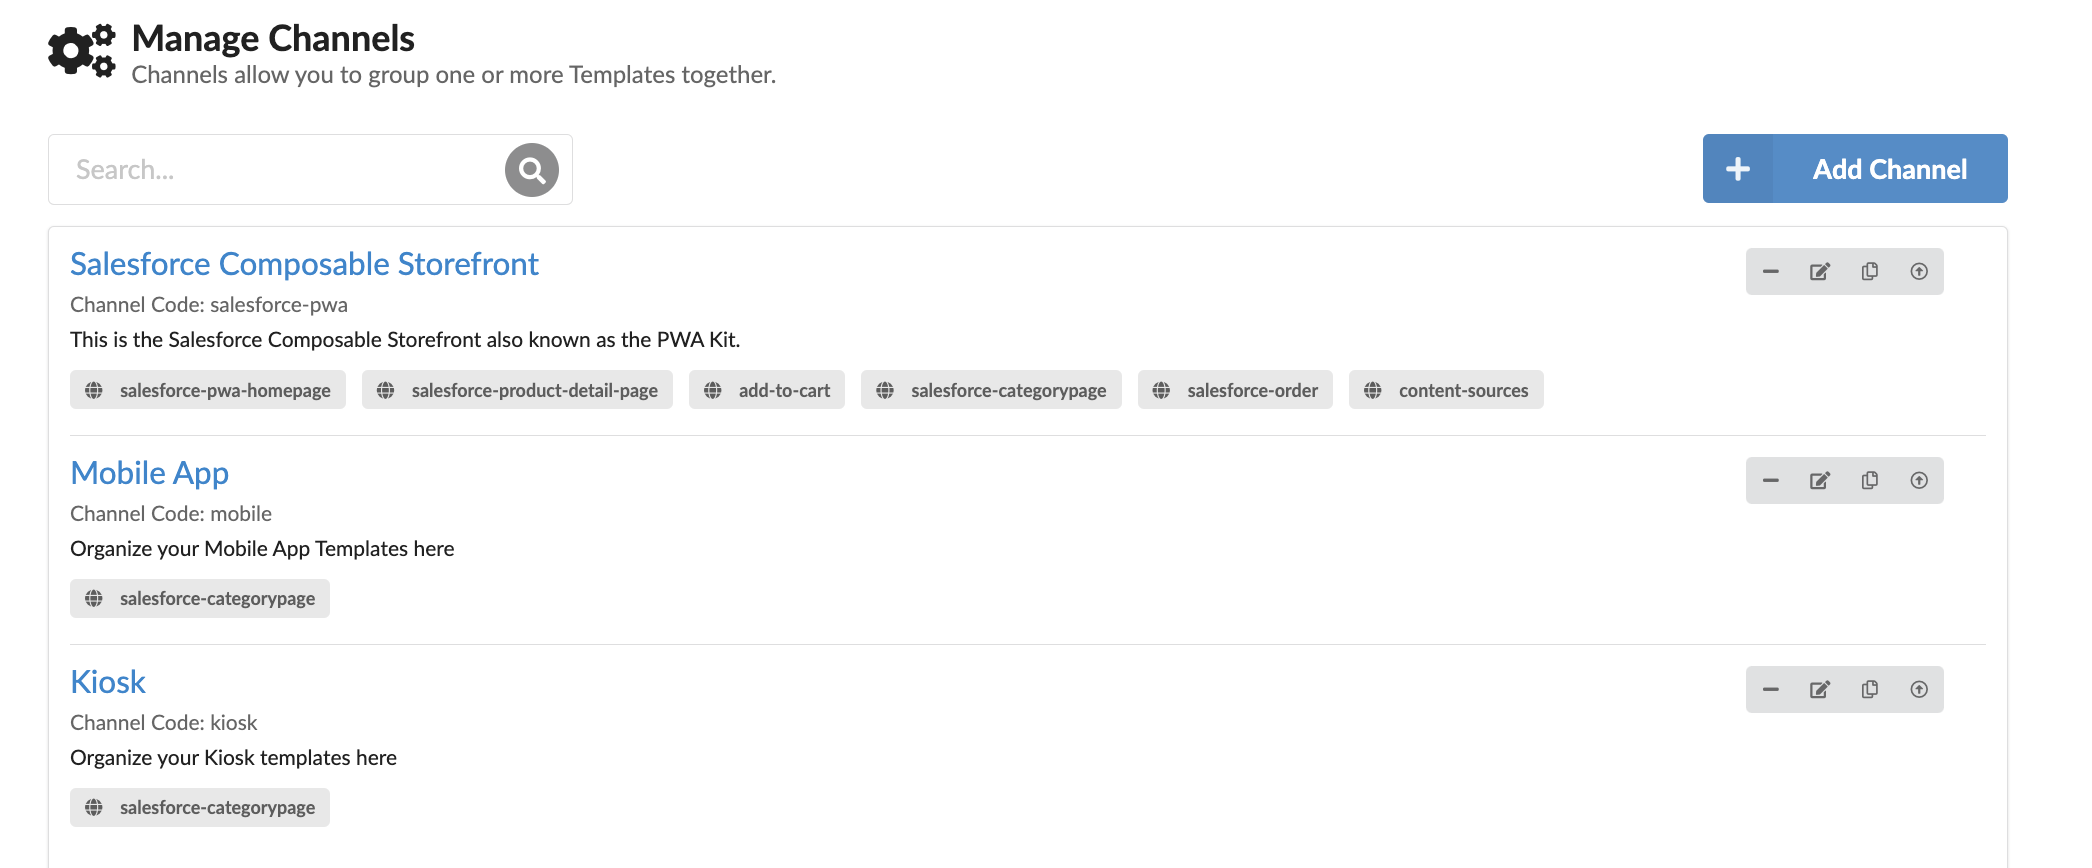
View the Channels page for more information.
Context Fields
Context Fields are used by the DX Engine to evaluate rules. These rules could be related to selecting content that should be displayed to the customer based on their real-time context or to implement conditional logic when orchestrating API calls to various backend systems. These are found under Settings in the top menu.
To learn about how to create and manage Context fields that you want to make available to the Rules Engine, visit the Context Fields page.
Experience Rules
Orchestration Components that require conditional logic will use 'Experience Rules'. These rules can be configured to pull content or data from different backend systems based on the real-time context provided to the Experience API request. For example, an Experience API request that is asking for content to be returned on the Home Page of a website may provide the customer's location, device or segment as real-time Context. These rules can evaluate this context and return the relevant experience.
Note that rules are not limited to pulling specific content from the backend. They can even be used to determine steps within the API orchestration flow. For example, if you want to call one CRM for B2C customers and another CRM for B2B customers, this can be achieved with Experience Rules as well.
Navigate to the 'Experience Rules' dashboard. Here, you will see a left nav tha displays a hierarchy of Channels, Templates and Components. The Rules are tied to each DX Component. This means that you can define business logic at the most granular level and create an infinite number of experiences by simply assembling a set of Components.
On the Experience Rules dashboard, you will see three Channels set up including one called 'Salesforce Composable Storefront'.
 .
.
Here, you can explore the various Templates and Components set up for the PWA kit and manage the content that should be fetched from CMSs, DAMs and even Salesforce itself based on the context of the customer.
Duplicating DX Engine Components
The ability to duplicate a DX Engine Component from the 'Components' dashboard will be added in the upcoming days. In the meantime, here is the curl command you can use for your convenience:
curl --request POST \
  --url https://engine-staging.conscia.io/api/experience/components/{COMPONENT_CODE}/duplicate \
  --header 'Accept: */*' \
  --header 'Authorization: Bearer {TOKEN}' \
  --header 'Content-Type: application/json' \
  --header 'X-Customer-Code: {CUSTOMER_CODE}' \
  --header 'X-Environment-Code: {ENVIRONMENT_CODE}' \
  --data '{
  "newComponentCode": "{COMPONENT_CODE}",
  "name": "{COMPONENT_NAME}"
}'
Connecting PWA kit to the DX Engine
As part of the integration package, we provide a library that offers an easy way to make calls to Conscia's DX Engine to get Orchestration Components and/or Orchestration Templates. The library provides the following two functions:
getTemplate- Parameters
templateCode(String): The code or identifier of the DX Template to retrieve.context(object): The context or data to be used while processing the DX Template.
- Returns
- A Promise that resolves the DX Template with the provided context.
- Parameters
getComponents- Parameters
componentCodes(String[]): An array of the code or identifier of the DX components to retrieve.context(object): The context or data to be used while processing the DX component(s).
- Returns
- A Promise that resolves the DX component(s) with the provided context.
- Parameters
In order to integrate with the PWA kit, we need to replace certain hooks/api calls provided by the PWA kit with either a getTemplate or getComponents call.
This is a code snippet of product-list page provided by the PWA kit which we will modify to call the DX engine.
if (params.categoryId) {
  searchParams._refine.push(`cgid=${params.categoryId}`)
}
const {
    isLoading,
    isRefetching,
    data: productSearchResult
  } = useProductSearch(
      {
        parameters: {
          ...searchParams,
          refine: searchParams._refine
        }
      },
      {
        keepPreviousData: true
      }
  )
We can replace this call with the Experience API using the getTemplate function. Here, we are calling the salesforce-categorypage DX Template which has the following three Orchestration Components: salesforce-category-products, model-announcement and, model-hero-banner. We then extract the data from the Component salesforce-category-products and store it in the variable productSearchResult which is used to render the product list by the PWA kit components.
if (params.categoryId) {
  searchParams._refine.push(`cgid=${params.categoryId}`);
}

// Conscia
const [productSearchResult, setProducts] = useState('');
useEffect(() => {
    const context = {
        categoryId: params.categoryId,
        refine: searchParams._refine,
        customerSegment
    };
    console.log('Conscia context:', context);
    getTemplate('salesforce-categorypage', context).then((data) => {
        setProducts(data.components['salesforce-category-products'].response);
        setConsciaAnnouncement(data.components['model-announcement'].response);
        setConsciaBanner(data.components['model-hero-banner'].response);
        setIsLoading(false);
        console.log('PLP:', category, products);
    });
}, [params]);
Additional Documentation Coming Soon
- How to intercept the Checkout process to use a third party Real-time Inventory Management system
- You will notice a DX Component called 'Get Inventory - Fluent Commerce'. This serves as an example for how you can call third party APIs within your checkout flow.