Working with Shadow Fields
Shadow fields are a powerful tool that allow you to create new fields in a Data Collection by pulling in information from one or more fields across one or more data sources. Shadow fields calculate their value based on a formula that you specify. For example, a shadow field could be a concatenation of two different fields, or something a lot more advanced as picking from two different field values based on the precedence of fields specified in the formula. In essence, shadow fields act as a form of calculated field where a formula is used to get data from different data sources or a value based on the AQL syntax.
Work with our Customer Success Team to define and operationalize shadow fields in your project. The syntax is specialized and it is important to configure these fields correctly.
Shadow Field Expressions
Expressions are the workhorse that allow shadow fields to reference data from different sources or to create new values altogether. Depending on the need at hand, expressions can be a simple construct or a more advanced one to address complex business needs or data structures.
Shadow field expressions are constructed using ArangoDB syntax. You can find the full reference here.
Configuring Shadow Fields
Shadow fields can be activated and defined as part of the Data Collections schema. They can be top level properties only and cannot be nested inside an Object or Array.
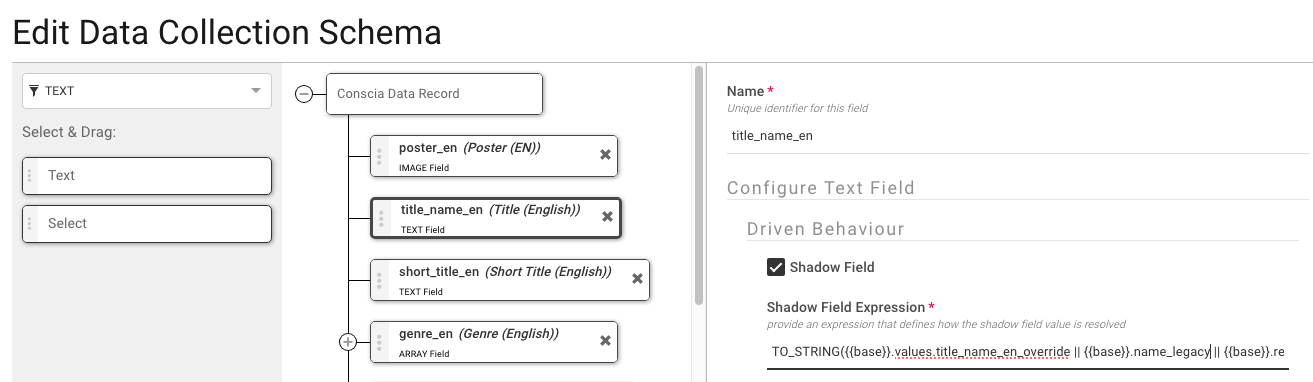
To set and define a shadow field, do the following:
- Open the Data Collections schema in the Data Model dashboard
- Select the field from the left panel of the schema editor
- Under the “Configure Text Field” section, check the "Shadow Field" box
- Enter the expression as needed to fit the business need.
- [optional] If the expression above references a relationship, enter the name of the relationship and the field referenced on the related Data Collection.
- Hit Submit to save.
Shadow Field Use Cases
Use Case - Field Overrides
The expression below allows you to offer the ability for business teams to override field values coming from a system of record:
TO_STRING({{base}}.values.poster_en_override || {{base}}.catalog_poster_en)
The above expression looks for a value stored in the poster override field. If that doesn't exist, it will source it's value from the poster field.
Use Case - Working with Nested Data
In many cases, especially with unstructured data, data can be highly nested. Shadow fields can tackle nested data by providing a path in which to find the value.
Consider the following PRODUCT record:
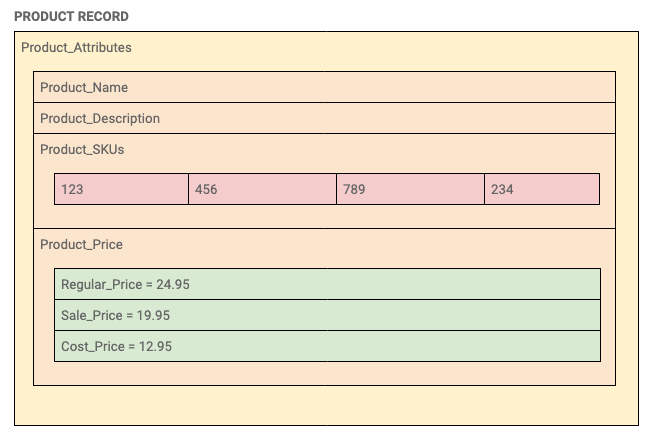
In this example, we are interested in accessing the “Sale_Price” field. In order to get the right value, the shadow field expression needs to understand the path to get there. In this case, the expression would be:
PATH = {{base}}.Product_Attributes.Product_Price.Sale_Price
Similarly, if we wanted to access the first SKU in the product, the expression would be:
PATH = {{base}}.Product_Attributes.Product_SKU[0]
For good measure, we can wrap the PATH in a function to convert it to a string (to match the data type of the target field - a string in this case):
VALUE = TO_STRING({{base}}.Product_Attributes.Product_SKU[0])
Getting the Field Name
In order to create a valid shadow field expression, it’s important to know the exact name of the source field(s) of interest. This information can be found using the schema editor feature in the dashboard.
-
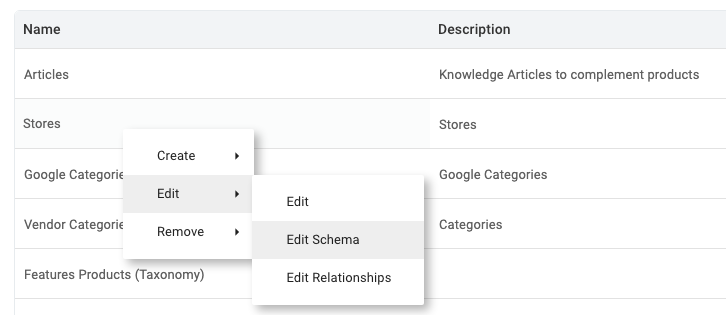
In the DX Graph dashboard, select “Data Model" from the main navigation
-
Select the target Data Collection by right clicking to bring up the context menu
-
Select Edit > Edit Schema
-
In the Schema Editor, take note of the field name (top right corner of of the modal). This is the value to be used as part of the shadow expression.

-
Copy / Paste this value into your shadow field expression:
VALUE = TO_STRING({{base}}.name) -
For nested objects, repeat the same process by expanding each node and taking note of the name of each level.
Use Case - Sourcing Files from Different Collections
If a Data Collection contains a relation to another Data Collection, then this relationship can also be traversed using the shadow field expression. Once traversed, the shadow field has access to all of the fields on the related Data Collection.
Product has a relationship to Trending Articles. A shadow field can traverse the product / article relationships and grab the article name field.
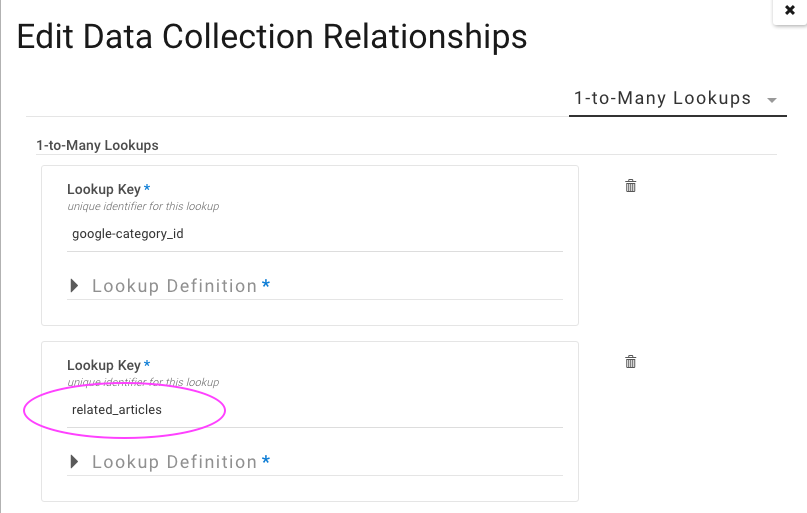
Getting the Relationship Name Relationships are defined as part of the Data Collections data model and thus can be accessed via the DATA MODEL dashboard.
- Click on Data Model from the main navigation
- Right click the target Data Collection and select EDIT > EDIT RELATIONSHIPS
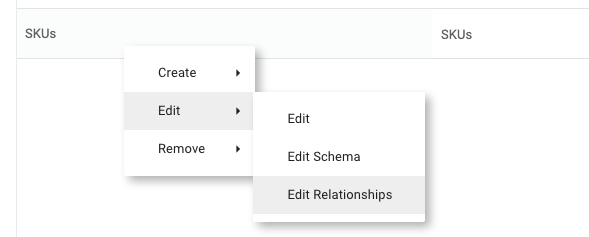
- In the relationship modal, find the target relationship and take special note of the relationship name, as this is what can be used to get a handle on to the other Data Collection.
Traversing the Relationship
Relationships are available on reach record with the base Data Collection and as such they can be accessed using the following notation:
{{base}}.relationships['related_articles']
In the above example, this expression provides a handle to the associated Articles record. This can be expanded to get a specific field:
{{base}}.relationships['related_articles'].entities[0].values['article_name']
Materializing Shadow Fields
It is highly recommended to materialize shadow fields in order to avoid any performance issues in the DX Engine UI. These fields are being calculated on the fly and hence if the field definition is very complex, it can slow the UI down significantly. For this reason, we run the materialization operation on a schedule (every 5-10 minutes), which means that the shadow fields are 'eventually consistent'.