Personalized Email with Kontent.ai and Twilio
You can implement a solution based on this recipe that explains how to create a personalized email message using user data from a Customer Relationship Manamagement System (CRM) or Customer Data Platform (CDP) and content from the Kontent.ai Content Management System (CMS) and using Twilio to send an email message.
Overall Orchestration Approach

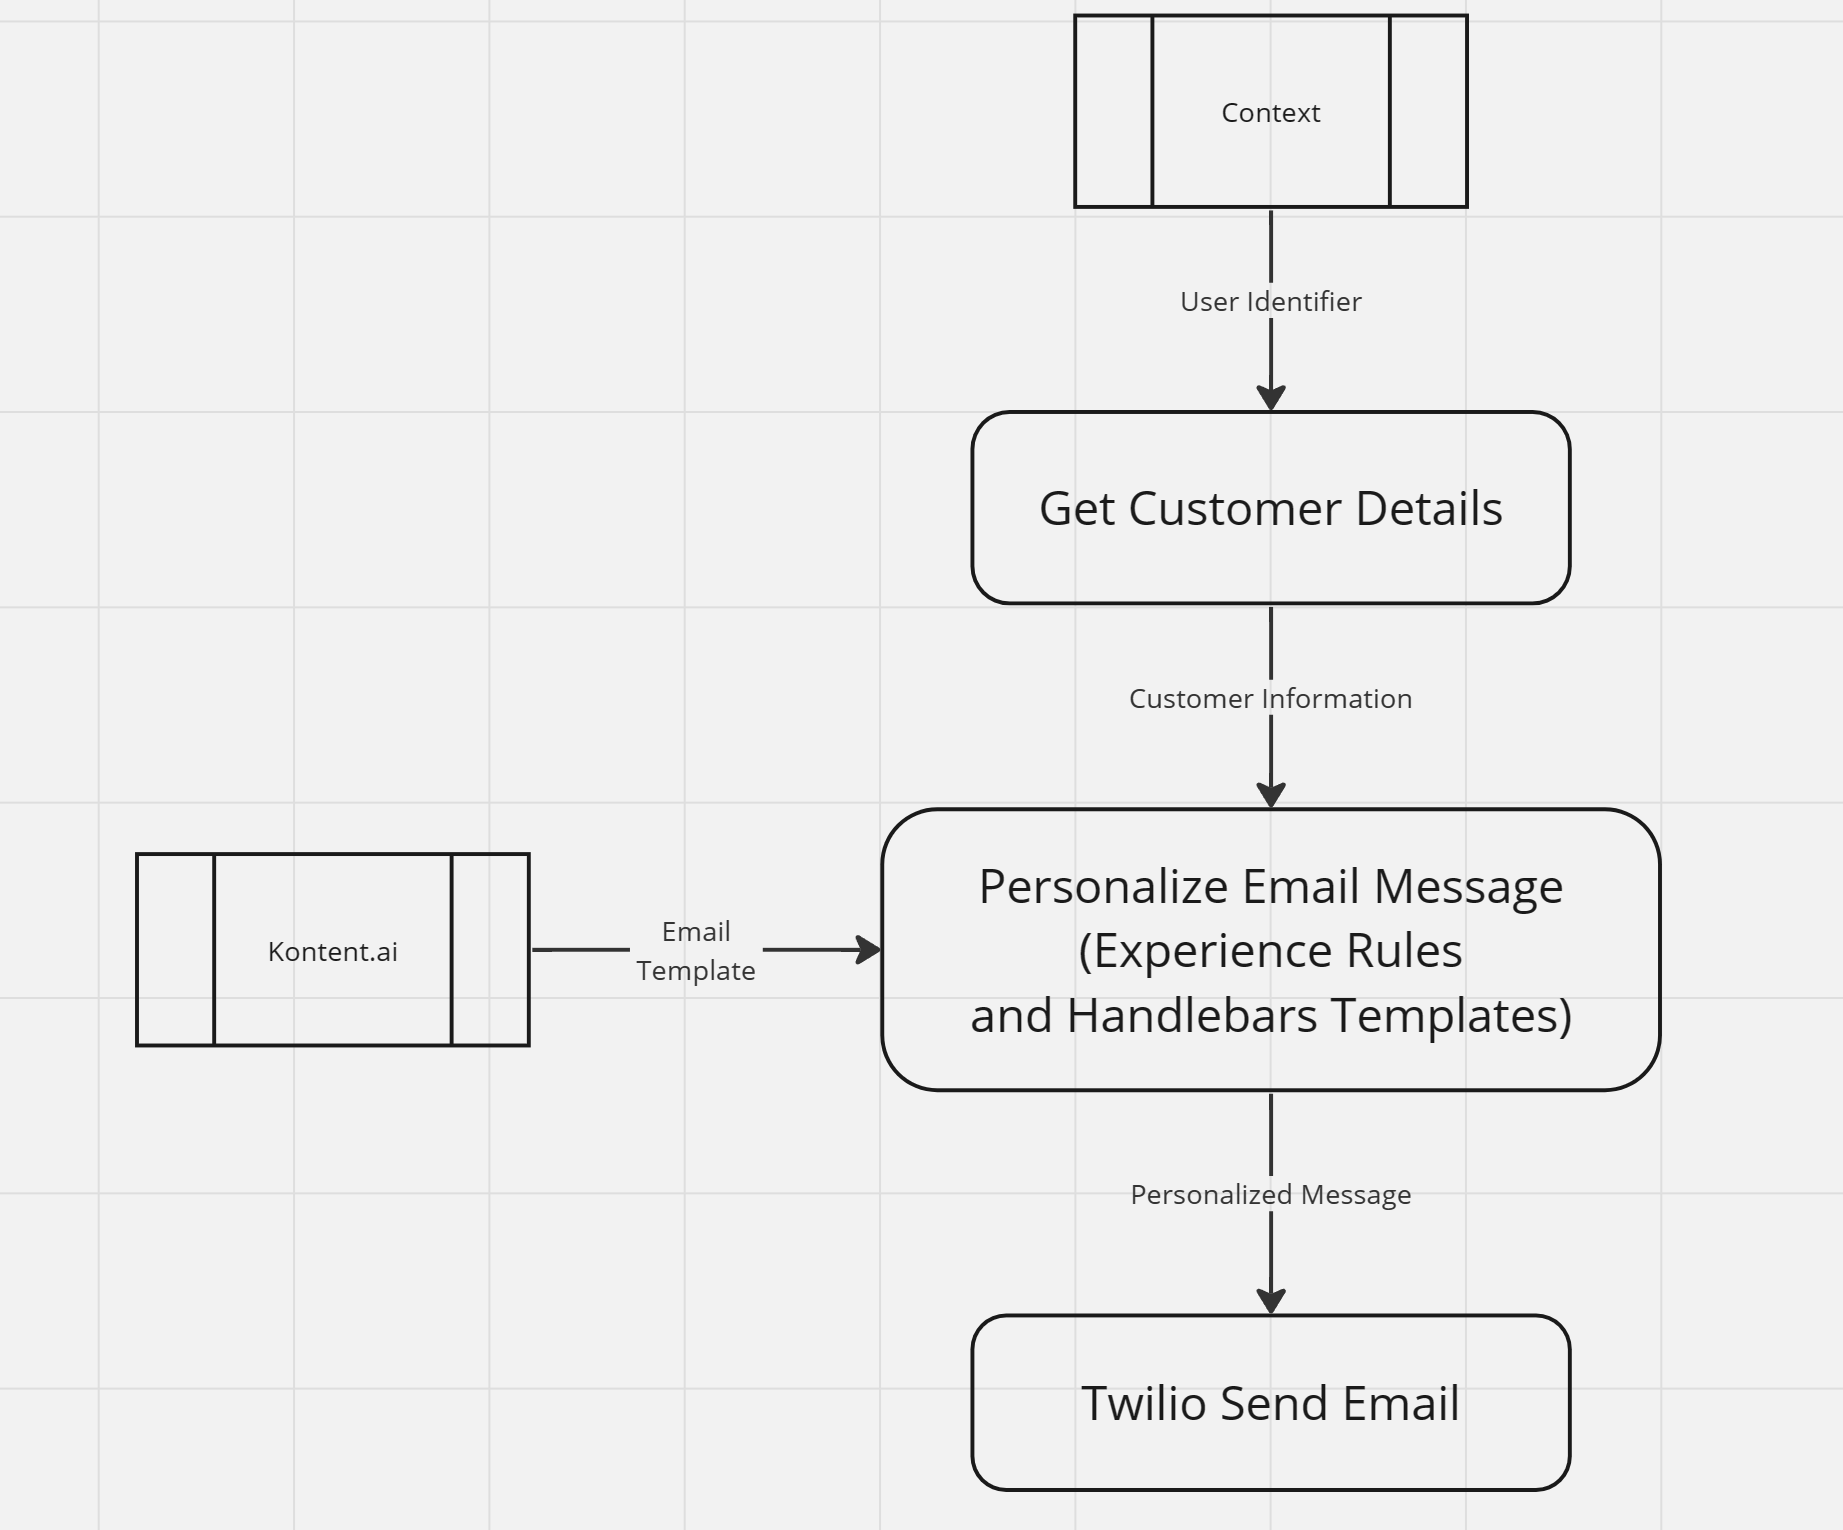
This orchestration flow:
- Retrieves customer data from a CRM or CDP.
- Uses Experience Rules to determine which email template to retrieve from the CMS.
- Applies data from the CRM or CDP to any Handlebars templates in that message content.
- Sends the email message.
This recipe assumes that a the content type named Email Message exists in Kontent.ai containing Rich Text fields with identifiers subject and email_body, and the existence of a DX Engine Connection to Kontent.ai.
Mapping Out Solution Elements
The Orchestration Flow diagram does not show the Twilio Send Email Orchestration Component used as a Sub Component.

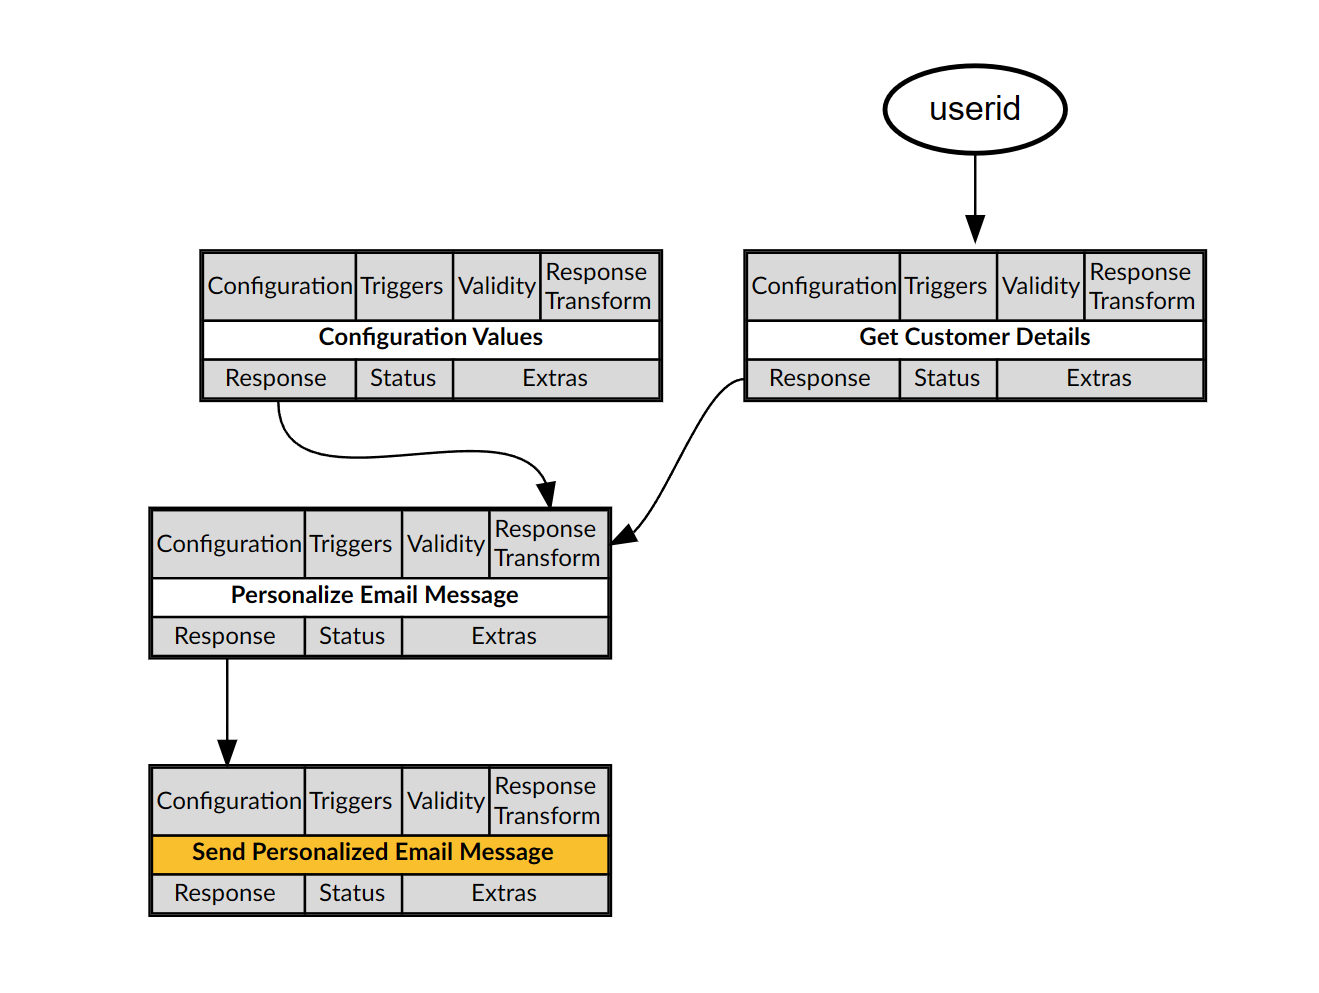
This recipe involves the following elements:
- The Kontent.ai Connection DX Engine Connection supports Orchestration Components that connect to Kontent.ai.
- A Kontent.ai Content Type that contains the subject and body fields for email messages.
- Some number of Kontent.ai entries based on that Content Type, which can contain Handlebars templates, allow Conscia users to apply Experience Rules personalize email messages.
- The Audience Segment Context Field lets Conscia users define Experience Rules rules based on individuals' audience segment as indicated by the CRM or CDP.
- The Configuration Values Orchestration Component retrieves the "From" email address for sending email messages.
- The Get Customer Details Orchestration Component retrieves relevant data from the CRM or CDP, such as the visitor's audience segment.
- The Personalize Email Message Orchestration Component allows business users to define rules to retrieve an item containing email message content from the Kontent.ai, and then processes Handlebars templates in that content to create a personalized and individualized email message.
- The Send Personalized Email Message Orchestration Component passes the email message from the Personalize Email Message Orchestration Component to the Twilio Send Email Orchestration Component as a Sub Component.
- The Twilio Send Email Orchestration Component sends email messages.
To minimize vendor specifics documented elsewhere, using one of the following techniques, this recipe mocks the Get Customer Details Orchestration Component and the Configuration Values Orchestration Component, showing only example JSON for each.
To use this recipe in a production environment, replace the CRM or CDP mock with an Orchestration Component that integrates with your CRM or CDP.
Configuration Details
The topics in this section describe how to implement the elements of this recipe.
The Kontent.ai Connection DX Engine Connection
In the DX Engine UI, locate or create the Kontent.ai Connection DX Engine Connection for the Personalize Email Message Orchestration Component to use:
The Kontent.ai Content Type
In the Kontent.ai CMS, identify or create Content Type that contains the subject and body fields for email messages.
The Kontent.ai Content Items
In the Kontent.ai CMS, ensure that at least two entries exist for the Content Type that contains the subject and body fields.
The Audience Segment Context Field
To define the Audience Segment Context Field, in the Conscia DX Engine UI:
- Click Settings in the top navigation, and then click Context Fields. The Manage Context Fields page appears.
- Click Add Context Field. The Create Context Field page appears.
- For Context Field Name, enter
audienceSegment. - For Display Name, enter
Audience Segment. - For Data Type, select String.
- Select the Enriched checkbox.
- Click Submit.
The Configuration Values Orchestration Component
Implement a solution to manage email sender information using the following format:
{
  "email": {
    "from": {
      "email": "{your-sender-email-address}",
      "name": "{your-sender-name}"
    }
  }
}
If you use the Managing Static Values technique, create the to Configuration Values Orchestration Component and set its Response Transform as follows:
_.assign({},{
  "email": {
    "from": {
      "email": "{your-sender-email-address}",
      "name": "{your-sender-name}"
    }
  }
})
The Get Customer Details Orchestration Component
Mock or implement a Get Customer Details Orchestration Component that retrieves relevant data from the CRM or CDP in the following format.
{
  "user": {
    "name": "{user-name}",
    "email": "{user-email}",
    "segment": "{audience-segment}",
    "shoppingCart": "{shopping-cart-identifier}"
  }
}
- If you use a Conscia - Data Transformation Script to mock the Get Customer Details Orchestration Component, you can pass the JS Expression
`${contextField('userid')}`as the Data to modifyscript, and set the Audience Segment Context Field toresponse.user.segment.
To configure the Get Customer Details Orchestration Component to set the Audience Segment Context Field to the value of the user.segment key from the JSON response of the Get Customer Details Orchestration Component, in the Manage Components page:
- Next to the Get Customer Details Orchestration Component, click the Edit button. The Edit Component page appears.
- From the drop-down, select the Update Context area.
- Add a Context Field Enrichment.
- Set Context Field to
audienceSegment. - Set Expression to
user.segment. - Click Submit.
The Personalize Email Message Orchestration Component
To create the Personalize Email Message Orchestration Component that retrieves a content item from the Kontent.ai CMS and applies Handlebars templates, in the DX Engine UI:
- Navigate to the Experience Components page (Manage Flows --> Components).
- Click Add Component. The Create Component wizard appears.
- For Component Code, enter
personalize-email-message. - For Component Name, enter
Personalize Email Message. - For Component Type, select Kontent - Static Record List.
- Click Submit.
For information about the Kontent - Static Record List Component Type, see - Kontent.ai Static Record List Configuration
To configure the Personalize Email Message Orchestration Component, in the Manage Experiences page:
- Next to the Personalize Email Message Orchestration Component, click the Edit button. The Edit Component page appears.
- For Connection, select your Kontent.ai DX Engine Connection.
- For Content Type, select the Kontent.ai content type that contains the
subjectandemail_bodyfields used for email messages. - For Display Template, enter
{{item.system.name}} [{{item.system.codename}}]. - For Response Transform, enter the following:
_.assign({},{
  "emailMessage": {
    "to": {
      "email": componentResponse('get-customer-details').user.email,
      "name": componentResponse('get-customer-details').user.name
    },
    "from": {
      "email": componentResponse('configuration-values').email.from.email,
      "name": componentResponse('configuration-values').email.from.name
    },
    "subject": processHandlebars(response[0].elements.subject.value, componentResponse('get-customer-details').user),
    "content":
    {
      "type": "text/html",
      "value": processHandlebars(response[0].elements.email_body.value, componentResponse('get-customer-details').user)
    }
  }
})
- Click Submit.
The Twilio Send Email Orchestration Component
To implement the Twilio Send Email Orchestration Component that sends email messages using Twilio SendGrid, follow the Sending Email with Twilio SendGrid recipe. The Twilio Send Email Orchestration Component must exist before you can complete the Send Personalized Email Message Orchestration Component.
The Send Personalized Email Message Orchestration Component
The Send Personalized Email Message Orchestration Component passses the email message constructed by the Personalize Email Message Orchestration Component to the Twilio Send Email Orchestration Component, which it invokes a a Sub Component. The Send Personalized Email Message Orchestration Component sets its response to the output of the Personalize Email Message Orchestration Component and then sets the emailMessage Context value to the emailMessage value from that response for the Send Personalized Email Message Orchestration Component. Using a Sub Component prevents the DX Engine from registering dependencies for the Components and Context value, which allows multiple flows to share components without triggering irrelevant dependencies.
To create the Send Personalized Email Message Orchestration Component, in the DX Engine UI:
- Navigate to the Experience Components page (Manage Flows --> Components).
- Click Add Component. The Create Component wizard appears.
- For Component Code, enter
send-personalized-email-message. - For Component Name, enter
Send Personalized Email Message. - For Component Type, select Conscia - Data Transformation Script.
- Click Submit.
To configure the Send Personalized Email Message Orchestration Component, in the Manage Experiences page:
- Next to the Send Personalized Email Message Orchestration Component, click the Edit button. The Edit Component page appears.
- Under Data to modify, for Get value from, select Component Response, and then select the Personalize Email Message Orchestration Component.
- For Script, enter
data. - Select the Sub Components area from the dropdown at the top. You may have to scroll down in this dropdown.
- Click Add another item.
- For Property Name, enter
emailResponse. - For Component Codes, add
twilio-send-email. - Add a Context Field for Sub Component. Set its Context Field to
emailMessageand its Expression toresponse.emailMessage. - Click Submit.
This Component passes the email message details from the Personalize Email Message Orchestration Component response to the Data Transformation Script as the data variable, which that script simply returns, replicating the response from the Personalize Email Message. Context Field Enrichment then uses that response to set the emailMessage Context value passed to the twilio-send-email Sub Component.
Business User Instructions
Business users can create additional entries for the Content Type that contains the subject and body fields in the Kontent.ai CMS including Handlebars templates and can configure Experience Rules for the Personalize Email Message Component using the Audience Segment Context Field.